
Pie Carrier Sewing Pattern

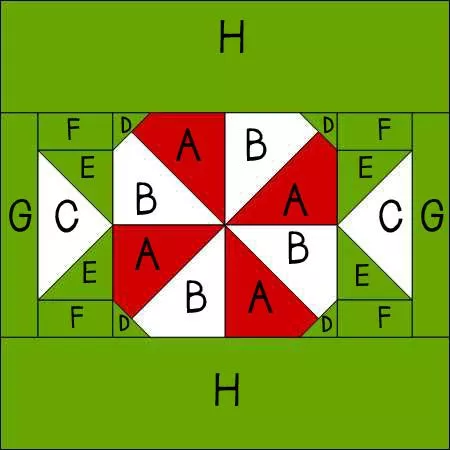
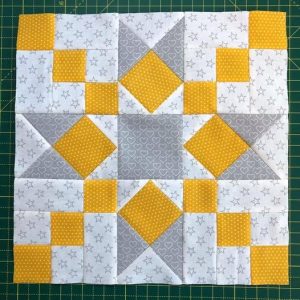
The Peppermint Twist Block Tutorial is a delightful and festive project that will add a touch of charm to any quilt.
Inspired by the classic candy cane pattern, the Peppermint Twist block creates a beautiful, swirled design that looks complicated but is surprisingly simple to make.
Whether you’re a seasoned quilter or just starting, this tutorial will guide you through each step of the process, making it easy to create this stunning block for your next project.
This quilt block has become a favorite for holiday-themed quilts and other projects because of its bold and cheerful design.
The Peppermint Twist Block is perfect for those looking to add some festive flair to their quilt collection. Its twisting pattern mimics the spirals of a peppermint candy, making it a great choice for any winter or Christmas-themed quilt.
You can customize this block with various colors to match your preferred aesthetic, or keep it traditional with red, white, and green hues.
In this Peppermint Twist Block Tutorial, we’ll walk you through the steps to create this fun and eye-catching block.
With clear instructions and tips for success, you’ll be able to make this block with ease. Once you master the basic construction of the block, you can experiment with different layouts and combinations to create an entire quilt or smaller projects like pillow covers, table runners, or wall hangings. Let’s dive into the process and get started on your Peppermint Twist adventure!
Before diving into the actual Peppermint Twist Block Tutorial, it’s essential to gather all the necessary materials. This ensures a smooth quilting experience and makes the process enjoyable. For this block, you’ll need fabric, a sewing machine, and some basic quilting tools. Let’s take a look at each of the materials required.
Start with fabric. Choose two contrasting fabrics for the main design and background. Traditionally, red and white fabrics are used to evoke the look of a peppermint candy, but you can choose any color combination that fits your style or the season. You’ll need enough fabric to cut the required pieces, so make sure to have ample fabric before beginning the project.
You’ll also need a rotary cutter and cutting mat to ensure that your fabric pieces are precisely cut. This is important for achieving clean lines and matching seams. Additionally, a ruler will help you cut your fabric accurately. If you don’t already have a quilting ruler, one with 6-inch by 24-inch measurements is ideal for this project.
Next, a sewing machine is needed to sew the fabric pieces together. Make sure your machine is equipped with a standard quarter-inch foot, as accurate seam allowances are crucial for the success of the Peppermint Twist block. Additionally, prepare some thread in a color that matches your fabric.
You will also need pins or clip-style fabric fasteners to hold your fabric pieces together as you sew. For a polished look, a pressing iron and ironing board are essential for pressing your seams flat as you go. This step is crucial for keeping the block crisp and accurate.
Finally, if you plan on making multiple blocks or a larger quilt, don’t forget to have quilt batting and fabric for backing ready. These are the final materials you’ll need once the individual blocks are completed.
The first step in making your Peppermint Twist Block is cutting your fabric into the appropriate shapes. This step is crucial for ensuring that each piece fits perfectly together, which will result in a seamless final block. Here’s a breakdown of the cutting process.
Start by cutting your background fabric into squares. For the Peppermint Twist block, you’ll need several background squares that will serve as the base of the block. Make sure to cut these squares to the size specified in the pattern. You may need to cut several smaller squares, depending on how many blocks you plan to make.
Next, cut the twist fabric into triangles. These triangles form the twisting pattern, and each one should be carefully measured and cut. Pay close attention to the angles to ensure they line up properly when sewn together. It’s important to cut these pieces accurately to maintain the sharp twist design.
Once your pieces are cut, it’s a good idea to label them so you can easily keep track of which fabric belongs where. This will help you avoid confusion during the sewing process and ensure everything goes smoothly. Keep the fabric pieces organized in small piles or containers.
Additionally, cut some border strips if your quilt design includes a border around each block. These border strips are used to frame the block and help it stand out in the overall design. Be sure to cut these strips to the correct width based on your pattern instructions.
Remember, accuracy is key during this step. The more precise your cuts, the better your final block will turn out. It’s always better to double-check your measurements before making the cuts.
Once all your fabric pieces are cut and ready, it’s time to move on to the next step—piecing the blocks together.
Now that your fabric pieces are cut, it’s time to start piecing them together to create the Peppermint Twist Block. This part of the process is where the magic happens, and with careful attention to detail, you’ll have your block looking fabulous in no time.
Start by laying out your background squares and twist triangles in the pattern. You’ll notice that the triangles are arranged in a way that mimics the swirling pattern of a peppermint candy. The background squares form the base of the block, and the twist triangles will be sewn onto them to create the twisting effect.
Using your sewing machine, begin by sewing the triangles to the background squares. Make sure to line up the edges carefully, using a quarter-inch seam allowance. This is where accuracy is key—if your seams are even and precise, the final block will have sharp lines and a clean look.
As you sew the pieces together, be sure to press the seams flat with your pressing iron. Pressing the seams as you go will help set the stitches and prevent puckering. Always press towards the darker fabric to ensure that the seams stay neat and the block maintains its shape.
Once you’ve sewn the triangles to the background squares, sew the sections together to complete the block. Again, be sure to match the seams carefully and use accurate seam allowances. This will ensure that the twist pattern looks uniform and smooth when the block is finished.
After piecing the block together, take a moment to check for any uneven edges or areas that need to be trimmed. Use your rotary cutter to clean up any excess fabric and make sure the block is square.
With your block pieced together, you’re almost done!
The final step in completing your Peppermint Twist Block is finishing it. This involves trimming, squaring up the block, and adding any additional borders or embellishments. By carefully following these steps, you’ll have a polished and beautiful quilt block ready for use.
Start by trimming the block to ensure it is the correct size. Use your quilting ruler and rotary cutter to carefully trim any excess fabric from the edges. It’s essential to make sure the block is perfectly square, as this will make it easier to join with other blocks if you’re making a larger quilt.
If your quilt design includes borders, now is the time to add them. Cut the border fabric to the required size and sew it around the edges of your block. This will frame the Peppermint Twist design and give it a finished look.
Once the borders are added, give the block one final press to ensure everything lies flat and crisp. This will make it easier to join your blocks together and ensure a professional-looking finish when your quilt is complete.
If you’re using the Peppermint Twist block for a project like a pillow or wall hanging, you can skip the borders and move on to the finishing touches. For these smaller projects, you may want to add a hanging sleeve or other decorative elements to complete the design.
With the block fully assembled and pressed, you’re now ready to incorporate it into your larger quilt project or create a stand-alone piece. The Peppermint Twist Block is a versatile design that can be used in a variety of ways, adding a festive touch to your home decor.
1. What size is the Peppermint Twist block?
The size of the Peppermint Twist block can vary depending on your pattern. However, it is typically made using 12-inch or 6-inch square blocks. Be sure to follow the specific measurements in your chosen pattern.
2. Can I make this block with different fabrics?
Absolutely! While the traditional Peppermint Twist block uses red, white, and green fabrics, you can customize the design with any color combination you like.
3. How many Peppermint Twist blocks should I make for a quilt?
The number of blocks you need will depend on the size of the quilt you want to make. For a standard quilt, you may need anywhere from 20 to 30 blocks, but this will vary based on your desired quilt dimensions.
4. Can I add embellishments to my Peppermint Twist block?
Yes, you can add embellishments like embroidery, buttons, or even fabric paint to give your Peppermint Twist block a unique touch.
5. Is this block suitable for beginners?
Yes, the Peppermint Twist block is beginner-friendly, as long as you take your time and follow the steps carefully. It’s a great way for new quilters to practice their piecing and sewing skills.
Join our VIP broadcast list and gain access to exclusive patterns, all for free. As a VIP member, you’ll receive the best patterns daily, delivered directly to your device. ✨📱 It’s a unique opportunity to stay up-to-date with the latest trends and designs, curated just for you. Don’t miss out on enhancing your projects and discovering new inspirations with the best patterns every day! 🎨🔝
The Peppermint Twist Block Tutorial offers a fun and festive way to create a beautiful quilt block that captures the spirit of the holiday season. By following the step-by-step instructions, you’ll be able to make a block that is both visually striking and enjoyable to create. Whether you’re making a quilt, a pillow, or another project, the Peppermint Twist block is sure to add a special touch to your creations.
Thank you for following along with this tutorial! We’d love to hear your thoughts and suggestions. Please leave a comment below with your feedback or any questions you may have about the process. Happy quilting!


