
Pie Carrier Sewing Pattern

Piecing the Swallows of Inklingo Block – Tutorial is a fantastic technique for quilters looking to enhance their skills with a beautiful and intricate block.
This tutorial will guide you through the step-by-step process of piecing the Swallows of Inklingo block, a unique design that combines classic elements with modern quilting tools.
By using the Inklingo method, which involves printable templates for precise fabric cutting, you can achieve perfect pieces every time, ensuring that your quilt blocks come out exactly as you envisioned.
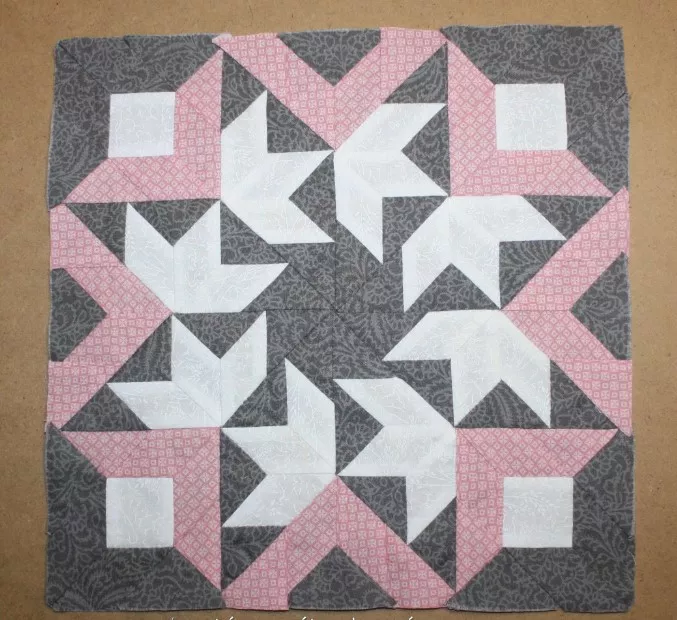
Image from google.
The Swallows of Inklingo block, known for its intricate design and vibrant appeal, is a wonderful challenge for quilters at any level.
Whether you’re a beginner or an experienced quilter, learning the Piecing the Swallows of Inklingo Block will allow you to add a sophisticated touch to your quilt projects.
The method is especially beneficial because it simplifies the cutting process, reducing the guesswork and ensuring each piece is accurately cut.
In this tutorial, we’ll walk you through each step, from printing the templates to piecing together the Swallows of Inklingo block.
You’ll also learn tips and tricks to make the process more efficient and less daunting. With the help of the Inklingo method and this guide, you’ll be able to create stunning quilt blocks that will impress anyone who sees them.
Before diving into the piecing process, it’s important to understand the design of the Swallows of Inklingo block. This block is made up of a series of flying geese and star units arranged in a way that resembles a swallow in flight. The beauty of this block lies in the symmetrical layout and the way the pieces fit together to form a striking pattern.
The Swallows of Inklingo block uses the Inklingo method, which involves printing your fabric pieces directly onto fabric using a printer and a special Inklingo template sheet. This eliminates the need for traditional rotary cutting or paper templates, making the piecing process much easier and more precise.
One of the reasons this block is so popular among quilters is because it allows for precise, accurate cutting and piecing. The Inklingo method ensures that each piece is perfectly sized, which leads to perfect points and crisp seams when pieced together. Additionally, the Inklingo method allows for a faster quilting process, which is especially helpful when making large quilts or multiple blocks.
By understanding the components of the Swallows of Inklingo block and how the Inklingo method works, you’ll be able to approach the project with confidence and enthusiasm. Now, let’s dive into the steps involved in piecing this beautiful block.
The first step in piecing the Swallows of Inklingo block is preparing your fabric and printing the Inklingo templates. Start by selecting the fabrics for your quilt. You can choose contrasting fabrics to create a bold effect or select fabrics that blend together for a more subtle design. Whatever you choose, make sure the fabric is pre-washed and pressed before starting the project.
Once your fabric is ready, you’ll need to print the Inklingo templates onto the fabric. To do this, you’ll need to use an Inklingo-compatible printer. Inklingo templates are specially designed to be printed directly onto fabric, and the templates for the Swallows of Inklingo block will include all the pieces you need for the flying geese and star units.
Follow the instructions that come with the Inklingo templates to ensure that the printout is accurate. Be sure to load your fabric onto your printer correctly, using a fabric stabilizer if necessary. This will ensure that the printed lines are crisp and clear, which will help when cutting the pieces.
After printing the templates, carefully cut out each piece using a pair of sharp scissors. The lines printed on the fabric will serve as your cutting lines, and you should trim along these lines to get perfectly sized pieces for your block.
By using the Inklingo method, you eliminate the need for traditional fabric cutting techniques. This not only saves time but also ensures that each piece is cut to the correct size, reducing the potential for mistakes during the piecing process.
Once you have all your fabric pieces cut out, it’s time to start piecing the flying geese and star units that make up the Swallows of Inklingo block. The key to successful piecing is to follow the printed lines carefully and sew along the stitching lines indicated by the templates.
Start by piecing the flying geese units. To do this, place two smaller triangles on the sides of a larger triangle, right sides together. Sew along the lines indicated on the template, making sure your stitching is accurate and even. After sewing, press the seams open or to one side, depending on the instructions provided with the templates.
Next, you’ll need to assemble the star units. The star units are typically made up of smaller triangles and squares, and they should be sewn together in rows. Take your time and ensure that each row is aligned properly before sewing. Press the seams as you go to avoid bulky seams and to keep everything crisp and flat.
Once the flying geese and star units are pieced together, it’s time to join them to create the final Swallows of Inklingo block. Lay out your flying geese and star units according to the design, and carefully sew them together. Again, pay attention to the printed lines on the fabric to ensure that each piece is joined correctly.
After piecing all the units together, press the seams carefully. This will help your Swallows of Inklingo block lay flat and give it a clean, professional look. With each piece perfectly cut and pieced, you’ll have a beautiful block that’s ready to be incorporated into your quilt.
To ensure success when piecing the Swallows of Inklingo block, here are some helpful tips to keep in mind:
By following these tips and using the Inklingo method, you’ll be able to create beautiful, precise Swallows of Inklingo blocks that will add a stunning touch to your quilt.
1. What is the Inklingo method?
The Inklingo method is a technique that involves printing quilting templates directly onto fabric using a regular printer. This allows for precise cutting of fabric pieces without the need for traditional rotary cutting or paper templates.
2. Do I need special equipment for Inklingo quilting?
Yes, you’ll need an Inklingo-compatible printer, fabric stabilizer (if needed), and the Inklingo templates. These can be purchased from the Inklingo website.
3. Can I use the Inklingo method for other quilt blocks?
Yes! The Inklingo method can be used for a wide variety of quilt blocks. There are templates available for many different designs, including traditional blocks and more intricate patterns.
4. What fabrics work best with the Inklingo method?
Any fabric that is compatible with your printer can be used, but quilting cotton is the most popular choice. Be sure to pre-wash and press your fabric before printing on it.
5. Can I adjust the size of the blocks with the Inklingo method?
Yes! Inklingo templates can be scaled to adjust the size of your blocks. However, be sure to follow the scaling instructions provided with the templates to maintain accuracy.
6. What should I do if I make a mistake while piecing the block?
If you make a mistake, carefully unpick the stitches and try again. The Inklingo method allows for accurate piecing, so mistakes are often easy to fix with a bit of patience.
Join our VIP broadcast list and gain access to exclusive patterns, all for free. As a VIP member, you’ll receive the best patterns daily, delivered directly to your device. ✨📱 It’s a unique opportunity to stay up-to-date with the latest trends and designs, curated just for you. Don’t miss out on enhancing your projects and discovering new inspirations with the best patterns every day! 🎨🔝
In this tutorial, we explored the process of piecing the Swallows of Inklingo block using the Inklingo method. We covered everything from preparing your fabric and printing the templates to piecing together the flying geese and star units.
By following the steps outlined in this guide and using the tips provided, you can create beautiful and precise quilt blocks with ease.
We hope this tutorial has inspired you to try the Inklingo method for your next quilting project. If you have any questions or suggestions, feel free to leave a comment below. Your feedback is always appreciated! Happy quilting!


