
Pie Carrier Sewing Pattern

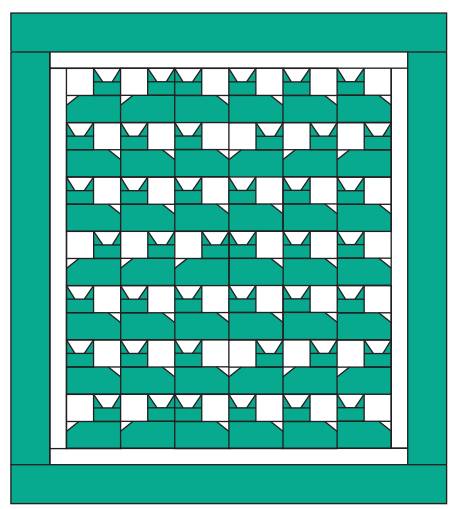
If you are a quilting enthusiast who loves cats, the Pins & Paws Cat Quilt Tutorial is the perfect project for you. This delightful quilt design combines the love of sewing with the charm of feline friends, offering a cozy and heartwarming craft experience.
Whether you are a beginner or an experienced quilter, this pattern brings joy, creativity, and satisfaction.
The Pins & Paws Cat Quilt Tutorial is not only adorable but also highly customizable. You can play with fabric choices, color palettes, and block arrangements to create a quilt that truly reflects your style and personality. Plus, the finished piece makes a wonderful gift for any cat lover or a charming addition to your home.
In this comprehensive guide, you will learn everything you need to know about creating your own Pins & Paws Cat Quilt. From gathering materials and cutting fabric to assembling blocks and adding the finishing touches, this tutorial will help you step-by-step through the process with clarity and confidence.
Before diving into the sewing process, it’s essential to prepare all the materials required for the Pins & Paws Cat Quilt Tutorial. Having everything ready will make the process smoother and more enjoyable.
First, select your fabrics. For this quilt, you’ll need a mix of background fabric, cat block fabrics, and accent pieces. Cotton quilting fabric is ideal because it’s easy to work with and durable.
Choose fabrics in colors and prints that complement each other. You can go with playful cat prints, solid colors, or floral patterns to create different vibes—from modern to whimsical.
You’ll need batting, which is the middle layer of the quilt. High-quality cotton or polyester batting gives the quilt softness and warmth without adding too much weight.
Backing fabric is another essential. This fabric covers the entire back of the quilt. Choose a complementary fabric that ties the front design together beautifully.
Make sure you have the necessary sewing tools: rotary cutter, cutting mat, quilting rulers, sewing machine with a 1/4” foot, iron, and ironing board.
Don’t forget the smaller but crucial items like pins, quilting clips, matching thread, scissors, and a marking pen or pencil for tracing shapes and cutting guides.
Once your materials are gathered, the next step in the Pins & Paws Cat Quilt Tutorial is cutting and preparing your fabrics. Precision is key to a neat and professional-looking quilt.
Start by pressing all your fabrics. Removing wrinkles helps ensure accurate cutting and better alignment when sewing the pieces together.
Use your rotary cutter and quilting rulers to cut background squares and rectangles according to the pattern measurements. Consistency in size is crucial for block assembly.
For the cat blocks, cut squares and rectangles for the cat bodies, heads, and ears. Choose contrasting fabrics for each cat to make the design pop and add visual interest.
Cut additional pieces for the paw blocks. These typically consist of squares and half-square triangles to create the cute paw shapes that accompany the cat blocks.
Label each set of pieces with sticky notes or fabric markers to keep everything organized. This step saves time when you start assembling your quilt.
Double-check your measurements before moving on. Accurate cutting is the foundation of a quilt that comes together smoothly and looks polished.
Now the real fun begins! In this section of the Pins & Paws Cat Quilt Tutorial, you’ll start assembling the quilt blocks that make up your adorable cat-themed design.
Begin with the cat blocks. Sew the body pieces together first, followed by attaching the head, and then the ears. Each part lines up neatly with the help of precise seam allowances.
When creating the cat’s face, you can either embroider simple eyes, whiskers, and a nose or use fabric markers to draw them on for a clean, modern look.
Move on to assembling the paw blocks. These blocks are usually composed of small squares and triangles arranged to resemble cat paws. They add a playful and cohesive touch to the overall design.
Join the completed cat and paw blocks with the background squares and sashing strips if the pattern includes them. This step creates the layout and flow of the quilt.
Take time to press each seam open or to one side as you go. Pressing keeps the blocks flat and helps them align better when stitching rows together.
Once all the blocks are ready, start assembling them into rows, then sew the rows together to form the quilt top. Check alignment regularly to maintain straight lines and neat corners.
The final part of the Pins & Paws Cat Quilt Tutorial is quilting and finishing your masterpiece. This step adds texture, stability, and the final aesthetic touch to your quilt.
Start by creating your quilt sandwich. Lay the backing fabric right side down, place the batting on top, and then the quilt top right side up. Smooth out any wrinkles.
Secure the layers with quilting pins or safety pins placed every few inches across the quilt top. This step prevents shifting during quilting.
Decide on your quilting method. You can quilt straight lines with a walking foot, follow the seams (stitch-in-the-ditch), or try free-motion quilting with playful loops and swirls.
Sew the quilting lines, starting from the center and working outward to avoid puckering. Take your time, and don’t hesitate to reposition the quilt as needed for control.
Once quilting is complete, trim the excess batting and backing fabric to align with the quilt top edges, preparing it for binding.
Finish by adding the binding. Cut strips of fabric, fold them, and sew them around the edges of the quilt. Binding neatly encloses the raw edges and gives your quilt a professional finish.
1. Is the Pins & Paws Cat Quilt Tutorial beginner-friendly?
Yes! This pattern is perfect for beginners who are familiar with basic quilting techniques like piecing squares and straight-line sewing.
2. How big is the finished Pins & Paws Cat Quilt?
The finished size depends on how many blocks you create, but a common size is lap quilt or throw size, approximately 60” x 70”.
3. Can I use scraps for this quilt?
Absolutely! The cat and paw blocks are perfect for using up fabric scraps, allowing for a colorful and unique quilt.
4. What quilting techniques are required?
Basic techniques like chain piecing, half-square triangles, pressing seams, and binding are all you need for this tutorial.
5. How long does it take to make the Pins & Paws Cat Quilt?
The time varies by experience level, but typically it can take anywhere from a weekend to a couple of weeks to complete.
6. Can I resize the quilt easily?
Yes, you can adjust the size by adding more cat or paw blocks or changing the size of the borders and sashing.
The Pins & Paws Cat Quilt Tutorial is a delightful and rewarding project for anyone who loves quilting and cats. From selecting your favorite fabrics to piecing adorable cat and paw blocks and finishing with cozy quilting stitches, this guide covers everything you need to create a beautiful handmade quilt.
We hope this tutorial has inspired you to start your own quilting journey with the Pins & Paws Cat Quilt. If you found this guide helpful, please share your honest opinion in the comments.
Let us know how your project turned out and feel free to suggest ideas for future patterns or tutorials. Your feedback means the world to us and helps keep our creative community thriving. Happy quilting!


