
Pie Carrier Sewing Pattern

The Professional Double Oven Glove – FREE Tutorial is designed for anyone who loves cooking, baking, or spending time in the kitchen while prioritizing safety and style. This tutorial provides step-by-step instructions to create a durable, functional oven glove that can handle high temperatures while being comfortable to wear.
Whether you are a beginner in sewing or an experienced crafter, this project is practical, rewarding, and perfect for personal use or gifting to fellow cooking enthusiasts.
Making a Professional Double Oven Glove – FREE Tutorial allows you to combine creativity with functionality. You can choose fabrics that match your kitchen décor, add padding for extra protection, and even customize the glove with embroidery or applique designs.
Unlike standard oven mitts, this double glove offers superior coverage for both hands at the same time, making it easier to handle larger pans, trays, and baking dishes safely.
This Professional Double Oven Glove – FREE Tutorial not only teaches sewing techniques but also gives you the satisfaction of crafting a handmade kitchen essential. Using this glove, you can confidently remove hot items from the oven, protect your hands from burns, and enjoy your cooking experience more fully.
Creating your own glove also means you can make it to your preferred size and fit, ensuring maximum comfort and utility in the kitchen.
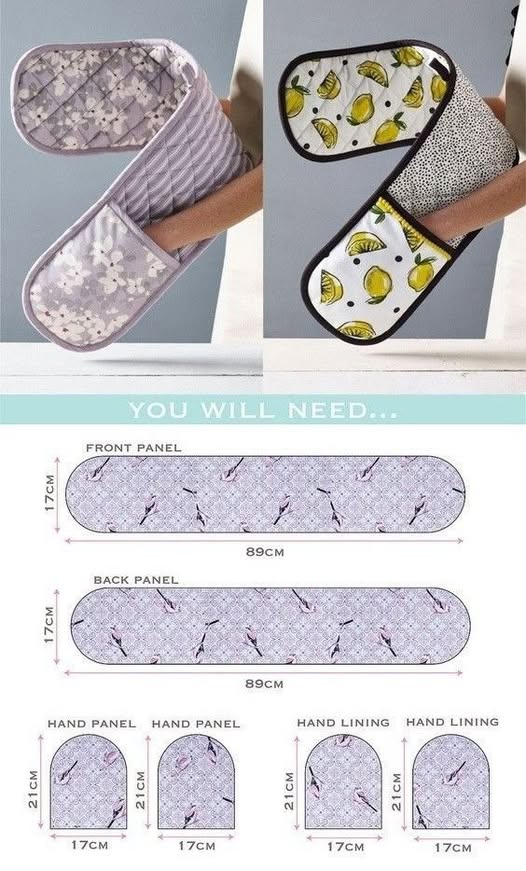
To start the Professional Double Oven Glove – FREE Tutorial, it is important to gather all the necessary materials. Choosing quality fabrics and insulation ensures your glove is both safe and durable.
The outer fabric should be a thick, heat-resistant cotton or quilting fabric. This layer provides style, color, and initial protection. The inner lining can be a soft cotton for comfort against your skin.
For insulation, you will need a heat-resistant batting or interfacing. Materials like cotton batting or Insul-Bright work well, providing excellent protection against high oven temperatures.
Other tools required include a sewing machine, coordinating thread, pins or clips, scissors, and a ruler or measuring tape. These items will help ensure precise cuts and professional-looking seams.
You may also want to have a marking pen or chalk to trace the glove pattern onto the fabric. Patterns can be printed from a tutorial or drawn freehand based on your hand size and desired glove length.
Lastly, optional decorative elements like embroidery thread, bias tape, or fabric labels can personalize your Professional Double Oven Glove – FREE Tutorial, making it uniquely yours while maintaining full functionality.
Begin the Professional Double Oven Glove – FREE Tutorial by cutting the outer fabric, lining, and batting according to your pattern. You’ll need two pieces for each layer—one for the top of the glove and one for the bottom.
Layer the outer fabric, batting, and lining together, ensuring the batting is sandwiched between the fabric layers. Pin or clip them in place to prevent shifting while sewing.
Quilt the layers together with straight or decorative stitching. Quilting helps keep the batting in place and increases the glove’s durability and heat resistance.
Next, sew the glove edges together, leaving the wrist opening unstitched. This allows you to turn the glove right side out after sewing. Be sure to reinforce the seams for extra strength, especially in areas that will endure the most heat and pressure.
Turn the glove right side out carefully, ensuring corners are sharp and seams lie flat. Press with an iron if needed to create a professional finish.
Finally, topstitch around the edges and finish the wrist opening with bias tape, elastic, or a fold-over hem. This secures the layers and gives the glove a polished look. Your Professional Double Oven Glove – FREE Tutorial is now complete and ready for use.
One of the advantages of this Professional Double Oven Glove – FREE Tutorial is the ability to personalize it according to your style and kitchen needs.
You can use vibrant patterned fabrics for a decorative touch or classic solids for a more professional appearance. Adding embroidery or applique can make your glove unique and memorable.
Adjust the glove size to fit your hands perfectly. Measuring the length from fingertip to wrist ensures maximum comfort, while making the glove slightly wider at the hand provides better movement and dexterity.
Consider adding loops for hanging. A small fabric loop sewn at the wrist or side of the glove allows for convenient storage when not in use.
Using contrasting thread or decorative quilting stitches not only strengthens the glove but also adds a visual element, making your handmade project stand out.
Finally, try experimenting with additional insulation layers if you frequently handle extremely hot dishes. More padding increases safety but can also affect flexibility, so find a balance that suits your needs.
Even experienced crafters can make mistakes when working on a Professional Double Oven Glove – FREE Tutorial, but they can be easily avoided with careful attention.
One common error is uneven quilting, which can cause the batting to bunch and reduce heat protection. Always quilt slowly and evenly, using guides or stitch markers if necessary.
Cutting the fabric inaccurately is another mistake. Always measure twice and cut once, using a clear pattern and sharp scissors to ensure precision.
Sewing layers incorrectly can cause the glove to be misshaped. Pin or clip layers securely, and double-check alignment before stitching.
Forgetting to reinforce high-stress areas, like the thumb and fingers, can reduce the glove’s durability. Reinforce seams in these areas for long-lasting protection.
Turning the glove right side out can sometimes stretch seams. Go slowly, use a point turner or blunt tool, and gently shape corners without pulling too hard.
Lastly, neglecting finishing touches like topstitching or bias tape can make the glove look unpolished. These final steps enhance both appearance and durability, ensuring your Professional Double Oven Glove – FREE Tutorial looks professional.
Q: Is this tutorial suitable for beginners?
Yes, the step-by-step instructions make it accessible even for those new to sewing.
Q: What type of fabric is safest for oven gloves?
Thick cotton or quilting fabrics with heat-resistant batting work best. Avoid polyester as the outer layer.
Q: Can I make the glove larger or smaller?
Absolutely. Adjust the pattern measurements to match your hand size.
Q: Is this glove machine washable?
Yes, but check the batting and any embellishments for washing instructions.
Q: Can I sell gloves made from this tutorial?
Yes, but be sure to credit the pattern source if required.
Q: How do I improve heat resistance?
Adding extra layers of heat-resistant batting or using Insul-Bright will enhance protection.
The Professional Double Oven Glove – FREE Tutorial provides a practical, customizable, and rewarding sewing project for any kitchen enthusiast. By following this guide, you can create a handmade oven glove that is both functional and stylish. From choosing materials to finishing touches, every step ensures safety and comfort while cooking.
Once you complete your glove, you’ll enjoy the satisfaction of using a professional-quality, handmade accessory. Share your results, feedback, and suggestions in the comments—we would love to see how your gloves turned out!


