
Pie Carrier Sewing Pattern

Rectangular Padded Toiletry Bag with Zipper is a functional and stylish sewing project perfect for beginners and experienced crafters who want to make their own travel accessories. A Rectangular Padded Toiletry Bag with Zipper is practical, durable, and customizable, making it an ideal handmade item for organizing personal items at home or on the go.
This type of bag provides structure, protection, and convenience, especially when padded materials are used to keep toiletries secure. With a simple construction and endless design possibilities, it offers a satisfying creative experience.
Sewing a Rectangular Padded Toiletry Bag with Zipper also allows you to personalize your travel gear. You can choose fabrics that reflect your style—bold prints, soft pastels, waterproof materials, or quilted cotton. This flexibility makes handmade toiletry bags especially popular for gifting.
Whether it’s for a holiday, birthday, or special occasion, recipients appreciate the functionality and thoughtfulness behind a handcrafted item. The padded structure and zipper closure add an elevated professional finish.
One of the most appealing aspects of making a Rectangular Padded Toiletry Bag with Zipper is how quickly the project comes together once the materials are prepped.
The rectangular shape is beginner-friendly, and the step-by-step process teaches valuable sewing techniques, such as inserting a zipper, working with stabilizers, boxing corners, and layering fabrics. Even if you are new to sewing, this project provides a great introduction to essential crafting skills while producing a high-quality final item.
To sew a Rectangular Padded Toiletry Bag with Zipper, you will need a small but essential set of materials. Start with choosing your main fabric. Medium-weight cotton is a favorite because it is easy to handle and comes in endless colors and patterns. You can also choose canvas, denim, or waterproof fabric if you want a more durable or wipeable bag. The fabric sets the tone of the final look, so pick something that matches your personal style or intended use.
Next, select the lining fabric. Lightweight cotton, nylon lining, or laminated fabric make excellent choices depending on your preference. A wipeable lining works well for toiletry bags because it makes cleaning easier. Choosing a contrasting lining fabric can also add a fun pop of color inside the bag.
The padding or stabilizer is what gives the Rectangular Padded Toiletry Bag with Zipper its structured, protective shape. Options include foam stabilizer, fusible fleece, or quilted batting. Foam gives the most structure, while fleece provides a soft, cushioned finish. Your choice depends on how firm you want the final bag to be.
A good-quality zipper is essential. For a toiletry bag, a zipper between 25–30 cm is ideal, though you can adjust depending on the bag size. Nylon coil zippers are recommended because they are easy to sew over and slide smoothly. Choosing a zipper color that complements your fabric enhances the overall aesthetic.
Basic sewing tools such as a sewing machine, scissors, ruler, pins, and thread are also required. Using high-quality thread ensures durable seams that can withstand frequent use. A walking foot or zipper foot can make sewing layers and zippers easier, but they are optional.
Finally, if you want to add personalization, you can prepare extra materials such as labels, small pockets, or decorative stitching. These optional features help create a unique Rectangular Padded Toiletry Bag with Zipper that reflects your creativity.
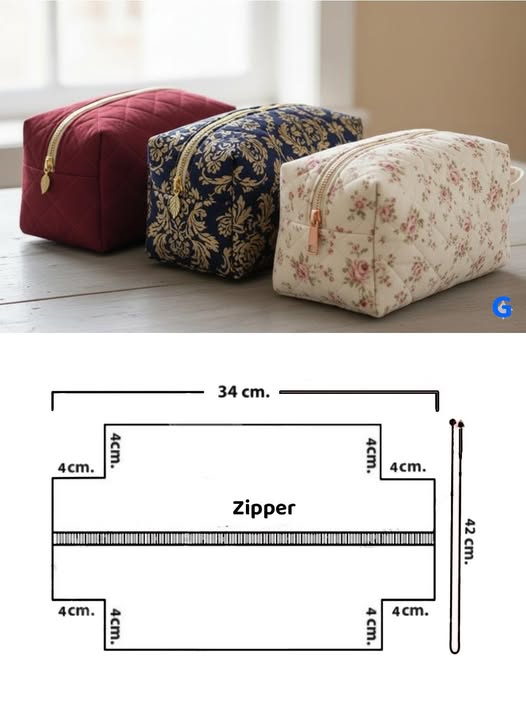
Start your Rectangular Padded Toiletry Bag with Zipper by cutting your main fabric, lining, and stabilizer to matching dimensions. A common size is 30 cm by 40 cm, but you can adjust according to your needs. Make sure all layers align precisely to ensure a clean, professional result.
Once cut, attach your stabilizer to the wrong side of the main fabric. If using fusible materials, simply press with an iron following the manufacturer’s instructions. If using foam, baste it in place with long stitches. This padding gives the bag its structure and protects the items stored inside.
Next, prepare the zipper. Place the zipper face down on the right side of the main fabric edge. Then place the lining fabric on top, right sides together, creating a fabric-zipper sandwich. Sew along the zipper edge using a zipper foot or narrow stitch line. This technique ensures the zipper is inserted cleanly and lies flat.
Repeat the process for the other side of the zipper using the remaining main and lining pieces. Once sewn, open the fabric layers like a book and press them away from the zipper. Topstitching along both edges of the zipper prevents the fabric from catching and adds a polished appearance to your Rectangular Padded Toiletry Bag with Zipper.
With the zipper in place, align the main fabrics right sides together and the lining fabrics right sides together. Make sure the zipper is centered and open halfway to allow turning later. Sew around the edges, leaving a small opening in the lining for turning the bag right side out. Secure the stitching around the zipper area carefully for strength.
Finally, box the corners of both the main fabric and lining. To do this, pinch the corners to form a triangle, measure equal distances, and sew straight across. This step transforms your flat fabric into a roomy, rectangular shape. Turn the bag right side out through the lining opening, sew the opening closed, and shape your finished Rectangular Padded Toiletry Bag with Zipper neatly.
There are countless ways to customize your Rectangular Padded Toiletry Bag with Zipper to make it unique and functional. One popular option is adding an interior pocket. A small zippered or slip pocket can help keep smaller items organized, such as makeup tools, jewelry, or medications. The pocket can be sewn onto the lining before attaching the zipper.
Another idea is quilting the exterior fabric before assembling the bag. Quilted stitching adds texture, stability, and a high-end look. You can choose simple straight-line quilting, diagonal patterns, or even decorative motifs. Quilting works especially well when using batting or foam stabilizer.
Adding a handle or side strap is another practical customization. Handles make the bag easier to carry, especially when traveling. A fabric strap can be sewn into the side seam, or a detachable handle can be added with D-rings for a more professional look. This enhances both convenience and style.
Decorative elements like appliqués, embroidery, fabric labels, or monograms help personalize your Rectangular Padded Toiletry Bag with Zipper even more. These details give your handmade bag a boutique feel and make it an excellent gift. Embroidery, in particular, allows you to add names, initials, or designs that reflect the personality of the recipient.
You can also experiment with fabric combinations. Using a bold print for the exterior paired with a contrasting lining can make the inside of the bag just as beautiful as the outside. Mixing textures like canvas with cotton or vinyl with quilting cotton creates a sophisticated look.
Finally, consider adjusting the size and proportions. A taller bag works well for bottles, while a wider base is ideal for makeup. By customizing the pattern dimensions, you can tailor the bag to your exact needs while still following the core steps of the Rectangular Padded Toiletry Bag with Zipper.
Taking care of your Rectangular Padded Toiletry Bag with Zipper helps prolong its lifespan and keeps it looking clean and fresh. If you used cotton fabrics, spot cleaning is often sufficient for small stains. Use mild soap, a soft cloth, and gentle dabbing motions. Avoid harsh scrubbing to prevent fabric wear.
For deeper cleaning, handwashing is recommended. Fill a basin with cold or lukewarm water and mild detergent. Submerge the bag and gently agitate it. Rinse thoroughly and reshape it before air-drying. Avoid using hot water or a dryer, as heat can damage fusible stabilizers or distort the padding.
If your toiletry bag has a waterproof lining, cleaning becomes even easier. Simply wipe the inside with a damp cloth to remove spills or residue. This makes the Rectangular Padded Toiletry Bag with Zipper ideal for storing makeup, toiletries, or skincare products.
Inspect the zipper regularly to ensure it continues to function smoothly. If it feels stiff, rub a small amount of beeswax along the teeth. This helps keep the zipper gliding easily and prevents snags.
Store the bag in a cool, dry area when not in use. Avoid placing heavy objects on top of it, as padding can lose shape over time. Keeping it upright or slightly filled helps maintain its structure.
Finally, if any seams or stitches loosen, repair them promptly. A simple reinforcement stitch ensures durability and prevents larger issues. Maintaining small repairs keeps your Rectangular Padded Toiletry Bag with Zipper in pristine condition for years.
Q: Is the Rectangular Padded Toiletry Bag with Zipper beginner-friendly?
Yes. The steps are simple and teach essential sewing skills, making it great for beginners.
Q: What type of stabilizer works best?
Foam stabilizer gives the most structure, while fusible fleece offers a softer padded feel.
Q: Can I wash the toiletry bag?
Yes, but handwashing is recommended unless your materials are fully waterproof.
Q: How can I resize the bag?
Adjust the length and width of your fabric rectangles before assembly to create larger or smaller bags.
Q: What zipper should I use?
A nylon coil zipper works best because it is easy to sew and durable for frequent use.
Q: Can I add pockets?
Absolutely. Interior or exterior pockets can be added before assembling the bag.
In this article, we explored the Rectangular Padded Toiletry Bag with Zipper, including materials, sewing steps, customization ideas, and care instructions. This project is practical, creative, and rewarding, offering endless ways to tailor it to your needs. Whether you sew it for yourself or as a special handmade gift, the result is a functional accessory with a professional finish.
I hope this guide inspires you to create your own toiletry bag. Please leave your honest opinion and suggestions—your feedback helps our creative community grow and improves future tutorials.


