
Pie Carrier Sewing Pattern

If you’ve ever wondered how to create a unique and practical kitchen accessory, this Reversible Pie Plate Cozy Quilt Tutorial is the perfect project to try. Not only does it protect your hands and countertops from hot dishes, but it also adds a delightful handmade touch to your table.
Whether you’re a beginner or an experienced quilter, this guide will walk you through each step using easy techniques and helpful tips.
In this article, we’ll explore everything you need to know about making a reversible pie plate cozy quilt, including materials, cutting instructions, sewing techniques, and how to personalize your cozy for gifts or home décor.
We’ll use the phrase Reversible Pie Plate Cozy Quilt Tutorial throughout to help you stay focused on the goal and to ensure excellent SEO optimization for fellow crafters looking for this exact tutorial.
Let’s get started with this cozy and creative quilting project. Before diving into the steps, it’s important to note that this project requires minimal fabric and is an excellent way to use up scraps or fat quarters.
It’s also reversible, meaning you can choose two fun prints or coordinate one side with holiday themes and the other for everyday use.
Before starting the Reversible Pie Plate Cozy Quilt Tutorial, let’s gather all the materials you will need for this project. Using high-quality cotton fabric is key, as it holds up well in the kitchen and can be washed frequently without shrinking or fading.
You’ll need two 12×12 inch squares of 100% cotton fabric. Choose prints that complement each other so both sides of your reversible cozy look beautiful. If you want a more insulated cozy, consider using thermal batting specifically designed for kitchen projects.
Cut two squares of cotton batting, each the same size as your fabric pieces. Cotton batting works well for pie cozies since it can safely be placed in the microwave, though you should always follow safety instructions when heating items with fabric.
You’ll also need a fabric marking pen or pencil, a rotary cutter or sharp scissors, quilting pins or clips, and a sewing machine. Make sure your iron is ready and set to cotton, as pressing will help keep your seams sharp and your quilted lines crisp.
If you plan to quilt the layers before assembling the cozy, prepare a design or follow a simple crosshatch pattern. Quilting not only strengthens the layers but adds a beautiful textured look to the finished cozy.
Prewashing your fabric is always recommended, especially for projects that might involve heat or frequent washing. Shrinkage or color bleeding can be avoided with a quick rinse and press before cutting your pieces.
Now that we’ve gathered our materials, it’s time to start shaping the fabric for your Reversible Pie Plate Cozy Quilt Tutorial. Begin by laying your cotton fabrics right side down and aligning the batting on the back of each one.
Pin or clip your layers together and use a ruler and marking tool to draw a quilting design on each piece. A simple grid or diagonal lines spaced about 1.5 inches apart make the cozy sturdy and attractive. This is your chance to add flair while keeping the design functional.
Once your lines are marked, quilt each set of layers by stitching over the drawn lines. Use a walking foot if available to prevent fabric shifting. Quilting both sides separately ensures a smooth finish when assembling the cozy later.
Next, trim each quilted sandwich to 11×11 inches to square up the edges. Use a rotary cutter and ruler for accuracy. This ensures the layers will align evenly during final construction.
To give the cozy its bowl-like shape, you’ll need to make darts. Mark 2-inch darts on each corner (measuring 2 inches in from each side and 2 inches down). Cut out the darts and pin the edges together, right sides facing, then stitch each dart closed.
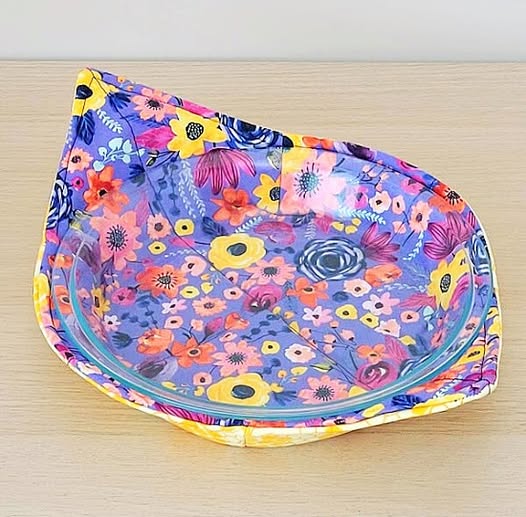
Repeat the dart process for both quilted squares. Once sewn, you’ll notice each square has a shallow bowl shape—perfect for cradling your pie plate securely.
Now we’re ready to put together the two quilted pieces in this Reversible Pie Plate Cozy Quilt Tutorial. With darts sewn and each square shaped, align the two cozies right sides together, matching the dart seams carefully.
Pin around the edges and leave a 3-inch opening on one side. This gap will allow you to turn the cozy right side out after stitching. Make sure all darts are aligned so the finished cozy will sit flat and symmetrical.
Sew around the entire edge with a ¼-inch seam allowance, taking care to backstitch at the beginning and end of the opening. This helps secure the stitches when you turn the cozy right side out.
Clip the corners and trim the seam allowance slightly to reduce bulk. This makes it easier to press and gives the cozy a neater edge when finished.
Turn the cozy right side out through the opening. Use a blunt tool or chopstick to gently push out the corners and seams. Then press the cozy flat, making sure the opening edges are tucked neatly inside.
Topstitch around the entire edge about ⅛-inch from the seam. This not only closes the turning gap but also reinforces the edge and gives the cozy a professional finish.
You’ve completed the basic construction in this Reversible Pie Plate Cozy Quilt Tutorial, but now it’s time to add your personal touch. Because the cozy is reversible, you have two sides to play with—get creative!
Consider using seasonal or holiday-themed fabric on one side and a more neutral or everyday print on the other. This gives your cozy year-round appeal and makes it a perfect gift.
Embellish with decorative stitching using contrasting thread, or add a small fabric tag with your initials or the recipient’s name. These little touches turn a simple project into a heartfelt handmade item.
For added texture, use a variety of quilting patterns or even applique a small motif in the center of the cozy. Hearts, stars, or floral shapes add charm and show off your quilting skills.
If you plan to give your cozy as a gift, consider bundling it with a pie plate, homemade recipe card, or matching pot holders. This turns your creation into a thoughtful and practical gift set.
Another creative twist is adjusting the size of the cozy to fit bowls or small casserole dishes. The same technique applies—just adjust the initial square sizes and dart measurements accordingly.
Remember to label your cozy with fiber content and care instructions, especially if it’s a gift. It’s best to hand wash or spot clean pie cozies to maintain their shape and color over time.
What size pie plate does this cozy fit?
This tutorial is designed for a standard 9-inch pie plate. You can adjust the starting fabric square size to fit larger or smaller dishes.
Can I use polyester batting?
It’s not recommended, especially if you plan to use the cozy in the microwave. 100% cotton batting is the safest and most heat-resistant option.
Is it safe to use the cozy in the oven?
No. The cozy is meant for carrying and insulating—not for oven use. Always place food into or remove it from the oven using proper oven mitts.
How do I wash the reversible pie cozy?
Hand washing or gentle machine washing in cold water is best. Lay flat to dry or tumble dry on low heat.
Can I add handles to my cozy?
Yes, you can add small fabric loops before stitching the two layers together. Just make sure they’re securely sewn and made of cotton.
Can beginners try this project?
Absolutely! This Reversible Pie Plate Cozy Quilt Tutorial is beginner-friendly, especially with straight-line quilting and basic darts.
This Reversible Pie Plate Cozy Quilt Tutorial has shown you how to create a beautiful, practical, and personalized kitchen accessory from start to finish. You’ve learned how to quilt each side, form the cozy shape with darts, sew the layers together, and add your own creative flair. It’s an excellent stash-busting project and makes for a heartwarming handmade gift.
We’d love to know what you thought of this tutorial! Leave a sincere comment below with your experience, tips, or suggestions. Have you made a reversible cozy before, or are you inspired to try for the first time? Your feedback helps this creative community grow and thrive.


