
Pie Carrier Sewing Pattern

If you’re a quilting enthusiast looking to add festive flair to your projects, this Santa Baby and NTT – Quilt Block Tutorial is just what you need! Perfect for the holiday season, this tutorial combines creative techniques with easy-to-follow instructions.
Whether you’re a beginner or an experienced quilter, you’ll enjoy crafting these charming quilt blocks. Read on to discover the materials, steps, and tips for making your Santa Baby and NTT quilt blocks truly shine.
Creating quilt blocks like Santa Baby and NTT is a wonderful way to personalize your holiday decor.
The intricate patterns and vibrant colors can brighten up any space, making your quilt a delightful conversation piece.
Plus, this project is an excellent opportunity to practice essential quilting skills while experimenting with unique designs.
This tutorial will guide you through the process of selecting fabrics, preparing your tools, and assembling your quilt blocks.
With clear instructions and useful tips, you’ll feel confident tackling this festive quilting project. So, let’s dive in and get started with our first steps!
Before diving into the quilting process, it’s essential to gather all necessary materials and create an organized workspace. Preparation is key to a smooth and enjoyable quilting experience.
By organizing your materials and tools ahead of time, you’ll set yourself up for success and reduce potential frustrations during the quilting process.
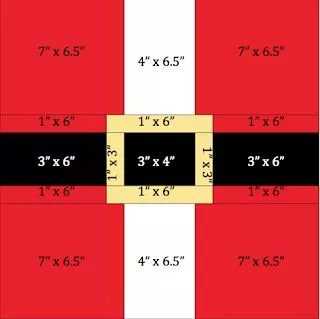
The Santa Baby quilt block features a playful holiday design that’s both eye-catching and fun to create. Follow these steps to piece it together with precision.
By following these steps, you’ll create a crisp and vibrant Santa Baby quilt block that’s ready to be incorporated into your quilt.
The NTT quilt block, known for its geometric elegance, complements the Santa Baby design beautifully. Let’s explore how to create this versatile block.
The NTT quilt block adds a sophisticated touch to your project, making it a standout feature in your holiday quilt.
Now that you’ve crafted the Santa Baby and NTT quilt blocks, it’s time to combine them into a cohesive quilt. Here’s how to bring your project together.
Combining these steps will result in a stunning quilt that showcases your Santa Baby and NTT blocks beautifully.
Q1: What does NTT stand for in quilting? A1: NTT stands for “New Traditions in Textiles,” a design style characterized by clean lines and modern patterns.
Q2: Can I use scraps to make these quilt blocks? A2: Yes! Both Santa Baby and NTT blocks are great for using up fabric scraps, especially for adding variety and texture.
Q3: Do I need special tools to make these quilt blocks? A3: Basic quilting tools like a rotary cutter, ruler, and sewing machine are sufficient. Optional tools like a fabric marking pen can help with precision.
Q4: How long does it take to complete one block? A4: Depending on your experience, each block can take 1-2 hours to complete, including cutting, sewing, and pressing.
Q5: Can beginners attempt these quilt blocks? A5: Absolutely! Both blocks are beginner-friendly, with straightforward steps and clear patterns.
Q6: What size should the finished blocks be? A6: The finished size can vary based on your template, but 12×12 inches is a common standard for quilt blocks.
Join our VIP broadcast list and gain access to exclusive patterns, all for free. As a VIP member, you’ll receive the best patterns daily, delivered directly to your device. ✨📱 It’s a unique opportunity to stay up-to-date with the latest trends and designs, curated just for you. Don’t miss out on enhancing your projects and discovering new inspirations with the best patterns every day! 🎨🔝
In this Santa Baby and NTT – Quilt Block Tutorial, we’ve covered everything from gathering materials to assembling and combining these festive quilt blocks. By following the steps outlined, you’ll create a stunning holiday quilt that showcases your skills and creativity. We hope this tutorial inspires you to start your own project and experiment with new designs.
If you enjoyed this tutorial, please share your thoughts and suggestions in the comments below. Your feedback helps us create more valuable content for the quilting community. Happy quilting!


