
Pie Carrier Sewing Pattern

If you’re a quilter looking to add a bit of charm and whimsy to your next project, the Schoolhouse Block Tutorial is a fantastic place to start. The Schoolhouse block is a classic design that captures the essence of cozy, country-inspired quilts and adds a nostalgic touch to your work.
Whether you are a seasoned quilter or just beginning your quilting journey, this pattern offers a delightful challenge and an opportunity to refine your skills.
In this tutorial, we will walk you through the entire process of making a Schoolhouse block, from selecting your materials to assembling the final piece.
The beauty of this block is that it can be adapted in various ways – you can use different colors, fabrics, and patterns to create a look that matches your personal style or the theme of your quilt. So grab your fabric, thread, and quilting tools, and let’s dive into this Schoolhouse Block Tutorial!
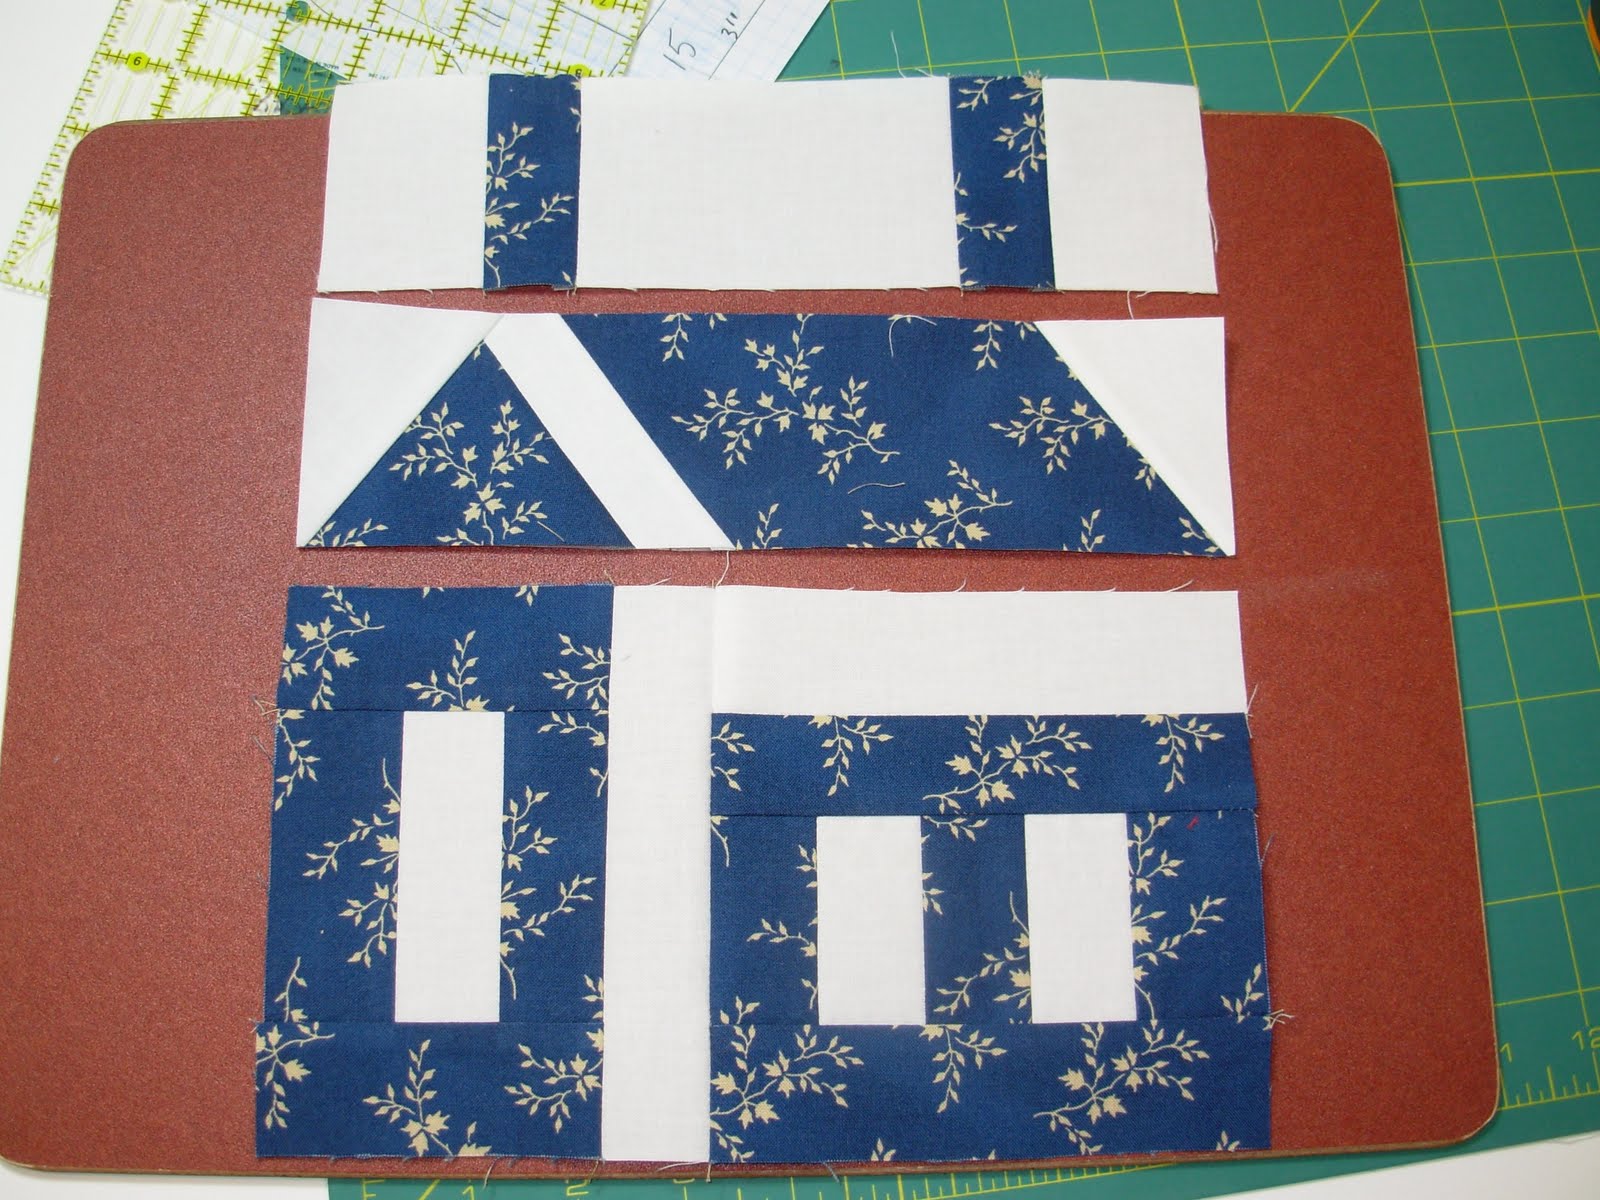
A Schoolhouse Block typically features a house shape with a roof, chimney, and body, often associated with simple and traditional quilting designs.
In the following sections, we’ll cover the basic steps to make this block, along with helpful tips and variations to ensure that your quilt stands out. This block is perfect for a variety of projects, from full quilts to smaller, decorative pieces.
Before diving into the Schoolhouse Block Tutorial, it’s important to gather all the materials you’ll need. Having everything ready will help make the process smoother and more enjoyable.
You will need fabric for the block. Typically, quilters use cotton fabric as it’s easy to work with and provides a nice finish. For the Schoolhouse block, you’ll need at least three fabrics: one for the roof, one for the body of the house, and one for the background. You can also incorporate accent fabrics to make the block more personalized.
A rotary cutter, cutting mat, and ruler are essential tools to achieve clean, precise cuts. The rotary cutter will allow you to slice through fabric layers easily, while the mat and ruler ensure that you cut your fabric accurately.
Don’t forget to have your sewing machine ready, along with a quarter-inch foot. This foot is designed to help you achieve accurate seam allowances, which is crucial when piecing quilt blocks. You’ll also need thread in a color that matches or complements your fabric. Additionally, having pins or clips can help hold pieces in place as you sew.
Lastly, a scissors for trimming threads, and an iron to press seams, will complete your set of tools. Now that you’re all set up, it’s time to get started with the Schoolhouse Block Tutorial!
The first step in this Schoolhouse Block Tutorial is cutting the fabric. Accurate cutting is essential for ensuring that your block comes out the correct size and looks neat. Here are the fabric measurements for each part of the block:
Remember, accuracy is key when cutting your fabric pieces. If you cut your fabric too large or small, the pieces won’t fit together properly, which could affect the final outcome of your block.
Once all your fabric pieces are cut, you’re ready to move on to the next step: piecing your block together. Let’s see how to assemble these pieces into a beautiful Schoolhouse block.
Now that you have all your fabric pieces cut, it’s time to start assembling the Schoolhouse Block. This process involves sewing the pieces together in a specific order to form the block’s recognizable shape.
Begin by taking your roof fabric piece and aligning it with the top edge of the body fabric. The roof should sit on top of the house body, overlapping slightly. Use a quarter-inch seam to sew the roof onto the body. Press the seam open to reduce bulk.
Next, take the small square you cut for the chimney. Position it near the top-left corner of the roof. You can choose to place it on either side of the roof, depending on your design preference. Sew the chimney onto the roof using a quarter-inch seam. Press the seam as you did with the roof seam.
Once the roof and chimney are attached, you can add the background fabric. The background will surround the house and roof, creating the illusion of space around your house. Attach the two 6.5-inch squares of background fabric to the sides of the house body. Be sure to line them up carefully and sew along the edges.
After you’ve sewn all the pieces together, take a moment to square up the block. This means trimming any excess fabric to ensure that the block is even on all sides. Use a ruler and rotary cutter to trim the block to the correct size. A well-squared block will make it easier to sew multiple blocks together later.
Once your block is assembled, it’s essential to press all the seams. This step is often overlooked but is crucial for giving your block a polished look. Press each seam open with an iron, being careful not to stretch the fabric out of shape.
Before moving on to the next block, check your work. Ensure all seams are secure, and there are no loose threads. If any part of the block looks uneven or misaligned, carefully rip the seams and re-sew. Once everything looks good, your Schoolhouse block is ready to be added to your quilt!
Now that you know how to make the basic Schoolhouse Block, you can explore different variations and tips to make your blocks stand out.
One easy variation is to change the fabric placement. Instead of traditional colors, consider using bright, modern fabrics or batiks for a more contemporary feel. You can also experiment with scrappy blocks, using multiple fabric scraps for the roof, body, and chimney, which gives your quilt a more eclectic vibe.
If you want to make your block larger or smaller, adjust the fabric measurements accordingly. You can scale up the block by increasing the size of the roof or body, or reduce it by cutting smaller pieces. Keep in mind that if you scale the block, the final dimensions of your quilt will change as well.
Adding embellishments like appliqué flowers, embroidery, or buttons can give your Schoolhouse block extra personality. Try adding a floral design to the background or stitching little windows onto the house for a whimsical touch.
Additionally, you can create a Schoolhouse Quilt by repeating the block in a grid pattern. Mix and match different colors for each block to create an eye-catching and vibrant quilt that’s perfect for any occasion.
1. What is a Schoolhouse Block in quilting? A Schoolhouse Block is a traditional quilt block that features a simple house shape with a roof, chimney, and body. It’s often used in country-style quilts and is a great choice for beginner quilters.
2. Can I make a larger Schoolhouse block? Yes, you can enlarge the block by scaling up the measurements for each fabric piece. This is a good option if you want to create a larger quilt or have more room for intricate designs.
3. Do I need to use specific fabrics for the Schoolhouse block? While cotton fabric is commonly used, you can experiment with other fabrics, such as batiks or flannel, to create different textures and looks for your block.
4. How do I square up the block? To square up the block, use a ruler and rotary cutter to trim any excess fabric along the edges. Make sure all sides are even and aligned.
5. Can I make a Schoolhouse block with a different design? Yes! You can experiment with fabric placement, embroidery, or other embellishments to personalize your Schoolhouse block and create a design that suits your style.
6. How many Schoolhouse blocks do I need for a quilt? The number of blocks you need will depend on the size of your quilt. A typical quilt may require 12 to 20 blocks, but this can vary based on the dimensions you want for your finished quilt.
Join our VIP broadcast list and gain access to exclusive patterns, all for free. As a VIP member, you’ll receive the best patterns daily, delivered directly to your device. ✨📱 It’s a unique opportunity to stay up-to-date with the latest trends and designs, curated just for you. Don’t miss out on enhancing your projects and discovering new inspirations with the best patterns every day! 🎨🔝
The Schoolhouse Block Tutorial is a wonderful way to create a charming, traditional quilt block that adds a touch of warmth and nostalgia to your quilting projects. Whether you’re a beginner or an experienced quilter, this block offers a fun and manageable challenge that allows you to get creative with fabric choices, colors, and designs.
By following the steps outlined in this tutorial, you’ll be able to create beautiful Schoolhouse blocks and incorporate them into quilts, pillows, or other home décor items. We hope this tutorial has inspired you to try the Schoolhouse block and experiment with different quilting techniques. Feel free to share your thoughts, suggestions, and any questions in the comments below. Happy quilting!
4o mini


