Creating a Scrap Jar Stars quilt is a delightful way to use leftover fabric scraps while adding charm and creativity to your quilting projects.
This tutorial will guide you step-by-step through making these vibrant and intricate star blocks, perfect for quilts, table runners, or wall hangings. Whether you are a beginner or a seasoned quilter, this project is both fun and rewarding.
By the end of this guide, you’ll have a deeper understanding of the techniques required to craft the Scrap Jar Stars, along with tips for assembling your quilt top.
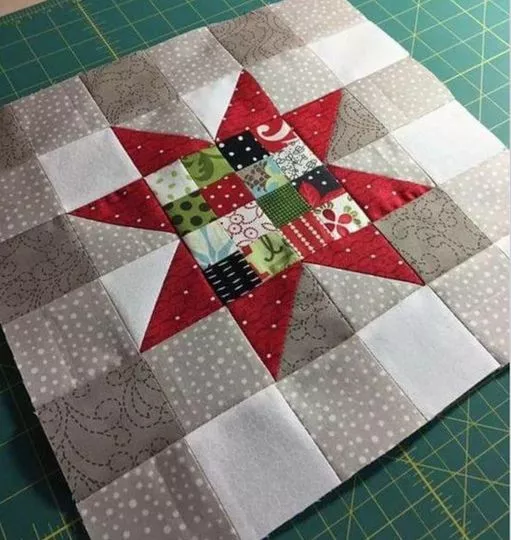
Image from google.
So gather your favorite fabric scraps, sewing tools, and let’s get started on this exciting quilting journey!
SEE MORE PATTERNS
1. Preparing Your Materials
Before diving into sewing, it’s essential to have all your materials prepared for a smooth workflow.
- Fabric Scraps: Choose scraps in various colors and patterns. The more diversity, the more striking your stars will appear. Organize them by size for easy access.
- Background Fabric: Select a neutral tone like white, cream, or gray to make the stars stand out. You’ll need enough yardage for the quilt blocks and sashing.
- Cutting Tools: A rotary cutter, cutting mat, and quilting ruler are crucial for precise cuts, which are vital for accurate piecing.
- Thread and Needles: Use high-quality thread that matches your background fabric and quilting needles for durability.
- Iron and Pressing Board: Pressing seams as you go ensures a polished finish and accurate block assembly.
- Sewing Machine or Hand Sewing Supplies: While this project can be done by hand, a sewing machine speeds up the process significantly.
Gather these items before starting to make the quilting process enjoyable and efficient.
2. Creating the Scrap Jar Star Blocks
The core of the Scrap Jar Stars – Tutorial lies in constructing the star blocks.
- Cutting Pieces: Begin by cutting your scraps into 2.5-inch squares and the background fabric into 4.5-inch squares. Precision here ensures seamless assembly.
- Making Half-Square Triangles (HSTs): Pair your scrap squares with background squares. Draw a diagonal line, sew on either side, and cut along the line to create two HSTs. Trim them to 2.5 inches.
- Arranging Your Star: Lay out your HSTs, background squares, and central scrap square in a 9-patch arrangement. Ensure the HSTs form the star points.
- Piecing Rows: Sew the squares together row by row, pressing seams in opposite directions for a snug fit when joining rows.
- Joining Rows: Sew the rows together to complete the star block, pressing the final seams flat.
- Repeat: Make as many blocks as your quilt requires. The versatility of this pattern allows you to create different quilt sizes, from lap quilts to king-size spreads.
3. Assembling the Quilt Top
Once your star blocks are ready, the next step is to assemble them into a cohesive quilt top.
- Layout Options: Arrange your star blocks on a design wall or flat surface. Experiment with layouts to find the one you love most.
- Adding Sashing: Use strips of background fabric between blocks to separate and highlight each star. Cut sashing strips to match the block size.
- Cornerstones: Include small fabric squares at the sashing intersections for added interest and cohesion.
- Sewing the Rows: Attach sashing to the blocks, then sew the rows together, ensuring the stars align perfectly.
- Borders: Add borders if desired to frame the quilt top and enhance its overall look.
- Final Pressing: Press all seams flat for a smooth finish, preparing the top for quilting.
4. Quilting and Finishing
Now that your quilt top is complete, it’s time to quilt and finish your Scrap Jar Stars creation.
- Layering the Quilt: Lay out the backing fabric, batting, and quilt top. Smooth out wrinkles and secure layers with basting pins or spray.
- Choosing a Quilting Design: Select a design that complements your stars. Straight-line quilting enhances the geometric look, while free-motion designs add an artistic touch.
- Quilting the Layers: Start quilting from the center outward to prevent puckering. Adjust your machine settings for a consistent stitch length.
- Trimming the Edges: Once quilting is complete, trim the excess batting and backing fabric to align with the quilt top.
- Adding Binding: Cut strips of fabric, fold them in half lengthwise, and sew them around the quilt’s edges. Hand-stitch the binding’s back for a clean finish.
- Final Inspection: Check for loose threads, untrimmed edges, and ensure all seams are secure.
FAQ
1. What size should the finished Scrap Jar Stars quilt be?
The size depends on the number of blocks you create and the layout. A small lap quilt may require 12 blocks, while a larger quilt may need 36 or more.
2. Can beginners attempt this pattern?
Yes! The pattern is beginner-friendly, with straightforward techniques like HSTs and 9-patch assembly.
3. What fabrics work best for this project?
Cotton fabrics are ideal due to their durability and ease of handling during piecing and quilting.
4. How can I make the stars more vibrant?
Use contrasting colors and bold patterns for the scrap fabrics. The higher the contrast, the more the stars will pop.
5. How long does it take to complete this quilt?
The time varies based on your experience and available time. A dedicated quilter might finish in a week, while casual crafters may take longer.
6. Can I use precut fabric for this pattern?
Absolutely! Charm packs or jelly rolls work perfectly for the 2.5-inch squares needed for this pattern.
Join our VIP broadcast list and gain access to exclusive patterns, all for free. As a VIP member, you’ll receive the best patterns daily, delivered directly to your device. ✨📱 It’s a unique opportunity to stay up-to-date with the latest trends and designs, curated just for you. Don’t miss out on enhancing your projects and discovering new inspirations with the best patterns every day! 🎨🔝
JOIN NOW
Conclusion
In this Scrap Jar Stars – Tutorial, we’ve explored the steps to create a stunning quilt from fabric scraps. From preparing materials to piecing star blocks and finishing the quilt, this project offers a fulfilling and creative experience for quilters of all levels.
PATTERN HERE
Try this project, share your journey, and let us know your thoughts and suggestions in the comments below. Your creativity inspires others to embark on their quilting adventures!


