
The Scrappy Hunter’s Star – a finished quilt tutorial is a wonderful resource for quilting enthusiasts looking to create a striking and dynamic quilt.
This timeless pattern combines precision and creativity, making it ideal for quilters of all skill levels.
The scrappy approach allows you to use various fabric pieces, turning your stash into a cohesive and eye-catching design.
The Hunter’s Star pattern is known for its interplay of contrast and geometry, and this tutorial will guide you through every step of the process.
Whether you’re a beginner or an experienced quilter, the Scrappy Hunter’s Star – a finished quilt tutorial provides an opportunity to explore the beauty of scrappy quilting while mastering the intricate details of this pattern.
This tutorial emphasizes efficient cutting techniques, proper alignment, and a step-by-step construction process to help you achieve stunning results. Let’s dive into the essentials of creating your very own Scrappy Hunter’s Star quilt.
The beauty of the Hunter’s Star pattern lies in its adaptability. By using a variety of fabrics, you can create a quilt that reflects your personality and creativity. The scrappy approach adds a layer of spontaneity to the process, making each quilt unique. Ready to get started? Let’s gather the materials and explore the steps!
1. Materials Needed for a Scrappy Hunter’s Star Quilt
Before starting your Scrappy Hunter’s Star quilt, you’ll need to prepare your materials. Having everything on hand will streamline the quilting process and ensure you enjoy every step without interruptions.
Fabric Choices
A scrappy quilt thrives on variety. Gather an assortment of fabric pieces in contrasting light and dark tones. The contrast is crucial for highlighting the star design. Use leftover fabrics from previous projects or purchase charm packs for a cohesive look. Ensure your fabrics are pre-washed to avoid shrinking and color bleeding.
Cutting Tools
Invest in a rotary cutter, a self-healing cutting mat, and a transparent quilting ruler. These tools will help you cut precise shapes, which is essential for creating sharp and accurate star points. Sharp scissors are also handy for trimming threads and small adjustments.
Sewing Machine and Thread
A reliable sewing machine is necessary for piecing the quilt blocks together. Use a neutral-colored thread, such as gray or beige, that blends well with most fabrics. This ensures your stitches are subtle and don’t detract from the design.
Iron and Pressing Board
Pressing is a key step in quilting. A steam iron and a sturdy pressing board will help you flatten seams and align blocks neatly. Pressing between each step ensures your quilt lies flat and looks professional.
Batting and Backing Fabric
Choose a high-quality batting to add warmth and structure to your quilt. For the backing, select a fabric that complements your scrappy quilt top. The backing can be a single piece or pieced together from scraps for an extra creative touch.
Quilt Binding
Binding fabric is needed to finish the edges of your quilt. Pick a fabric that ties the quilt’s colors together. Striped or solid bindings work well with scrappy designs.
2. Step-by-Step Instructions for the Scrappy Hunter’s Star Pattern
Now that your materials are ready, let’s move on to the step-by-step process for creating the Scrappy Hunter’s Star quilt. This section covers cutting, piecing, and assembling the quilt blocks.
Step 1: Cutting the Fabric
Begin by cutting your fabric into squares and triangles. The Hunter’s Star pattern is built on half-square triangles (HSTs), so accuracy is vital. Use your rotary cutter and ruler to cut pieces to the exact measurements specified in your chosen quilt size. Remember to keep your light and dark fabrics separate for easy pairing.
Step 2: Constructing Half-Square Triangles
Pair one light fabric square with one dark fabric square, placing them right sides together. Draw a diagonal line across the square, then sew a 1/4-inch seam on both sides of the line. Cut along the marked line to create two HSTs. Press the seams toward the darker fabric and trim to the correct size.
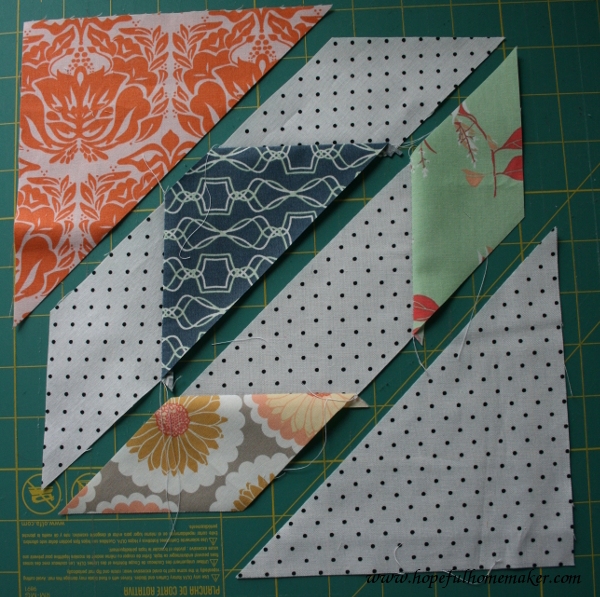
Step 3: Arranging the Blocks
Lay out your HSTs on a flat surface to visualize the Hunter’s Star design. Arrange the pieces in a way that alternates light and dark triangles to create the star shape. Experiment with the layout until you’re satisfied with the overall design.
Step 4: Piecing the Blocks Together
Sew the HSTs together in rows, then join the rows to complete each block. Use pins to secure your fabric layers and ensure precise alignment. Press each seam as you go, alternating seam directions to reduce bulk.
Step 5: Assembling the Quilt Top
Once all the blocks are completed, arrange them on a design wall or flat surface to finalize the quilt top layout. Sew the blocks together in rows, then join the rows to form the entire quilt top. Press the seams carefully to keep the quilt flat.
Step 6: Quilting and Finishing
Layer the quilt top, batting, and backing fabric. Baste the layers together using pins or a temporary spray adhesive. Quilt as desired, either with straight-line quilting or free-motion quilting to add texture. Finally, attach the binding to finish the edges and secure it with hand or machine stitching.
3. Tips for Making a Perfect Scrappy Hunter’s Star Quilt
Here are some practical tips to make your quilting process smoother and your results even more impressive:
Embrace the Scrappiness
Don’t worry about perfect fabric coordination. The charm of a scrappy quilt lies in its diversity. Mix colors, patterns, and textures to create a dynamic design.
Prioritize Contrast
Ensure there’s a clear distinction between your light and dark fabrics. High contrast enhances the star pattern and makes it pop.
Use Chain Piecing
To save time, use the chain piecing method. Sew multiple HSTs in a continuous line without cutting the thread between pieces. This technique speeds up the process and reduces thread waste.
Test Layouts Before Sewing
Before stitching your blocks together, try different layouts to find the most appealing arrangement. Take a photo of each option to compare them easily.
Keep Seams Consistent
Maintaining a consistent 1/4-inch seam allowance is crucial for aligning your blocks accurately. Use a seam guide or presser foot attachment to stay precise.
Practice Quilting Designs
If you’re new to quilting, practice your chosen quilting design on a small fabric scrap before working on the actual quilt. This helps build confidence and ensures better results.
4. Benefits of Making a Scrappy Hunter’s Star Quilt
Quilting the Scrappy Hunter’s Star offers several advantages:
Resourcefulness
It’s a fantastic way to use up fabric scraps, reducing waste and creating something beautiful from leftovers.
Creativity
The scrappy approach encourages creativity, allowing you to experiment with colors and patterns freely.
Skill Development
This pattern enhances precision, cutting, and piecing skills, making it ideal for intermediate quilters looking to improve.
Personalization
Each scrappy quilt is unique, reflecting the quilter’s personality and style.
Versatility
The Hunter’s Star pattern suits various sizes, from small wall hangings to large bed quilts.
Timeless Design
The geometric star pattern is classic and never goes out of style, ensuring your quilt remains a treasured piece for years.
FAQ: Scrappy Hunter’s Star – A Finished Quilt Tutorial
Q: What size should my HSTs be for this quilt?
A: The size of your HSTs depends on your desired quilt size. Refer to your pattern for specific measurements, but common sizes range from 3 to 6 inches.
Q: Can I make this quilt without a sewing machine?
A: While it’s possible to hand-stitch the blocks, using a sewing machine is much faster and ensures consistent seams.
Q: How do I prevent fabric from shifting while sewing?
A: Use pins or clips to secure the layers and sew slowly to maintain control.
Q: Can I use precut fabrics for this pattern?
A: Yes, precut fabric bundles like charm packs or fat quarters are perfect for scrappy quilts and save time on cutting.
Q: What’s the best way to store my quilt?
A: Store your quilt in a cool, dry place. Avoid direct sunlight to prevent fading, and consider using acid-free tissue paper for long-term storage.
Q: How do I wash a finished quilt?
A: Wash your quilt on a gentle cycle with cold water and mild detergent. Air-dry it or use a low-heat setting in the dryer.
Join our VIP broadcast list and gain access to exclusive patterns, all for free. As a VIP member, you’ll receive the best patterns daily, delivered directly to your device. ✨📱 It’s a unique opportunity to stay up-to-date with the latest trends and designs, curated just for you. Don’t miss out on enhancing your projects and discovering new inspirations with the best patterns every day! 🎨🔝
Conclusion
The Scrappy Hunter’s Star – a finished quilt tutorial offers an exciting opportunity to create a vibrant and timeless quilt. By following the steps and tips outlined in this guide, you can craft a stunning masterpiece that reflects your creativity.
Don’t forget to experiment with colors and layouts to make the quilt truly your own. We’d love to hear your thoughts and suggestions, so please leave a comment below. Happy quilting!


