
Pie Carrier Sewing Pattern

If you’re looking to explore a fun and creative quilting project, the Scrappy “Lifesaver” Blocks pattern is a fantastic option. These blocks combine bright colors and various fabric scraps to create a playful, dynamic design that adds personality to any quilt.
Whether you are a seasoned quilter or a beginner, this pattern will help you experiment with different fabric combinations while creating a beautiful, cohesive quilt.
The beauty of the Scrappy “Lifesaver” Blocks lies in their simplicity and versatility. These blocks are not only visually appealing but also allow you to repurpose leftover fabric, making them an eco-friendly choice for your quilting projects.
As you dive into this tutorial, you’ll learn how to make these vibrant, charming blocks and incorporate them into a larger quilt or use them for smaller projects like pillow covers or tote bags.
In this guide, we’ll take you through the step-by-step process of creating the Scrappy “Lifesaver” Blocks, from selecting fabric to assembling the blocks.
The key to making these blocks stand out is selecting a variety of fabrics that complement each other while providing contrast and visual interest. Let’s dive into the fun world of scrappy quilting!
One of the most enjoyable aspects of creating Scrappy “Lifesaver” Blocks is the freedom to choose from a variety of fabric scraps. The first step is to select fabrics that will work well together. The best way to approach this is by choosing fabrics with a common theme, whether it’s color, pattern, or texture.
Start by pulling together fabrics from your stash or collecting leftover bits from previous projects. The beauty of scrappy blocks is that they don’t require you to buy new fabric — it’s all about using what you already have. You can mix and match different colors, prints, and textures, but aim to keep the palette balanced. Too many contrasting fabrics can overwhelm the design, so it’s best to maintain a harmony of shades.
When selecting fabrics, it’s helpful to consider the background fabric for your blocks. A neutral background, like white or beige, can make the colorful fabrics stand out more. Alternatively, you can use a contrasting background color to make your Scrappy “Lifesaver” Blocks pop with vibrancy. Make sure to cut your fabrics into consistent-sized squares or strips, as this will ensure uniformity throughout the block-making process.
Once you’ve selected your fabric, it’s time to cut it into the appropriate shapes for the Scrappy “Lifesaver” Blocks. For each block, you’ll need squares and rectangular pieces of fabric. The size of these pieces will depend on the finished size of your blocks. However, a common starting size for scrappy blocks is 2.5 inches by 2.5 inches for the smaller squares and 4.5 inches by 2.5 inches for the rectangular pieces.
Use a rotary cutter, ruler, and mat to ensure precise cuts. Accuracy is key when piecing together quilt blocks, so take your time with this step. If you don’t have a rotary cutter, fabric scissors will work, but be sure to cut carefully for straight edges.
Once your fabric pieces are cut, organize them into piles based on their position in the block. This will help streamline the assembly process. If you’re using several different fabrics, grouping them by color or pattern can make it easier to assemble the blocks later on.
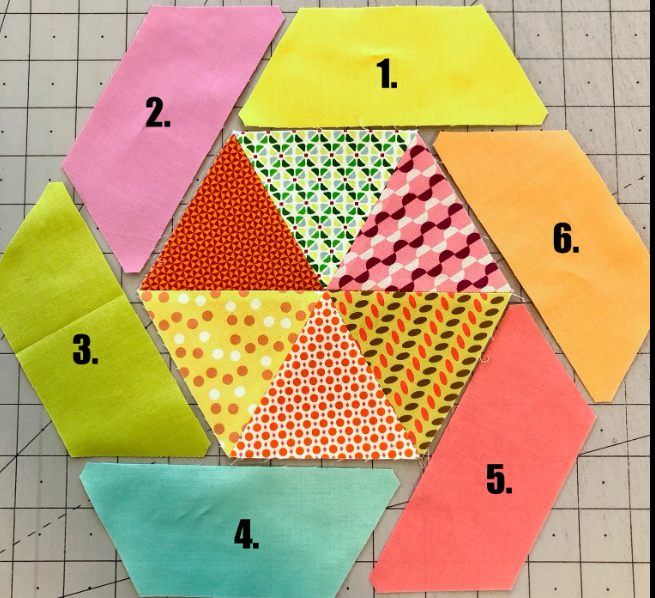
Now that your fabric is prepped and ready, it’s time to start assembling your Scrappy “Lifesaver” Blocks. Begin by laying out your fabric pieces in the shape of a cross, as this is the basic structure of the “lifesaver” design. You’ll use the square pieces as the central part of the block, and the rectangular strips will form the arms of the cross.
Start by sewing together the smaller square pieces into the center of the block. Use a quarter-inch seam allowance to join them, and press the seams as you go to keep the block neat. Next, attach the rectangular fabric strips to each side of the square, sewing them together to create the arms of the cross. Again, use the same seam allowance and press the seams flat.
As you sew the pieces together, be mindful of the fabric’s direction and placement. Try to maintain symmetry throughout the block, ensuring that the arms are even and the central square is centered. Once all the pieces are joined, give your block a final press to smooth out any wrinkles.
Repeat this process for as many blocks as you need, keeping in mind that each Scrappy “Lifesaver” Block is unique. The mix of colors and patterns in each block will give your quilt an eclectic, charming look.
Once you’ve finished all your Scrappy “Lifesaver” Blocks, it’s time to assemble them into a quilt. You can choose to sew the blocks together in a straight grid or opt for a more creative arrangement. Make sure the seams are aligned properly and that the blocks are joined securely.
If you want to add borders to your quilt, this is the stage where you’ll do it. A simple border around the edges of the quilt can help frame the design and give it a polished look. You can use a contrasting fabric or go for a more subtle, neutral border to keep the focus on the Scrappy “Lifesaver” Blocks.
Once the quilt top is complete, it’s time to quilt and bind your project. Quilting adds texture and can help bring the blocks together visually. After quilting, bind the edges to finish your quilt with a clean, professional look.
Q1: How do I know what fabrics will go well together for scrappy blocks?
A1: When choosing fabrics for your Scrappy “Lifesaver” Blocks, try to stick with a consistent color scheme or theme. You can mix patterns, but make sure the colors complement each other. For example, using a mix of warm-toned fabrics (reds, oranges, yellows) or cool-toned fabrics (blues, greens, purples) can help create a cohesive look.
Q2: Can I use pre-cut fabric for these blocks?
A2: Yes, pre-cut fabric such as charm squares or jelly rolls can work great for Scrappy “Lifesaver” Blocks. They are already cut into uniform pieces, saving you time on cutting. Just ensure the pieces fit the size requirements for the pattern.
Q3: How many blocks do I need for a full quilt?
A3: The number of Scrappy “Lifesaver” Blocks you’ll need depends on the size of the quilt you want to make. For example, a twin-size quilt might require around 60 blocks, while a lap quilt could use 30 or fewer. Plan your quilt layout based on your desired size.
Q4: How can I make my blocks more interesting?
A4: To make your Scrappy “Lifesaver” Blocks stand out, consider incorporating unique fabrics, such as novelty prints or vintage fabrics. You can also experiment with varying the size of the blocks to create a more dynamic design.
Q5: What is the best way to press my seams?
A5: Press your seams as you go to ensure the block stays flat and neat. You can press seams open or to one side, depending on your preference. Pressing helps set the stitches and gives your quilt blocks a crisp, professional finish.
Join our VIP broadcast list and gain access to exclusive patterns, all for free. As a VIP member, you’ll receive the best patterns daily, delivered directly to your device. ✨📱 It’s a unique opportunity to stay up-to-date with the latest trends and designs, curated just for you. Don’t miss out on enhancing your projects and discovering new inspirations with the best patterns every day! 🎨🔝
Creating Scrappy “Lifesaver” Blocks is an enjoyable and rewarding quilting project. By using fabric scraps and experimenting with colors and patterns, you can create a stunning quilt that reflects your unique style. Whether you’re new to quilting or an experienced crafter, this project is a great way to hone your skills and create something beautiful.
We’d love to hear about your experience with the Scrappy “Lifesaver” Blocks pattern! Share your feedback and suggestions in the comments section below, and feel free to showcase your completed quilts. Happy quilting!


