
Pie Carrier Sewing Pattern

If you’ve ever wanted to add a touch of charm and creativity to your home decor, this guide on how to Sew a Beautiful Quilt-Style Cushion Cover – TUTORIAL is just what you need.
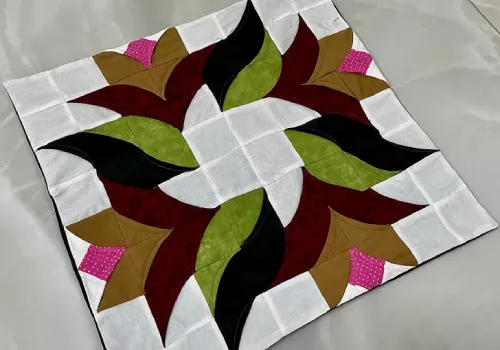
Quilt-style cushion covers are a perfect way to combine practicality with artistry, transforming ordinary cushions into standout pieces for your living space.
Whether you’re a seasoned sewist or a beginner, this tutorial will walk you through each step with clear instructions and helpful tips.
A quilt-style cushion cover allows you to experiment with colors, patterns, and textures while honing your quilting skills.
By repurposing fabric scraps or using your favorite prints, you can create a one-of-a-kind accessory that reflects your personal style. Let’s dive into the process and discover how rewarding it is to craft your own cushion cover.
Ready to bring your vision to life? Let’s get started!
To sew a beautiful quilt-style cushion cover, the first step is gathering all the materials you’ll need. Having the right tools and supplies ensures a smooth and enjoyable sewing experience.
Gathering these materials in advance will save time and help you stay focused on the creative process.
Before you begin sewing, it’s important to plan your design. A quilt-style cushion cover offers endless possibilities for patterns and layouts.
Taking time to plan your design will ensure a cohesive and beautiful result.
With your design ready, it’s time to bring your cushion cover to life through sewing and quilting.
This step transforms your fabric pieces into a cohesive quilted panel for your cushion cover.
Now that your quilted panel is ready, the final step is assembling the cushion cover.
Congratulations! You’ve successfully created a beautiful quilt-style cushion cover.
1. Can I use fabric scraps for this project? Yes! Fabric scraps are perfect for quilt-style projects, adding variety and reducing waste.
2. What size should my cushion cover be? The size depends on your cushion insert. Add an extra half-inch to each side for seam allowances.
3. Do I need a quilting machine? A regular sewing machine works fine for most quilt-style cushion covers. Use a walking foot for better results.
4. How do I clean my cushion cover? Machine wash on a gentle cycle or hand wash, depending on the fabric. Air dry to preserve its shape.
5. Can I add embellishments? Absolutely! Consider adding buttons, embroidery, or applique for extra flair.
6. How long does it take to complete this project? The time varies based on your experience and design complexity but typically ranges from 2 to 6 hours.
Join our VIP broadcast list and gain access to exclusive patterns, all for free. As a VIP member, you’ll receive the best patterns daily, delivered directly to your device. ✨📱 It’s a unique opportunity to stay up-to-date with the latest trends and designs, curated just for you. Don’t miss out on enhancing your projects and discovering new inspirations with the best patterns every day! 🎨🔝
This guide on Sew a Beautiful Quilt-Style Cushion Cover – TUTORIAL demonstrates how easy and rewarding it is to create custom home decor.
By following these steps, you’ll enhance your sewing skills and produce a functional, decorative piece that reflects your creativity. Don’t forget to share your thoughts, experiences, and suggestions in the comments below. Happy sewing!


