
Pie Carrier Sewing Pattern

Sew Your Own Structured Zipper Bag is a wonderful project for anyone who enjoys sewing and wants to create a practical and stylish accessory. By learning how to Sew Your Own Structured Zipper Bag, you’ll not only expand your sewing skills but also end up with a versatile bag that can be used for cosmetics, tools, or even as a small travel organizer.
Structured zipper bags are popular because they keep their shape, protect the items inside, and look professional, making them perfect for gifting or selling at craft fairs.
When you choose to Sew Your Own Structured Zipper Bag, you gain full creative control over every detail. From selecting fabrics and colors that match your personality to customizing the size for your needs, this project lets you express your creativity while producing something functional.
Unlike mass-produced bags, a handmade zipper bag feels personal and unique. Plus, working on a structured design helps you practice techniques like installing zippers, adding interfacing, and sewing straight seams.
Another reason to try a Sew Your Own Structured Zipper Bag project is sustainability. Instead of buying new bags or using disposable pouches, you can repurpose fabric scraps or old garments into something useful and long-lasting.
This is a small but meaningful step toward reducing waste and making conscious crafting choices. In the following sections, we’ll cover everything you need to know—from materials and preparation to step-by-step instructions, creative customization ideas, and tips for gifting or selling your finished bag.
To Sew Your Own Structured Zipper Bag successfully, gathering the right materials is essential. Choose a sturdy cotton or canvas fabric for the exterior, as these materials will help your bag maintain its shape. For the lining, lighter cotton or polyester blends work well, giving the inside a smooth, finished look. Select a coordinating or contrasting zipper that complements your chosen fabrics for a polished appearance.
Interfacing is a crucial part of making your bag structured. Fusible interfacing or foam stabilizer will add the stiffness needed to hold the bag upright. Without it, your bag might collapse or look floppy. Always read the interfacing instructions and test a small piece of fabric before fusing to ensure compatibility. When preparing to Sew Your Own Structured Zipper Bag, having high-quality interfacing will make a noticeable difference in the final product.
Gather your basic sewing tools: a sewing machine, sharp scissors or rotary cutter, pins or clips, a ruler or measuring tape, and a marking tool. A zipper foot for your sewing machine will help you sew neatly along the zipper teeth. Organizing your workspace and ensuring you have everything on hand will make the process smooth and enjoyable.
Prewashing and pressing your fabrics before cutting is highly recommended. This prevents shrinkage after your bag is assembled and gives you clean, crisp pieces to work with. Take the time to iron your fabrics—it may seem like a small step, but it contributes to a more professional finish when you Sew Your Own Structured Zipper Bag.
Cut your fabric pieces according to the dimensions suggested by your pattern or your own measurements. Double-check your cuts to ensure accuracy, as even small discrepancies can affect how well the bag pieces align. Careful preparation is key to achieving a structured, well-fitted result.
Finally, consider the purpose of your bag when selecting materials. If you’re making a makeup bag, a waterproof lining might be a smart choice. For a tool bag, heavier-duty fabrics will provide extra durability. Thoughtful preparation sets you up for success with your Sew Your Own Structured Zipper Bag.
Start by fusing the interfacing or foam stabilizer to the wrong side of your exterior fabric pieces. This will give your bag its structure and make sewing easier. Follow the manufacturer’s instructions carefully for the best results. Attaching the interfacing first ensures that the pieces remain stable throughout the construction of your Sew Your Own Structured Zipper Bag.
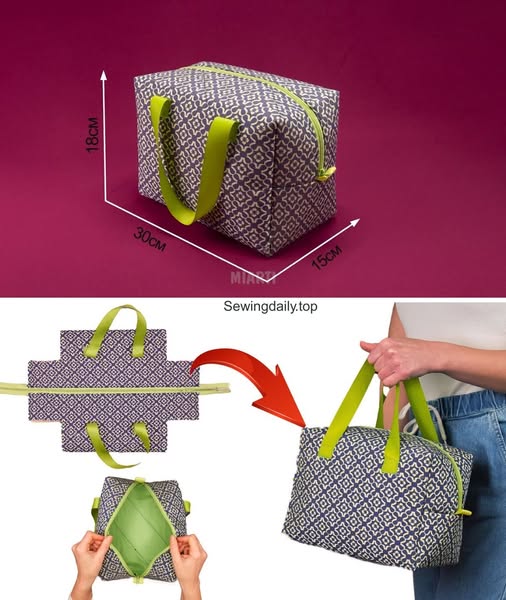
Next, install the zipper. Place the zipper face-down along the top edge of one exterior fabric piece, aligning the edges. Place the lining fabric face-down on top, creating a zipper sandwich. Pin or clip in place and use your zipper foot to sew along the edge. Repeat the process for the other side of the zipper, attaching the second exterior and lining pieces. When you open it, the zipper should sit neatly between the fabrics.
Once the zipper is installed, press the fabrics away from the zipper and topstitch along both sides. This step is important not only for appearance but also to keep the fabric from catching in the zipper teeth. A neat topstitch gives your Sew Your Own Structured Zipper Bag a polished, professional finish.
Align the exterior fabric pieces right sides together and the lining pieces right sides together. Pin or clip the edges, making sure to leave a small opening in the lining for turning the bag later. Sew around all edges, except for the opening. This creates the main body of your bag.
To create a structured, boxy shape, pinch each corner and sew across it to form boxed corners. Measure evenly on all corners to ensure your bag sits flat and balanced. Trim the excess fabric from the corners to reduce bulk. This step transforms your flat bag into a three-dimensional Sew Your Own Structured Zipper Bag.
Finally, turn the bag right side out through the opening in the lining. Push out the corners gently for a crisp shape. Sew the opening in the lining closed using a slip stitch or machine stitch, then push the lining into the bag. Zip it closed, and your beautiful structured zipper bag is complete!
One of the best parts about choosing to Sew Your Own Structured Zipper Bag is the freedom to personalize it. Start by experimenting with fabric combinations. Use bold prints for the exterior and a coordinating solid for the lining, or mix different patterns for a playful design.
Consider adding decorative elements such as embroidery or applique to the exterior fabric before assembling the bag. A monogram, floral design, or themed motif can elevate your bag and make it truly one-of-a-kind. These personal touches are especially meaningful if you plan to give your bag as a gift.
You can also add pockets to the inside or outside of the bag for extra functionality. A small interior pocket is perfect for keeping items like lip balm or keys organized. An exterior slip pocket can hold a phone or notes, making your Sew Your Own Structured Zipper Bag even more versatile.
Changing the size of your bag is another creative option. Scale up for a larger travel pouch or down for a coin purse or pencil case. Simply adjust the dimensions of your fabric pieces and zipper length accordingly.
Try experimenting with different types of zippers. A metal zipper can give your bag a modern, high-end look, while a colorful plastic zipper adds a fun, casual vibe. Zipper pulls or charms are another way to enhance your bag’s style.
Lastly, consider using specialty fabrics or linings to match specific uses. A laminated cotton lining is ideal for a makeup bag, while denim or waxed canvas makes a rugged tool pouch. Customizing these details will make your Sew Your Own Structured Zipper Bag perfectly suited to your needs.
Once you Sew Your Own Structured Zipper Bag, you’ll be proud to display it or share it with others. Use your new bag at home to organize sewing notions, cosmetics, or stationery. Displaying it on your dresser or craft table shows off your handiwork while keeping things tidy.
Handmade zipper bags make excellent gifts for birthdays, holidays, or special occasions. Choose fabrics that match the recipient’s personality or hobbies. Adding a small note inside saying you made it by hand makes the gift even more meaningful.
If you participate in craft fairs or online marketplaces, structured zipper bags are popular items to sell. They are practical, customizable, and appealing to a wide range of customers. Highlight the durability and handmade quality of your Sew Your Own Structured Zipper Bag to attract buyers.
Another creative use is as eco-friendly gift wrap. Place small presents inside your zipper bag instead of using disposable wrapping paper. This adds value to your gift and reduces waste, aligning with sustainable crafting principles.
Structured zipper bags can also be used for travel. Use them to pack toiletries, accessories, or chargers neatly in your suitcase. The structured design prevents items from being crushed, and the zipper closure keeps everything secure.
Finally, consider sharing photos of your finished bags on social media or with your sewing community. Showcasing your work can inspire others to try the Sew Your Own Structured Zipper Bag project and connect you with fellow crafters who appreciate handmade creations.
Q1: Is the Sew Your Own Structured Zipper Bag project suitable for beginners?
Yes, it is beginner-friendly if you are comfortable with basic sewing skills and using a zipper foot.
Q2: What type of interfacing should I use for structure?
Fusible foam stabilizer or medium-weight fusible interfacing works best for creating a firm, structured shape.
Q3: Can I adjust the size of the zipper bag?
Absolutely. Simply modify the fabric dimensions and zipper length to make smaller or larger bags.
Q4: How do I prevent my zipper from puckering?
Use a zipper foot, sew slowly, and press your fabrics before stitching to keep everything smooth.
Q5: What fabrics are best for a structured bag?
Canvas, quilting cotton with interfacing, denim, or waxed canvas provide excellent structure and durability.
Q6: Can I wash my zipper bag in the machine?
Yes, but use gentle settings and air-dry to maintain the bag’s shape and structure.
Learning how to Sew Your Own Structured Zipper Bag is a rewarding experience that combines creativity, practicality, and skill-building. By carefully preparing your materials, following clear steps, and adding personal touches, you can create a professional-quality bag tailored to your needs or style.
Whether you plan to use it, gift it, or sell it, a handmade structured zipper bag is both functional and beautiful. Share your honest opinions and suggestions about this project—we’d love to hear how your Sew Your Own Structured Zipper Bag turned out and what tips or ideas you discovered along the way!


