
Creating a quilt can be a meditative and deeply satisfying experience. The Simply Serene Quilt – Tutorial is perfect for quilters of all skill levels who are looking for a project that blends simplicity with elegance.
This pattern, known for its calming design and straightforward construction, is ideal for crafting a quilt that brings warmth and tranquility to any space.
In this tutorial, we will guide you through each step of the process, offering tips and insights to make your quilting journey enjoyable and successful.
Quilting has long been celebrated as both an art and a practical craft. The Simply Serene Quilt – Tutorial focuses on achieving a harmonious balance between aesthetics and functionality.
Whether you’re making this quilt as a gift or to adorn your home, the clean lines and soothing patterns will leave a lasting impression. With its easy-to-follow instructions, this tutorial ensures that even beginners can achieve professional-looking results.
Before we dive into the specifics, let’s take a moment to gather our materials and prepare our workspace.
Having everything ready will make the process smooth and enjoyable. The Simply Serene Quilt – Tutorial requires basic quilting supplies, fabric in complementary colors, and a sewing machine. Now that we’re prepared, let’s explore the steps to bring this beautiful quilt to life.
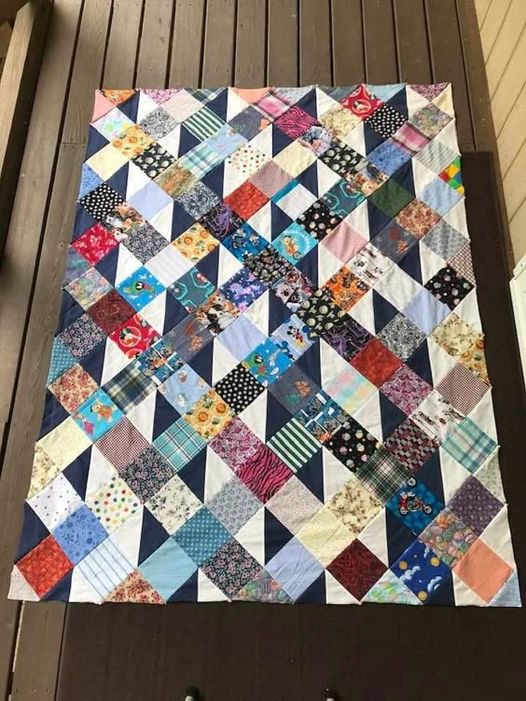
1. Choosing the Perfect Fabrics
The fabric selection is one of the most exciting parts of any quilting project. For the Simply Serene Quilt, choosing the right materials will set the tone for the entire design.
- Start with a color palette: Opt for soft, serene hues like pastels, neutrals, or muted blues and greens to maintain the calming theme of the quilt. These colors are not only soothing but also versatile, making the quilt suitable for various settings.
- Mix solids and prints: Combining solid fabrics with subtle patterns, such as florals or geometric designs, adds depth and interest to your quilt without overwhelming its simplicity.
- Consider fabric texture: Using high-quality cotton is recommended, but incorporating fabrics with slight texture, such as linen blends, can enhance the tactile appeal of your quilt.
- Plan for contrast: Ensure there’s enough contrast between your fabrics to make the design stand out. Light and dark shades in complementary colors work well together.
- Prewash your fabrics: Washing your fabrics beforehand helps prevent shrinkage and color bleeding later on. It also makes the material softer and easier to work with.
- Coordinate binding and backing: Choose a fabric for the binding and backing that complements the quilt’s front. A solid or subtly patterned fabric often works best for these components.
2. Preparing Your Quilt Blocks
The next step involves cutting and piecing together the quilt blocks that will form the foundation of your design.
- Measure and cut accurately: Use a rotary cutter and quilting ruler to ensure precise measurements. For the Simply Serene Quilt, standard block sizes like 10×10 inches work well.
- Organize your blocks: Lay out your cut pieces before sewing to visualize the overall design. This step allows you to make adjustments and ensure a balanced look.
- Chain piecing for efficiency: Sew your blocks in an assembly-line style to save time and maintain consistency in your seams.
- Press seams carefully: After sewing, press the seams to one side using an iron. This creates a clean finish and reduces bulk in your quilt.
- Arrange blocks thoughtfully: Experiment with the layout of your blocks before final assembly. Aim for a harmonious arrangement that showcases the contrast and balance of your chosen fabrics.
- Trim as needed: Ensure all blocks are uniform in size to make assembly easier and avoid mismatched seams.
3. Assembling the Quilt Top
Once your blocks are ready, it’s time to piece them together to create the quilt top.
- Lay out your design: Arrange the blocks on a flat surface to finalize the placement. Take a picture for reference to keep track of the layout.
- Sew in rows: Start by sewing the blocks into rows, aligning the edges carefully. Pinning the blocks together can help maintain accuracy.
- Join the rows: Once the rows are complete, sew them together to form the quilt top. Press the seams between rows to reduce bulk.
- Add sashing and borders: Including sashing between rows and a border around the edges can frame your design beautifully. Use fabrics that complement the main quilt top.
- Check for symmetry: Step back and evaluate the quilt top for symmetry and balance. Make any necessary adjustments before proceeding.
- Square the quilt top: Trim the edges to ensure the quilt top is perfectly square, making the next steps easier.
4. Quilting and Finishing Touches
The final steps involve quilting your layers together and adding the finishing touches to complete your project.
- Layer the quilt: Create a quilt sandwich with the backing fabric, batting, and quilt top. Smooth out any wrinkles and secure the layers with safety pins or basting spray.
- Choose a quilting design: Decide on a quilting pattern that complements your quilt. Straight-line quilting or simple free-motion designs work well with the serene theme.
- Quilt with care: Use a walking foot on your sewing machine for even stitching. Start quilting from the center and work outward to prevent shifting.
- Bind the edges: Sew the binding to the quilt’s edges, folding it over and stitching it down for a polished finish. Hand-stitching the binding provides a clean, professional look.
- Inspect for quality: Check your quilt for any loose threads or areas that need additional stitching. Trim excess fabric or batting if needed.
- Label your quilt: Add a label with your name, date, and any other details to commemorate your work.
FAQ: Simply Serene Quilt – Tutorial
1. What size should the finished quilt be? The size can vary depending on your preference. Common sizes include lap quilts (50×65 inches) and bed quilts (90×108 inches).
2. How long does it take to complete this quilt? This depends on your experience and available time. On average, it takes about 15-20 hours spread over several days.
3. Can I hand-sew the quilt instead of using a machine? Yes, you can hand-sew the quilt, but it will take longer. Machine sewing is faster and provides stronger seams.
4. What type of batting is best for this quilt? Cotton batting is a popular choice for its softness and breathability. Polyester batting can add more loft if desired.
5. How can I customize the quilt design? Experiment with different fabric patterns, colors, or block arrangements to make the quilt uniquely yours.
6. Can I wash the quilt after finishing it? Yes, wash the quilt gently in cold water and air-dry or tumble-dry on low heat.
Join our VIP broadcast list and gain access to exclusive patterns, all for free. As a VIP member, you’ll receive the best patterns daily, delivered directly to your device. ✨📱 It’s a unique opportunity to stay up-to-date with the latest trends and designs, curated just for you. Don’t miss out on enhancing your projects and discovering new inspirations with the best patterns every day! 🎨🔝
Conclusion
The Simply Serene Quilt – Tutorial provides a wonderful opportunity to create a beautiful and calming quilt that reflects your style.
By following these steps, you can enjoy the process and produce a finished product to be proud of.
Whether for personal use or as a gift, this quilt is sure to bring joy and comfort. We’d love to hear your thoughts! Share your experience and suggestions in the comments below. Happy quilting!


