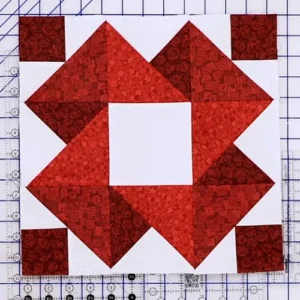
The Slip Knot – Free Quilt Block Pattern is an elegant and versatile design, perfect for quilters looking to add a unique touch to their projects.
This pattern features interlocking loops that resemble the classic slip knot, creating a visually appealing motif suitable for quilts, pillows, and other fabric crafts.
Whether you’re a beginner or an experienced quilter, this block offers a manageable yet exciting challenge.
Image from google.
Creating a quilt block like the Slip Knot is a rewarding process that allows for endless customization. With the right fabric choices, it can look modern, traditional, or whimsical. It’s a fantastic way to practice piecing techniques and experiment with color combinations.
SEE MORE PATTERNS
In this guide, we’ll walk you through the steps to create your own Slip Knot – Free Quilt Block Pattern. We’ll discuss materials, provide detailed instructions, and share tips to ensure your quilt block turns out beautifully.
1. Materials Needed for the Slip Knot Quilt Block
Before starting the Slip Knot – Free Quilt Block Pattern, gather the following materials to make the process smooth and enjoyable:
- Fabric
Choose three to four complementary fabrics: one for the background and others for the loops. Opt for high-quality cotton quilting fabric for the best results.
- Cutting Tools
A rotary cutter and self-healing cutting mat are essential for accurate cutting. Sharp fabric scissors are also helpful for trimming threads.
- Ruler
A quilting ruler ensures precise measurements, which are crucial for a neat block.
- Sewing Machine and Thread
A reliable sewing machine with a neutral-colored thread works well for this pattern.
- Iron and Ironing Board
Pressing seams as you sew is vital for achieving a flat, polished quilt block.
- Pins or Clips
These help secure fabric pieces together before stitching.
Having these tools and materials ready will make your quilting experience more efficient and enjoyable.
2. Step-by-Step Instructions for the Slip Knot Quilt Block
Follow these instructions to create a beautiful Slip Knot – Free Quilt Block Pattern:
- Cut the Fabric Pieces
Using your rotary cutter and ruler, cut the background and loop fabrics into the required shapes. Typical sizes include squares, rectangles, and strips, depending on your desired block dimensions.
- Assemble the Loops
Start by sewing the loop pieces together. Ensure consistent seam allowances for a clean finish. Press the seams open or to one side, as preferred.
- Create the Background
Sew the background fabric pieces together to form the block’s base. This step provides the structure for the loops.
- Piece the Loops into the Background
Carefully align the loop pieces with the background, pinning them in place before sewing. Double-check alignment to maintain the integrity of the slip knot design.
- Trim and Square the Block
After sewing, trim any excess fabric and square the block to its final size. A perfectly squared block ensures easier assembly when combining multiple blocks in a quilt.
- Press and Admire Your Work
Give the block a final press, ensuring all seams are flat. Take a moment to appreciate the intricate design and your hard work!
3. Creative Ways to Use the Slip Knot Quilt Block
The Slip Knot – Free Quilt Block Pattern is incredibly versatile and can be used in various projects:
- Quilts
Incorporate multiple blocks into a full quilt for a cohesive design. Experiment with alternating colors to create visual interest.
- Pillows
Make a single block into a decorative pillow. It’s a quick project and a great way to showcase the pattern.
- Table Runners
Combine a row of Slip Knot blocks to create an elegant table runner.
- Wall Hangings
A single block framed or stretched over a canvas makes a stunning wall hanging.
- Tote Bags
Use the block as a panel for a handmade tote bag, adding charm and functionality.
- Gift Wrap
For a unique presentation, use quilt blocks to wrap small gifts or make reusable fabric wraps.
4. Tips for Quilting Success
To make the most of your Slip Knot – Free Quilt Block Pattern, consider these tips:
- Choose Fabrics Thoughtfully
Select colors and patterns that contrast well to highlight the slip knot design.
- Maintain Consistent Seam Allowances
Accurate seam allowances are critical for ensuring the pieces fit together perfectly.
- Use a Design Wall
Lay out your pieces on a design wall before sewing to visualize the final block.
- Work in Good Lighting
Proper lighting helps you see your stitches clearly, preventing errors.
- Practice Patience
Take your time with cutting and piecing. Precision leads to a polished final product.
- Experiment with Sizes
Adjust the block size to suit your project needs, whether it’s for a small coaster or a large quilt.
FAQ
1. What is the standard size for a Slip Knot quilt block?
The block can be customized, but 12” x 12” is a common size for this pattern.
2. Can beginners make this quilt block?
Yes! With clear instructions and patience, beginners can successfully create this block.
3. How long does it take to make a single block?
Depending on experience, a single block can take 1-2 hours, including cutting and sewing.
4. What type of fabric works best?
Cotton quilting fabric is recommended for its durability and ease of use.
5. Can I hand-sew the block instead of using a machine?
Yes, hand-sewing is an option, though it will take longer. Ensure your stitches are small and consistent.
6. How do I incorporate this block into a larger quilt?
Combine multiple blocks with sashing or alternate with solid blocks for a stunning quilt design.
Join our VIP broadcast list and gain access to exclusive patterns, all for free. As a VIP member, you’ll receive the best patterns daily, delivered directly to your device. ✨📱 It’s a unique opportunity to stay up-to-date with the latest trends and designs, curated just for you. Don’t miss out on enhancing your projects and discovering new inspirations with the best patterns every day! 🎨🔝
JOIN NOW
Conclusion
The Slip Knot – Free Quilt Block Pattern is a delightful addition to any quilter’s repertoire. This guide has provided step-by-step instructions, creative uses, and valuable tips to help you master this pattern. Whether you’re creating a quilt, pillow, or wall hanging, this design offers endless possibilities for creativity.
PATTERN HERE
We’d love to hear from you! Share your experiences, thoughts, and suggestions in the comments below. Happy quilting!