
The Snail Trail Easy Block Quilt Tutorial – Free Pattern is a must-try for quilters who want to create a visually stunning quilt using a simple and accessible design.
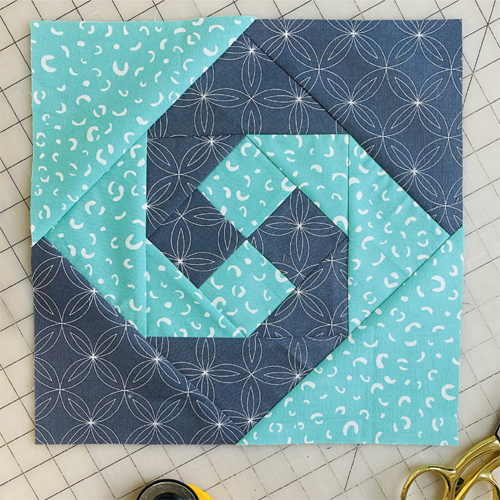
This classic block pattern is known for its swirling effect that mimics a snail’s spiral trail. It’s a versatile design that can be adapted to various color schemes, making it suitable for beginners and advanced quilters alike.
With this tutorial, you’ll learn how to craft this timeless pattern effortlessly while incorporating your own creative flair.
The Snail Trail quilt block is created using simple squares and triangles arranged in a spiral formation.
Despite its intricate appearance, the block is surprisingly straightforward to construct, especially with our step-by-step guide.
Whether you’re crafting a quilt for a cozy home addition or a thoughtful gift, this free pattern offers an easy way to achieve professional-looking results.
In this article, we’ll guide you through the entire process, from selecting materials to piecing the blocks together.
We’ll also share tips for achieving precision and discuss how you can customize your quilt for a truly unique finish. Let’s dive into this exciting quilting adventure and master the Snail Trail Easy Block Quilt Tutorial – Free Pattern!
1. Materials and Tools Needed for the Snail Trail Quilt
Before starting your Snail Trail Easy Block Quilt, it’s essential to gather all the necessary materials and tools. A well-prepared workspace ensures smooth progress and reduces frustration. Below are the key items you’ll need.
The primary material for your quilt is fabric. Choose at least two contrasting fabrics to highlight the spiral effect of the Snail Trail block. Cotton fabric is highly recommended because of its durability and ease of handling. Depending on the size of your quilt, you may need a variety of fabric cuts, such as fat quarters or yardage.
Next, prepare your quilting tools. Essential items include a rotary cutter, cutting mat, and ruler for precise fabric cutting. These tools ensure clean edges, which are crucial for accurate piecing. Additionally, a sewing machine with a quarter-inch seam foot will help you maintain consistent seam allowances throughout the project.
Finally, gather accessories like thread, pins, and an iron for pressing seams. A design wall or flat surface for laying out your blocks will also come in handy as you arrange the spiral pattern. With these materials and tools ready, you’re set to begin your Snail Trail Easy Block Quilt journey.
2. Step-by-Step Instructions for Creating the Snail Trail Block
Creating the Snail Trail block is a systematic process that involves assembling squares and triangles in a spiral arrangement. Follow these steps to construct your blocks efficiently.
Start by cutting your fabric pieces. Each block consists of a center square, two smaller triangles, and two larger triangles. Use your rotary cutter and ruler to ensure accuracy, as precise cuts are vital for the spiral design.
Begin with the center square. This is the foundation of the Snail Trail block, so choose a fabric that contrasts well with the surrounding pieces. Sew two small triangles to opposite sides of the square, pressing the seams outward. This forms the first layer of the spiral.
Next, attach two larger triangles to the remaining sides of the square. Align the edges carefully to maintain symmetry. Once sewn, press the seams outward again. At this stage, the spiral shape begins to emerge.
Repeat the process by adding additional layers of triangles, alternating colors to enhance the spiral effect. Each new layer should follow the same principle: small triangles for the next sides, then larger triangles for the corners.
Once all layers are complete, trim the block to ensure it’s square and the edges are clean. This final step ensures your Snail Trail blocks will align perfectly when pieced together in the quilt.
3. Arranging and Assembling the Quilt Top
After constructing the individual Snail Trail blocks, the next step is to arrange them into a cohesive quilt top. This part of the process allows you to experiment with layouts and customize the overall design.
Start by laying out your blocks on a flat surface or design wall. Play with different arrangements to see how the spiral patterns interact. You can opt for a traditional uniform layout or mix and match orientations for a dynamic look.
Consider adding sashing or borders between the blocks. Sashing strips can help frame each Snail Trail block, emphasizing the individual spirals. Borders, on the other hand, provide a finished edge and can tie the entire quilt together.
Once satisfied with the layout, begin piecing the blocks together. Sew them row by row, ensuring the seams align at each intersection. Press the seams between rows in alternating directions to reduce bulk and create a smooth quilt top.
If you’ve included sashing, attach it to each block before sewing the rows together. For borders, measure the edges of your quilt top and cut fabric strips accordingly. Attach the borders last, sewing them to the sides, then the top and bottom.
With the quilt top assembled, give it a final press to ensure all seams lie flat. Your Snail Trail Easy Block Quilt is now ready for the finishing touches.
4. Finishing the Snail Trail Easy Block Quilt
The final steps in creating your Snail Trail Easy Block Quilt involve layering, quilting, and binding. These processes bring your quilt to life and prepare it for use or display.
Start by layering the quilt top, batting, and backing fabric. Smooth out any wrinkles and secure the layers with pins or basting spray. This step is crucial for preventing shifting during quilting.
Choose a quilting design that complements the Snail Trail pattern. Simple straight-line quilting works well for a modern look, while free-motion quilting can add intricate details. Use a coordinating thread color that blends with your fabric choices.
Quilt through all layers, starting from the center and working outward. This approach minimizes puckering and ensures even tension. Once quilting is complete, trim any excess batting and backing fabric.
Finally, bind the edges of your quilt. Cut strips of fabric for the binding, fold them in half lengthwise, and sew them to the quilt’s edges. Miter the corners for a polished finish. Hand-stitch the binding’s back for a seamless look.
With the binding complete, your Snail Trail Easy Block Quilt is ready to be enjoyed. Display it on a bed, sofa, or wall to showcase your craftsmanship and creativity.
FAQ – Frequently Asked Questions
1. What is the Snail Trail quilt block?
The Snail Trail quilt block is a classic design featuring a spiral pattern created with squares and triangles. Its swirling effect makes it a popular choice among quilters.
2. Is the Snail Trail pattern suitable for beginners?
Yes, the Snail Trail Easy Block Quilt Tutorial is beginner-friendly. While it requires precise cutting and piecing, the steps are straightforward and easy to follow.
3. What fabrics work best for the Snail Trail quilt?
Cotton fabric is ideal due to its durability and ease of handling. Choose contrasting colors to enhance the spiral effect.
4. How do I ensure my blocks align properly?
Accurate cutting and consistent seam allowances are key. Use a rotary cutter, ruler, and quarter-inch seam foot for precise results.
5. Can I customize the Snail Trail pattern?
Absolutely! Experiment with different color combinations, block sizes, and layouts to create a unique quilt.
Join our VIP broadcast list and gain access to exclusive patterns, all for free. As a VIP member, you’ll receive the best patterns daily, delivered directly to your device. ✨📱 It’s a unique opportunity to stay up-to-date with the latest trends and designs, curated just for you. Don’t miss out on enhancing your projects and discovering new inspirations with the best patterns every day! 🎨🔝
Conclusion
The Snail Trail Easy Block Quilt Tutorial – Free Pattern is a delightful project that combines classic design with modern quilting techniques. By following this guide, you’ll create a stunning quilt that showcases your skills and creativity. Whether for personal use or as a gift, this quilt is sure to be cherished for years to come.
We hope you enjoyed this tutorial and feel inspired to start your own Snail Trail Easy Block Quilt. Share your thoughts, experiences, and suggestions in the comments below—we’d love to hear from you. Happy quilting!


