
Pie Carrier Sewing Pattern

If you’re a quilting enthusiast looking for a festive and creative project, the Snowman Quilt Block – Free Pattern is the perfect choice.
This adorable quilt block captures the charm of winter and adds a touch of personality to any quilt, table runner, or wall hanging.
Whether you’re crafting a seasonal decoration or a gift for a loved one, this free pattern offers endless possibilities for creativity and fun.
The Snowman Quilt Block is not only beginner-friendly but also highly customizable. You can use various fabrics, colors, and embellishments to bring your snowman to life.
From cozy scarves to bright carrot noses, each detail adds a personal touch to your finished quilt block.
In this article, we’ll walk you through the steps to create your own Snowman Quilt Block, covering everything from materials and cutting techniques to assembly and decoration. Let’s dive into this delightful quilting project that’s sure to become a seasonal favorite!
Before you begin creating your Snowman Quilt Block, it’s essential to gather all the necessary materials. Having everything ready will make the process smoother and more enjoyable.
Start with fabric. You’ll need white or cream fabric for the snowman’s body, as well as various colors for the scarf, hat, and background. Quilting cotton is ideal due to its durability and wide range of designs.
Next, ensure you have a reliable cutting tool. A rotary cutter and a self-healing mat are indispensable for achieving precise cuts. Pair these tools with a clear quilting ruler for accurate measurements.
Choose thread that complements your fabric. Neutral tones work well for piecing the block, while colored threads can add decorative touches. Make sure your sewing machine is equipped with a sharp needle suitable for quilting.
Other essentials include an iron for pressing seams, pins or clips for securing fabric pieces, and fusible webbing if you plan to applique any details. Finally, download and print the Free Pattern to use as a guide throughout the project.
By preparing these materials in advance, you’ll set yourself up for a stress-free and enjoyable quilting experience.
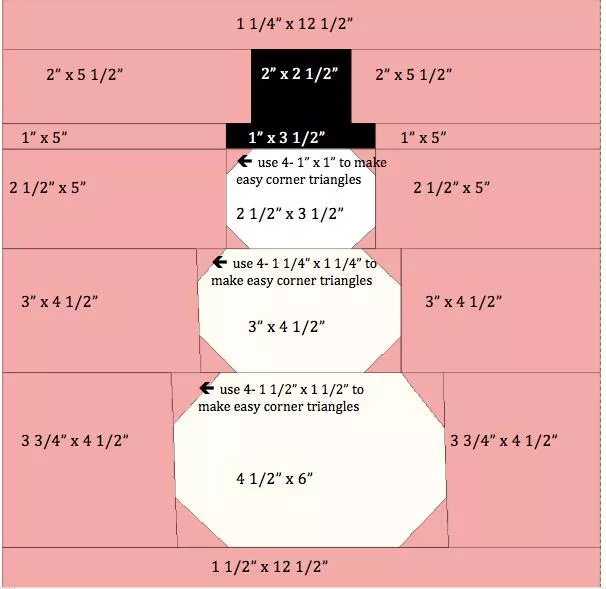
Creating a flawless Snowman Quilt Block starts with precise cutting and preparation. This step ensures that your pieces fit together seamlessly during assembly.
Begin by cutting the fabric for the snowman’s body. Depending on the pattern’s size, you may need two or three circles of varying diameters. Use templates or circular objects to trace and cut perfect shapes.
Next, cut fabric for the background. These pieces typically consist of squares or rectangles that frame the snowman. Choose colors that contrast with the snowman’s body to make it stand out.
For the hat, scarf, and other accessories, cut smaller pieces in vibrant or patterned fabrics. These elements add character to your snowman and allow you to infuse your personal style into the design.
Don’t forget about the snowman’s facial features! Cut small pieces of black fabric for the eyes and mouth, and use orange for the carrot nose. If you’re adding buttons or other embellishments, gather them at this stage.
Label each fabric piece according to the pattern instructions. This step helps you stay organized and ensures you don’t accidentally mix up pieces.
Finally, press all fabric pieces with an iron to remove wrinkles and achieve crisp edges. Proper preparation is key to a smooth assembly process.
Now that your fabric pieces are ready, it’s time to assemble your Snowman Quilt Block. Follow these steps for a precise and polished result.
Start with the snowman’s body. If you’re using circles, position them on the background fabric, ensuring they’re centered and evenly spaced. Use pins or fusible webbing to secure the pieces in place.
If your pattern includes pieced sections, such as a patchwork background, assemble these first. Sew the squares or rectangles together using a 1/4-inch seam allowance, pressing the seams open as you go.
Next, add the snowman’s accessories. Position the hat, scarf, and facial features according to the pattern. Use applique techniques or edge-stitching to attach these elements securely.
For added detail, consider stitching decorative lines or patterns onto the scarf or hat. These touches can enhance the overall design and make your snowman even more charming.
Assemble the block by sewing the background pieces to the snowman. Double-check your alignment and seam allowances to ensure everything fits together perfectly.
Once the block is complete, give it a final press with your iron. This step sets the seams and prepares the block for incorporation into a larger project.
The finishing touches bring your Snowman Quilt Block to life and make it truly unique. This step is where your creativity can shine!
Start by embellishing your snowman. Add buttons, beads, or embroidery for details like eyes, mouths, or buttons on the body. Choose materials that complement your fabric and won’t interfere with washing.
Consider adding texture to your block. Quilting stitches, whether by hand or machine, can create dimension and highlight specific elements. Use contrasting thread for a bold look or matching thread for subtlety.
Frame your block with borders if desired. Adding a border can enhance the design and make it easier to incorporate the block into a larger quilt. Choose a coordinating fabric that ties the design together.
If you plan to use the block in a quilt, ensure it’s the correct size to match other blocks. Trim any excess fabric carefully, maintaining straight edges and accurate measurements.
Finally, decide how you’ll use your finished block. It can be a standalone decoration, a centerpiece for a quilt, or part of a festive table runner. The possibilities are endless!
Celebrate your accomplishment by showcasing your finished block in your home or gifting it to a loved one.
1. Can beginners make a Snowman Quilt Block?
Absolutely! The Snowman Quilt Block – Free Pattern is beginner-friendly and includes simple steps that are easy to follow.
2. What fabrics work best for this pattern?
Quilting cotton is ideal due to its durability and wide range of designs. Choose contrasting colors for the background and snowman to make the design pop.
3. Do I need special tools for this project?
A rotary cutter, self-healing mat, and quilting ruler are highly recommended for precise cutting. An iron and sewing machine are also essential.
4. How can I personalize my Snowman Quilt Block?
Use unique fabrics, add embellishments like buttons or embroidery, and experiment with different quilting stitches for a personal touch.
5. Can I use this block in larger projects?
Yes! The Snowman Quilt Block can be incorporated into quilts, table runners, wall hangings, and more. Adjust the size as needed for your project.
Join our VIP broadcast list and gain access to exclusive patterns, all for free. As a VIP member, you’ll receive the best patterns daily, delivered directly to your device. ✨📱 It’s a unique opportunity to stay up-to-date with the latest trends and designs, curated just for you. Don’t miss out on enhancing your projects and discovering new inspirations with the best patterns every day! 🎨🔝
The Snowman Quilt Block – Free Pattern is a delightful and versatile project that’s perfect for quilters of all skill levels.
By following this guide, you can create a charming block that captures the joy of winter and showcases your creativity.
We hope this tutorial inspires you to bring your own snowman to life. Share your thoughts, creations, and suggestions in the comments below—we’d love to hear from you! Happy quilting!


