
Pie Carrier Sewing Pattern

If you’re looking to create a stunning quilt that combines intricate design with a touch of whimsy, the Sparrows Quilt Pattern – Tutorial: A Step-by-Step Guide is the perfect project for you. This quilt features a beautiful bird motif, with sparrows gracefully perched across the fabric.
Whether you’re a seasoned quilter or just starting out, this tutorial will walk you through the entire process of making your own sparrow quilt, from selecting fabrics to stitching the final seams. By the end of this guide, you’ll have a stunning quilt that captures the charm of sparrows and the art of quilting.
The Sparrows Quilt Pattern is versatile enough to be customized with different fabrics, colors, and quilting techniques. It can be made as a throw quilt, bedspread, or even a wall hanging.
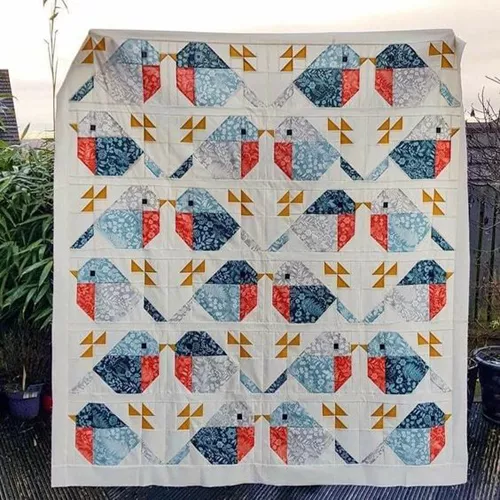
The bird design brings life to any room, and the step-by-step approach in this tutorial ensures that every quilter, regardless of skill level, can confidently create this beautiful quilt.
Throughout this tutorial, we’ll cover everything from the essential materials you’ll need to detailed instructions on how to piece together the sparrows in the quilt block.
Whether you’re a beginner or an experienced quilter, you’ll find helpful tips that will guide you to success with your Sparrows Quilt Pattern.
Before you dive into the process, it’s important to gather all the materials you’ll need for the Sparrows Quilt Pattern – Tutorial: A Step-by-Step Guide. Having everything prepared in advance will help make the process smoother and more enjoyable. Here’s a list of materials you will need:
Once you’ve gathered all your materials, you’ll be ready to begin stitching the sparrow blocks that form the heart of this quilt pattern.
The next step in the Sparrows Quilt Pattern – Tutorial: A Step-by-Step Guide is cutting the fabric pieces for your quilt blocks. The key to a successful quilt lies in precise cutting, so take your time with this step. Here’s how to do it:
By taking the time to accurately cut your fabric pieces, you’ll be able to sew your quilt blocks together without any issues and achieve clean, precise results.
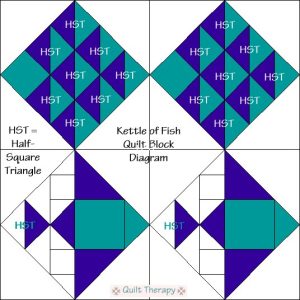
Now that you’ve prepared all your fabric pieces, it’s time to piece them together into the sparrow quilt blocks. This is where the magic happens, as you’ll begin to see the design take shape. Here’s how to proceed:
By following these steps and taking your time with the piecing process, you will be able to create a beautiful sparrow design that flows seamlessly across the quilt.
After you’ve pieced together your sparrow blocks and quilt top, it’s time to quilt and finish the Sparrows Quilt Pattern. This step involves adding the quilt batting and backing fabric, then stitching through all layers to hold everything together. Here’s how to do it:
Once the quilt is finished, you’ll have a beautiful sparrow-inspired piece that’s full of charm and personality.
1. What fabrics are best for the Sparrows Quilt Pattern?
For this quilt, cotton fabric is typically the best choice due to its durability and ease of use. You can also experiment with other fabrics such as linen or flannel for a different texture.
2. Can I hand-sew the Sparrows Quilt?
Yes, it’s possible to hand-sew the quilt, though it may take more time and effort. Using a sewing machine is recommended for faster and more consistent stitching.
3. How long does it take to make a Sparrows Quilt?
The time required depends on your experience level and how much time you can dedicate to the project. For most quilters, it takes several weeks to complete a full-sized quilt.
4. Can I use a different bird design for this quilt?
Yes, you can adapt the pattern to feature different bird motifs. Just adjust the design elements to suit your chosen bird.
5. How do I quilt my Sparrows Quilt?
You can quilt by hand or machine. Machine quilting is quicker, but hand quilting offers a more personalized, intricate finish.
6. How do I make my quilt more colorful?
You can add more colors to the sparrow fabric or use different background fabrics to create a more vibrant quilt. Mixing different color schemes will make your quilt more eye-catching.
Join our VIP broadcast list and gain access to exclusive patterns, all for free. As a VIP member, you’ll receive the best patterns daily, delivered directly to your device. ✨📱 It’s a unique opportunity to stay up-to-date with the latest trends and designs, curated just for you. Don’t miss out on enhancing your projects and discovering new inspirations with the best patterns every day! 🎨🔝
The Sparrows Quilt Pattern – Tutorial: A Step-by-Step Guide provides all the necessary steps to create a beautiful, bird-inspired quilt. From gathering your materials to piecing together the blocks and adding the finishing touches, this tutorial ensures that your quilt will come together beautifully. With patience and attention to detail, you can create a stunning quilt that showcases your quilting skills.
We hope this tutorial has inspired you to start your own sparrow quilt. Feel free to share your thoughts, ask questions, or suggest improvements in the comments below. We’d love to hear from you! Happy quilting!


