
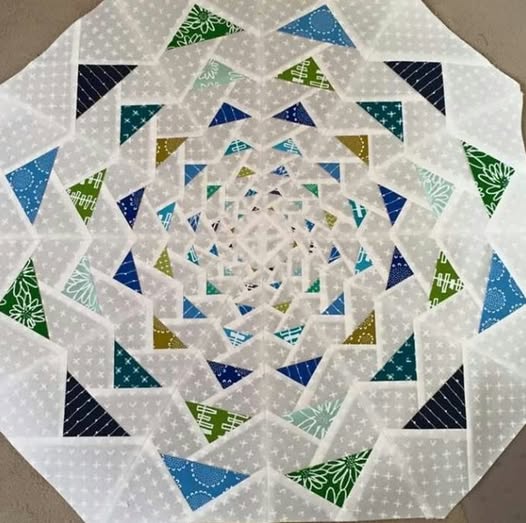
The Spiral Bloom – Quilt block is a stunning design that combines gentle curves, symmetry, and vibrant colors to create a captivating effect in any quilting project. Whether you are a beginner or an experienced quilter, this block is a fantastic way to explore creative expression through fabric and thread.
In this article, you’ll learn how to create the Spiral Bloom – Quilt block, understand the techniques behind it, and get inspired to include it in your next quilt.
This block is often used in modern quilts due to its bold visual appeal. It’s perfect for standalone wall hangings or for creating a cohesive yet dynamic quilt top. The secret to its beauty lies in the smooth transitions of the spiral shape and the floral-inspired symmetry.
With practice and the right tutorial, you’ll find the Spiral Bloom – Quilt block surprisingly approachable, even if you’ve never tried curved piecing before.
Creating the Spiral Bloom – Quilt block offers more than just a visually stunning result—it’s also a great learning opportunity. You’ll get to work on precision cutting, curved seams, and color placement, all of which will strengthen your quilting skills.
This block also opens doors to experimenting with layout ideas, as the spiral motif can be rotated and mirrored for unique effects. Now, let’s take a step-by-step look at how to bring this block to life.
1. Materials and Preparation
Before you begin piecing your Spiral Bloom – Quilt block, it’s important to gather the right materials. Start with high-quality cotton fabrics in contrasting or complementary colors. Using different tones will help emphasize the spiral and bloom features of the design.
You will also need a rotary cutter, a cutting mat, a ruler, and fabric marking tools. Because this block involves curves, having template plastic or printed templates will make your cutting more precise. If you’re using a downloadable pattern, make sure it prints at 100% scale for accuracy.
To assemble the block, use a sewing machine with a ¼” foot for consistent seam allowances. You’ll also want to have pins or clips ready to hold curved seams in place as you sew. Don’t forget to keep your iron nearby; pressing each seam after sewing will help your block lay flat and look professional.
If you’re using a color scheme, lay out your pieces before stitching. This helps to visualize how the Spiral Bloom – Quilt block will look once completed and gives you a chance to adjust your choices. Planning your colors ahead of time ensures balance and enhances the bloom effect.
Finally, take time to cut your pieces accurately. Curved pieces, in particular, require steady hands and patience. If you’re a beginner, consider making a practice block with scrap fabric to get comfortable with the technique before committing to your final project.
Once all materials are prepped and cut, organize them by color or shape. Staying organized throughout the project helps prevent mistakes and makes the sewing process smoother and more enjoyable.
2. Sewing Techniques for Spiral Bloom Block
To construct the Spiral Bloom – Quilt block, begin with the inner spiral segments. These form the foundation of the block and will determine how smoothly your curves fit together. Pin carefully, aligning notches or marks on each piece.
Curved seams are the heart of this pattern, so take your time sewing slowly. Don’t stretch the fabric, and keep your seam allowance consistent throughout. Use pins or clips generously, especially around tighter curves.
After each curved seam, press the fabric gently. Pressing toward the darker fabric usually helps prevent seam shadowing. You can also finger-press first before using your iron for best results. This small step makes a big difference in the final appearance of your Spiral Bloom – Quilt block.
As you move outward from the center, continue building the spiral sections. Each ring you add should align smoothly with the previous one. If you notice puckering or stretching, don’t worry—just adjust gently and resew if needed. Mastering curved seams takes practice, but it’s rewarding.
Repeat the steps of aligning, pinning, sewing, and pressing for each layer of the spiral. As you complete the outer sections of the bloom, you’ll begin to see the floral shape take form. The key is to maintain smooth transitions between pieces.
By the time your block is fully assembled, you’ll have worked on precise piecing, matching seams, and curve management—all essential skills for advanced quilt projects. Your finished Spiral Bloom – Quilt block will be both beautiful and a reflection of your improved craftsmanship.
3. Design Variations and Layout Ideas
The beauty of the Spiral Bloom – Quilt block is how customizable it is. By simply changing the color palette, you can shift the mood of the design—from calm and cool to vibrant and energetic. Consider trying it in solids, batiks, or even prints for a unique effect.
You can create a quilt top made entirely of Spiral Bloom – Quilt blocks arranged in different orientations. Rotating every other block creates a kaleidoscope-like quilt, full of movement and depth. Alternatively, alternate the Spiral Bloom with solid squares for a more modern and clean aesthetic.
Another exciting approach is to play with scale. Make some blocks smaller or larger to create visual variety across your quilt. This also allows you to highlight certain areas or create a focal point. You can use a large center block surrounded by smaller versions of the same block for a framed effect.
If you’re working on a wall hanging or a mini quilt, you might use just one Spiral Bloom – Quilt block in a striking color combination. Add simple borders or quilt heavily around the spiral to make it pop. It becomes a piece of textile art you can display proudly.
You can also integrate the block into other projects like quilted pillow covers, table runners, or bags. Its shape and symmetry make it versatile and visually appealing in many formats. You’re not limited to traditional quilts when using this block.
Lastly, don’t be afraid to experiment. Try ombre fabrics, metallic threads, or even hand quilting to enhance the block. Quilting is as much about creativity as it is about precision, and the Spiral Bloom – Quilt block invites both in equal measure.
4. Tips for Quilting and Finishing
Once your Spiral Bloom – Quilt block is pieced, the next step is quilting. Consider echo quilting around the spiral to enhance its motion. This technique emphasizes the curved shapes and adds texture without overwhelming the design.
Mark your quilting lines using a washable marker or tailor’s chalk. If you prefer a minimal look, straight-line quilting across the block can create a pleasing contrast with the curves of the spiral. Choose a thread color that complements your fabric choices.
If you’re creating a full quilt, plan how your quilting design will flow from block to block. Keeping the quilting continuous saves time and gives the quilt a cohesive look. You might choose a floral motif to match the bloom theme or swirls to echo the spiral.
After quilting, square up your block to ensure clean edges. If you’re combining multiple Spiral Bloom – Quilt blocks, accurate squaring is key to achieving perfect alignment when you assemble the quilt top. Use a large ruler and take your time with this step.
Binding can add a final touch of flair to your project. Try a contrasting binding for a bold frame or use the same fabric as your background for a more seamless edge. Machine binding is quicker, while hand binding gives a softer, more traditional finish.
Finally, don’t forget to label your quilt! Include your name, the date, and the name of the pattern—Spiral Bloom – Quilt block—to celebrate your accomplishment. It’s a thoughtful way to personalize your work and honor the effort you put into each stitch.
FAQ: Spiral Bloom – Quilt Block
What is the skill level needed for the Spiral Bloom – Quilt block?
This block is best suited for confident beginners and intermediate quilters. It involves curved seams and precise piecing, but with patience and practice, beginners can learn it too.
Can I make the Spiral Bloom – Quilt block without templates?
Using templates is highly recommended for accuracy, especially with curved shapes. Templates help ensure each piece fits perfectly, making sewing easier and the final result cleaner.
What size is the finished Spiral Bloom – Quilt block?
Block size may vary depending on the pattern or tutorial you follow. A common finished size is 12” x 12”, but you can scale it larger or smaller based on your project needs.
Is this block suitable for hand sewing?
Yes, it is possible to hand sew this block, though it may take more time and patience. Hand sewing curved seams requires careful pinning and consistent stitching for best results.
How can I avoid puckers when sewing curves?
Pin frequently along the curve, sew slowly, and press after each seam. Practice on scraps to get comfortable with the motion and technique before working on your final pieces.
What are some common uses for the Spiral Bloom – Quilt block?
This block is great for full quilts, wall hangings, mini quilts, pillows, and decorative items like table runners or quilted totes. Its elegant design makes it versatile and striking.
Conclusion
Throughout this guide, we explored the process of creating the Spiral Bloom – Quilt block, from material preparation and sewing techniques to creative design ideas and quilting tips. This block not only challenges your technical skills but also sparks artistic expression through its spiral and floral elegance.
With practice and creativity, you can make each block uniquely your own. Whether it’s a colorful quilt or a single block art piece, the Spiral Bloom – Quilt block brings beauty and sophistication to any project.
Now it’s your turn—try the pattern, play with colors, and enjoy the quilting journey. Don’t forget to share your thoughts below. Have you tried this block? Do you have tips or suggestions? We’d love to hear your opinion and see what you create!


