
Creating a Starburst Quilt is a rewarding experience that allows you to combine creativity with craftsmanship.
This stunning quilt pattern is both eye-catching and versatile, making it a favorite among quilters of all skill levels.
In this tutorial, we will guide you through the steps to create your own Starburst Quilt, covering everything from selecting fabrics to piecing the quilt top. Let’s dive into this exciting journey!
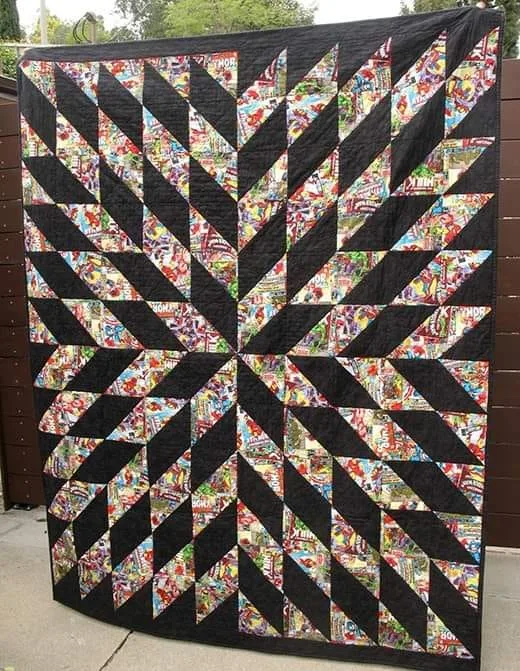
The Starburst Quilt pattern is characterized by its striking geometric shapes that radiate outward like a star. It’s perfect for adding a touch of elegance and style to any space.
Whether you’re an experienced quilter or just starting out, this guide will help you craft a quilt that you’ll be proud to display or gift to a loved one.
Before diving into the details, it’s important to gather the necessary materials and tools. Having everything prepared in advance ensures a smooth and enjoyable quilting process. Let’s start with the first step of this tutorial: gathering your supplies.
1. Gathering Supplies and Choosing Fabrics
The first step in making your Starburst Quilt is collecting the right materials and selecting fabrics that complement your design vision.
Choosing high-quality quilting cotton is essential for achieving a professional finish. Cotton is durable, easy to work with, and available in a wide variety of colors and patterns. Opt for fabrics that contrast well to highlight the starburst design.
Next, you’ll need quilting tools such as a rotary cutter, cutting mat, quilting ruler, and sewing machine. Don’t forget thread, pins, and a reliable iron for pressing seams. Having these tools on hand will make the process efficient and enjoyable.
When selecting fabrics, consider using a combination of solids and prints. Solids provide clean lines for the starburst shape, while prints add texture and visual interest. Pre-cut fabric bundles like fat quarters or layer cakes are excellent for this project, as they come in coordinated colors and patterns.
Think about the size of the quilt you’d like to make. A small throw, lap quilt, or full-size bedspread are all achievable with this pattern. Adjust your fabric quantities accordingly to avoid running out mid-project.
Lastly, wash and press your fabrics before cutting to prevent shrinkage and ensure accurate measurements. Pre-washing also helps to remove excess dye, which can prevent color bleeding later.
2. Cutting and Preparing Quilt Pieces
Once your materials are ready, it’s time to cut the fabric pieces for your Starburst Quilt. Precision in this step is crucial for a seamless design.
Begin by measuring and cutting your fabrics using a rotary cutter and ruler. The Starburst pattern typically requires triangles and squares of varying sizes. Refer to your pattern or template for exact measurements.
Take your time to ensure clean, straight edges. Accurate cuts are the foundation of a well-aligned quilt top. If you’re new to quilting, consider practicing with scrap fabric before cutting your chosen materials.
Label each piece after cutting to keep everything organized. Small sticky notes or fabric clips work well for this purpose. This step will save you time and confusion during the assembly process.
Next, arrange your pieces on a flat surface or design wall to visualize the final layout. This step allows you to experiment with color placement and adjust as needed. A pleasing arrangement enhances the overall impact of your quilt.
Press each piece lightly with an iron to remove any wrinkles. Pressing ensures that the pieces fit together snugly during sewing. Be careful not to distort the fabric by using too much heat or steam.
Finally, double-check your measurements and layout before proceeding. Taking a few extra minutes to review your work can prevent costly mistakes later.
3. Assembling the Quilt Top
With your fabric pieces prepared, it’s time to assemble the quilt top for your Starburst Quilt. This step brings your vision to life.
Start by sewing smaller pieces together to form larger units. For example, sew triangles into squares or diamonds, depending on the design. Use a ¼-inch seam allowance for all seams, which is standard in quilting.
Press seams open or to one side as you go. Pressing seams reduces bulk and ensures that the quilt lies flat. Use a hot iron and press carefully without stretching the fabric.
Once the smaller units are assembled, join them to create rows or blocks. Pay close attention to alignment, as precise joins are essential for maintaining the starburst effect. Pin pieces together before sewing to prevent shifting.
Continue piecing rows or blocks until the entire quilt top is complete. Step back frequently to check for alignment and symmetry. Making adjustments as you go will result in a more polished final product.
After completing the quilt top, give it a final press. Smooth, crisp seams make quilting easier in the next stage. Your Starburst Quilt is now ready for quilting and finishing.
4. Quilting and Finishing Touches
The final steps in your Starburst Quilt journey involve quilting and adding finishing touches. These steps ensure durability and enhance the quilt’s appearance.
Begin by layering your quilt top, batting, and backing fabric. Smooth each layer to eliminate wrinkles and secure them with basting pins or spray adhesive. Proper basting prevents shifting during quilting.
Choose a quilting design that complements the Starburst pattern. Straight-line quilting emphasizes geometric shapes, while free-motion quilting adds texture. Select a thread color that blends with or highlights the fabric.
Quilt your layers together using a sewing machine or by hand. Work from the center outward to avoid puckering. Take your time and enjoy the process, as quilting brings dimension and personality to your project.
After quilting, trim the edges of your quilt to ensure they’re even. Add binding to finish the edges. Binding can be made from coordinating fabric and sewn on using a machine or by hand.
Finally, inspect your quilt for any loose threads or missed stitches. Make any necessary repairs and give the quilt a final press. Your Starburst Quilt is now complete and ready to be admired!
FAQ About Starburst Quilts
What is a Starburst Quilt? A Starburst Quilt is a quilt pattern characterized by geometric shapes radiating outward like a star. It’s a popular choice for its striking visual appeal.
Do I need to be an experienced quilter to make a Starburst Quilt? No, this pattern is suitable for all skill levels. Beginners can follow step-by-step tutorials, while experienced quilters can experiment with advanced techniques.
What fabrics work best for a Starburst Quilt? High-quality quilting cotton is ideal. Use a mix of solids and prints for contrast and visual interest.
Can I make a Starburst Quilt without a sewing machine? Yes, hand sewing is an option, though it will take longer. A sewing machine speeds up the process and ensures consistent stitches.
How do I care for a finished Starburst Quilt? Wash your quilt on a gentle cycle with cold water and air dry or tumble dry on low. Avoid harsh detergents to preserve the fabric’s colors and texture.
What size should my Starburst Quilt be? The size depends on your preference and intended use. Common sizes include throw, twin, and queen. Adjust the fabric quantities accordingly.
Join our VIP broadcast list and gain access to exclusive patterns, all for free. As a VIP member, you’ll receive the best patterns daily, delivered directly to your device. ✨📱 It’s a unique opportunity to stay up-to-date with the latest trends and designs, curated just for you. Don’t miss out on enhancing your projects and discovering new inspirations with the best patterns every day! 🎨🔝
Conclusion
Making a Starburst Quilt is a fulfilling project that combines artistry and technique. This tutorial has guided you through the entire process, from gathering supplies to finishing touches. Whether you’re creating a quilt for yourself or as a gift, the results are sure to impress.
We hope you enjoyed this guide and feel inspired to start your own Starburst Quilt. Please share your thoughts and suggestions in the comments below. Your feedback helps us create even better tutorials in the future!


