
Pie Carrier Sewing Pattern

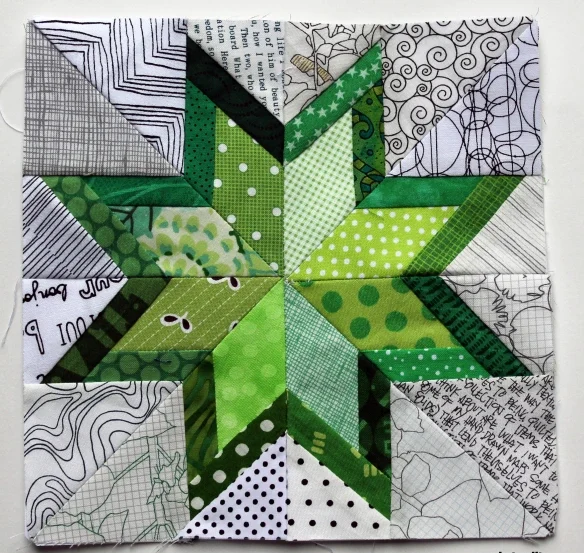
The Starry Night Block Quilt – Tutorial is a dreamy and creative journey into the world of quilting that brings the beauty of a starlit sky to your hands.
Whether you’re a beginner exploring your passion for quilts or an experienced quilter searching for your next masterpiece, this pattern is sure to inspire.
Using simple blocks to recreate a star-filled night, this quilt balances charm and elegance with accessibility.
In this tutorial, you’ll discover how to construct the Starry Night Block Quilt – Tutorial using clear, step-by-step guidance. It’s a relaxing project with room for personal touches, allowing you to experiment with colors, textures, and layouts. The beauty of this quilt lies not only in its celestial design but also in its versatility across styles and spaces.
By the end of this article, you’ll be equipped with all the knowledge and inspiration you need to start your own Starry Night Block Quilt – Tutorial journey. Let’s explore the techniques, materials, and secrets to bringing your quilt to life with stardust magic.
The foundation of the Starry Night Block Quilt – Tutorial lies in the careful construction of the star blocks. Each block represents a shining star, and when repeated across the quilt, the effect is both enchanting and cohesive.
Start by choosing a mix of fabrics in deep navy, twilight blues, and golden yellows to represent the night sky. You can also add lighter shades or even some shimmer to mimic starlight. Cotton fabrics are highly recommended for their ease of use and comfort.
Cutting your fabric precisely is crucial. Use a rotary cutter and ruler to ensure your squares and triangles are sharp and clean. This accuracy helps with block alignment later on.
Sewing the blocks together requires attention to seam allowance. A consistent 1/4-inch seam ensures that your blocks line up perfectly. Press your seams flat or to the side based on your preference.
Once you have a few star blocks completed, lay them out on a design wall or floor. This helps you visualize the overall layout and make adjustments before final assembly.
Don’t be afraid to get creative with the design! Mix star sizes or scatter accent blocks for a more abstract night sky feel. Quilting is your art form—let your imagination guide you.
To begin your Starry Night Block Quilt – Tutorial, gather all necessary materials before cutting or stitching. Having everything ready will make your quilting session smooth and enjoyable.
The fabric selection is key. Choose at least three coordinating colors: a dark background (like navy), a star color (such as yellow or gold), and one accent shade. You may also use pre-cut charm packs or fat quarters.
Essential tools include a rotary cutter, self-healing mat, quilting ruler, sewing machine, pins or clips, and thread that matches your chosen fabric colors. Make sure your rotary blade is sharp for clean cuts.
For batting, opt for a lightweight cotton or cotton-poly blend. This provides the softness you want while maintaining structure. The backing fabric can be a fun print or solid color that complements the front.
Thread choice can enhance or blend with your quilting design. If you want your stitching to stand out, choose a contrasting thread. Otherwise, match the thread to your fabric to keep it subtle.
Don’t forget about marking tools. A fabric-safe pencil or chalk helps mark cutting lines or design details. An iron and pressing board are also essential for keeping your pieces neat and seams crisp.
Begin your Starry Night Block Quilt – Tutorial by organizing your cut pieces into piles based on block type and color. This streamlines your process and helps avoid confusion.
Start with half-square triangles (HSTs), a core element of star blocks. Sew two squares together along the diagonal, then cut and press open. Trim to size if needed. Repeat this step for all necessary star points.
Next, assemble the nine-patch layout typical in many star blocks: four corners with HSTs, four background squares, and a center square. This layout creates the radiant star shape central to the quilt’s design.
Sew the rows together first, pressing seams carefully. Then join the rows to complete the block. Take your time here—precision helps the star points meet neatly in the center.
Once your blocks are ready, arrange them in rows and columns. You may add sashing (strips between blocks) or borders to frame the quilt. Pin the blocks in place and sew the rows together.
After your quilt top is assembled, it’s time to make your quilt sandwich: backing, batting, and quilt top. Baste them together using pins, spray, or hand stitching. This holds everything steady for quilting.
The quilting stage brings your Starry Night Block Quilt – Tutorial to life. Choose a quilting pattern that complements the star design. You can follow the lines of the blocks or create swirls to mimic a starry sky.
If you’re machine quilting, a walking foot or free-motion foot will help depending on the pattern you choose. Test your stitching on scrap fabric before quilting your main piece.
Start quilting from the center and work your way out to avoid puckering. Stitch slowly and evenly, making sure your layers stay aligned. Re-adjust your quilt as needed.
Once quilting is complete, trim any excess batting and backing. Then bind the edges with bias tape or a handmade binding strip. Fold and stitch to secure all around the quilt.
A quilt label is a nice finishing touch. Use fabric markers or embroidery to add your name, date, and a short message. This turns your quilt into a keepsake.
Finally, give your quilt a gentle wash and dry. This helps set the stitches and gives the quilt its soft, cozy texture. Now it’s ready to display, gift, or cuddle under the stars.
What size should I make my Starry Night Block Quilt? The size depends on your purpose. A baby quilt might measure 36″ x 48″, while a throw could be 60″ x 72″. Adjust the number of blocks accordingly.
Can I use scraps for this quilt? Absolutely! This pattern is great for using leftover fabric. Just make sure your scraps are large enough to cut accurate shapes.
Is this tutorial suitable for beginners? Yes, the Starry Night Block Quilt – Tutorial is beginner-friendly with basic sewing skills and patience.
What if my star points don’t match up? Don’t worry! Imperfection is part of handmade charm. Take your time with cutting and sewing to improve accuracy over time.
How long does this quilt take to finish? Depending on your experience, it could take a few days to a few weeks. Set small daily goals and enjoy the process.
Can I machine wash this quilt? Yes, use a gentle cycle with cold water and mild detergent. Air dry or tumble dry on low to preserve the quilt’s quality.
Join our VIP broadcast list and gain access to exclusive patterns, all for free. As a VIP member, you’ll receive the best patterns daily, delivered directly to your device. ✨📱 It’s a unique opportunity to stay up-to-date with the latest trends and designs, curated just for you. Don’t miss out on enhancing your projects and discovering new inspirations with the best patterns every day! 🎨🔝
The Starry Night Block Quilt – Tutorial offers a beautiful and achievable project for quilters of all levels. With simple techniques and space for creativity, it’s a rewarding experience that results in a stunning handmade piece.
We hope this tutorial has inspired you to start your own quilt under the stars. If you tried it or have questions, please leave a comment with your thoughts and suggestions. We’d love to hear from you!


