
Pie Carrier Sewing Pattern

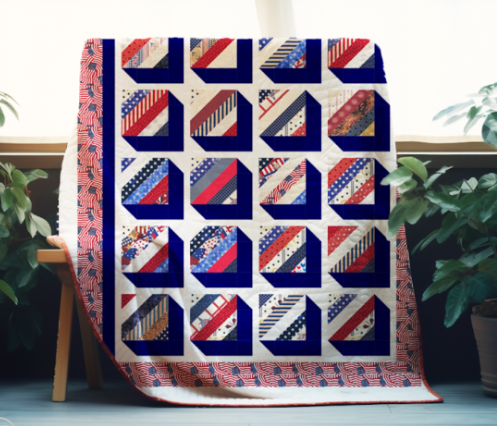
If you love patriotic quilts and timeless designs, the Stars and Stripes Forever – Quilt Pattern is an excellent choice. This pattern combines the beauty of stars with the boldness of stripes, creating a quilt that celebrates freedom, tradition, and creativity.
Whether you are quilting for the Fourth of July, Memorial Day, Veterans Day, or simply to show your love for your country, this pattern will inspire you.
The Stars and Stripes Forever – Quilt Pattern is perfect for quilters of all levels. It balances simplicity with elegance, making it beginner-friendly while offering enough variety for experienced quilters to enjoy.
The combination of star blocks and stripe elements creates a dynamic and visually appealing quilt that looks stunning in any setting.
In this comprehensive guide, we will walk you through everything you need to know about the Stars and Stripes Forever – Quilt Pattern, including materials, cutting instructions, assembly tips, and creative ideas. By the end, you’ll be ready to craft a meaningful quilt that stands as a symbol of unity and pride.
To start the Stars and Stripes Forever – Quilt Pattern, it’s essential to have the right materials and tools. Preparing ahead ensures your quilting process runs smoothly and efficiently.
Begin by selecting your fabrics. Traditionally, this quilt pattern uses red, white, and blue fabrics to represent the American flag. However, you can customize it with different shades or even modern prints to match your style.
You’ll need fabric for the background, star blocks, and stripe sections. Solid fabrics work beautifully for a bold look, but don’t hesitate to mix in subtle prints, tone-on-tone fabrics, or even batiks for extra texture.
A rotary cutter, self-healing cutting mat, and quilting ruler are indispensable tools for this project. They help you achieve precise cuts, which is critical for aligning stars and stripes perfectly.
Make sure your sewing machine is equipped with a 1/4-inch quilting foot. This foot helps maintain consistent seam allowances, which is key for assembling the Stars and Stripes Forever – Quilt Pattern accurately.
Additional supplies include thread in coordinating or neutral colors, straight pins or fabric clips, an iron, and an ironing board. Good pressing throughout the process leads to cleaner, sharper blocks.
Consider using fabric marking tools to assist with cutting lines, sewing guides, and block placement. This simple step can help avoid mistakes, especially when working with intricate star blocks.
In this section of the Stars and Stripes Forever – Quilt Pattern, we will cover how to cut your fabric accurately to prepare for piecing. Getting your measurements right from the start is crucial for a polished finish.
Begin with the stripe sections. Cut long strips from your red and white fabrics. These will form the iconic stripes of the flag motif in your quilt. Make sure all strips are the same width for consistency.
For the star blocks, cut squares and triangles. Typically, stars are constructed using a combination of half-square triangles (HSTs) and quarter-square triangles (QSTs) depending on your chosen block style.
If your quilt includes a navy background for the stars, cut background squares accordingly. These pieces will frame the star points and help them stand out beautifully in the finished quilt.
The corner blocks or filler blocks can be made from either solid fabrics or pieced designs, depending on how complex you want your quilt to be. Cut these to match the size of your star and stripe units.
Lay out all your pieces on a design wall or a flat surface. Arranging them before sewing helps you visualize the overall design and make adjustments to color placement if needed.
Double-check all your measurements and quantities before sewing. This prevents having to recut fabric later and ensures the star and stripe elements align properly in the Stars and Stripes Forever – Quilt Pattern.
Now that your pieces are ready, it’s time to start sewing the Stars and Stripes Forever – Quilt Pattern together. This step brings your quilt to life as the stars and stripes take shape.
Start with the stripe sections. Sew red and white strips together in alternating order. Press seams towards the darker fabric to prevent color bleed through the lighter fabrics.
Move on to the star blocks. Begin by making half-square triangles or flying geese units, depending on the block style. Take your time with accurate trimming to ensure points match perfectly.
Sew the star units together, usually forming a nine-patch layout with four star-point units, four background pieces, and a center square. Check that your points are crisp and seams are even.
Combine the star blocks with the stripe panels according to your layout plan. Pay close attention to alignment, especially where stripes meet other blocks. This creates a cohesive, professional look.
Press all seams carefully as you go. Consistent pressing helps flatten the quilt top and reduces bulk, especially at seam intersections where stars and stripes meet.
Once the rows are assembled, sew them together to complete the quilt top. Give the entire top one final press to smooth it out and prepare it for quilting.
This part of the Stars and Stripes Forever – Quilt Pattern focuses on finishing techniques and creative ways to make your quilt truly special and personal.
Choose your batting and backing fabric. A lightweight cotton batting works well for wall hangings, while a slightly heavier batting provides warmth for throw quilts or bed quilts.
Baste the quilt sandwich using your preferred method—spray basting, pin basting, or thread basting. Ensure it is smooth and free of wrinkles for a clean quilted finish.
Decide on a quilting design. Straight-line quilting following the stripes adds a modern touch, while echo quilting around the stars highlights their shape beautifully.
You can also use free-motion quilting to add swirls, loops, or patriotic motifs like stars, fireworks, or waves for extra texture and interest.
Select a binding fabric that complements the quilt. Traditional red, navy, or striped binding looks fantastic. Apply the binding carefully, mitering corners for a neat finish.
Label your quilt with the date, your name, and a dedication if desired. A simple embroidered label or fabric pen note on the back makes the Stars and Stripes Forever – Quilt Pattern even more meaningful as a gift or keepsake.
What size should the Stars and Stripes Forever quilt be?
It can vary based on your needs. Common sizes include wall hangings (30×40 inches), throws (50×70 inches), or full bed quilts (70×90 inches or larger).
Do I have to use red, white, and blue for this quilt?
No, while traditional colors are popular, you can choose any palette that suits your style. Monochrome, pastels, or modern prints work beautifully too.
What is the easiest star block for beginners in this pattern?
The Sawtooth Star is one of the easiest and most commonly used star blocks in the Stars and Stripes Forever – Quilt Pattern, offering clean lines and simple construction.
How do I keep my stripes straight and flat?
Use lots of pins or fabric clips when sewing long strips together. Press seams carefully and avoid pulling the fabric as you sew to prevent distortion.
Can I make this pattern using pre-cuts like jelly rolls?
Yes, jelly rolls are perfect for the stripe sections since they are pre-cut 2.5-inch strips. For star blocks, you may need additional yardage or fat quarters.
Is this pattern suitable for a quilting beginner?
Absolutely! The Stars and Stripes Forever – Quilt Pattern is beginner-friendly, especially if you start with simple star blocks and focus on accurate strip piecing.
In this guide to the Stars and Stripes Forever – Quilt Pattern, we explored how to select materials, cut fabric precisely, assemble star and stripe blocks, and finish your quilt with beautiful quilting and binding techniques. This pattern is not just about stitching fabric—it’s about crafting a meaningful piece that represents pride, unity, and the art of quilting.
Whether you create a small wall hanging, a festive throw, or a full-size quilt, the Stars and Stripes Forever – Quilt Pattern is sure to be a treasured piece for years to come. Quilters of all levels can enjoy the process and create something truly special.
I would love to hear your feedback! Please share your honest opinion about this tutorial in the comments and let me know if you have any questions or suggestions for future patterns. Your input helps make this quilting community stronger and more creative.


