
If you’re looking for a beautiful quilt pattern that combines elegance with simplicity, then the Stars Over Scott – Quilt Tutorial is the perfect project for you. This stunning quilt design is known for its striking star blocks, which create a mesmerizing effect, making it ideal for both beginners and experienced quilters.
Whether you’re making this quilt for a gift, a personal project, or to decorate your home, this tutorial will guide you through every step of the process, from selecting fabrics to finishing your quilt with a professional touch.
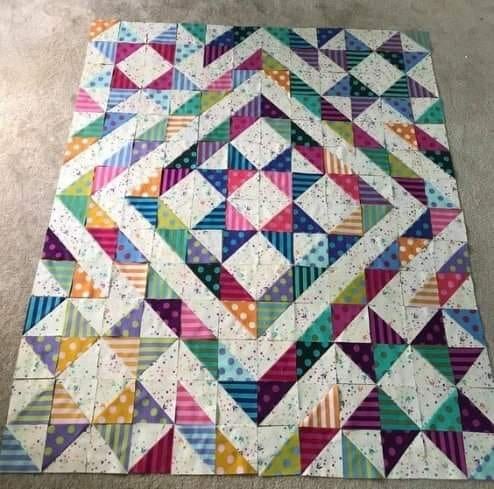
The Stars Over Scott pattern uses a classic design that features star blocks set against a contrasting background, which creates a visually dynamic quilt. The great thing about this quilt pattern is that it can be customized with different fabrics and colors to make it truly unique.
With easy-to-follow instructions and helpful tips, this tutorial will take you from the first stitch to the final quilt, all while ensuring you achieve a perfect result.
In this Stars Over Scott – Quilt Tutorial, we will cover everything from choosing the right fabrics to assembling the quilt top and finishing it with a beautiful binding.
You’ll learn how to create the star blocks, how to join them together, and how to quilt the layers for a professional-looking finish. By the end of this tutorial, you’ll have a gorgeous quilt that you can be proud of. Let’s get started!
1. Materials You Will Need for the Stars Over Scott Quilt
Before diving into the quilt-making process, it’s important to gather all the materials you will need for your Stars Over Scott – Quilt Tutorial. Preparing ahead of time ensures that the project runs smoothly and that you have everything within reach.
To begin with, you’ll need fabric. For the Stars Over Scott quilt, you will require two main fabric types: one for the star blocks and another for the background. Choose contrasting fabrics for a striking effect. Opt for high-quality cotton fabrics, which are durable, easy to work with, and perfect for quilting. Depending on the size of the quilt, you will need approximately 4-5 yards of background fabric and smaller amounts of fabric for the star blocks.
Next, you’ll need a rotary cutter and a cutting mat for precise cutting of your fabric pieces. A quilting ruler is also essential to ensure that your cuts are straight and accurate. Don’t forget to have a sewing machine with a quarter-inch seam allowance foot to help you maintain consistency while piecing the quilt top together. Additionally, a quilt batting will be necessary for the middle layer, along with backing fabric to complete the quilt.
Finally, prepare a quilting needle and thread for hand or machine quilting, depending on your preference. A needle specifically designed for quilting will make the process smoother. A pair of scissors will be needed to trim any excess fabric, and a marking pen or fabric chalk will help you mark your quilting lines.
2. Creating the Star Blocks for Your Quilt
The heart of the Stars Over Scott quilt is the star blocks, which are the focal point of the design. These blocks are created by sewing together different fabric pieces in a way that forms a star pattern. The star blocks can be made in a variety of sizes, but for this tutorial, we’ll focus on 12-inch blocks, which work perfectly for this quilt.
To start, cut your fabrics into the necessary shapes for the star blocks. You will need triangles for the points of the star and squares for the center and corners. Once you’ve cut your fabric pieces, it’s time to begin sewing them together. Begin with the center square, and then attach the triangle pieces to form the arms of the star. Be sure to press the seams as you go to keep your blocks flat and neat.
After you have pieced together the star block, measure it to ensure it is the correct size. If necessary, trim the edges to achieve a perfect 12-inch block. Repeat this process to create the number of star blocks needed for your quilt. You can mix and match fabrics to create a visually appealing design, or keep it uniform for a more traditional look.
It’s important to maintain an accurate seam allowance throughout the process to ensure the blocks fit together properly later on. If you find any of the seams are not aligned correctly, take a moment to rip them out and resew. Precision is key to achieving a professional finish in your Stars Over Scott – Quilt Tutorial.
3. Assembling the Quilt Top
Once you have completed the star blocks, it’s time to assemble them into the quilt top. This part of the process is where you can start to see the final design come together. Lay out your star blocks in the pattern you want to use. For the Stars Over Scott design, the blocks are typically arranged in rows, with the stars alternating with background fabric pieces.
Use a design wall or floor space to lay out the blocks so you can see the arrangement before sewing them together. Make sure the star blocks are evenly spaced and aligned properly. Once you’re happy with the arrangement, start piecing the blocks together row by row. Join the blocks by sewing along the edges, ensuring that the seams line up perfectly.
After you’ve joined the rows, press the seams open or to one side to eliminate bulk and ensure the quilt top lies flat. Once the rows are sewn together, you’ll have a finished quilt top, which is the foundation for the rest of the quilt.
If you want to add some extra flair to your quilt, consider adding a border around the quilt top. A border can help frame the design and provide a finished look to the quilt. Choose a fabric that complements the star blocks and background fabric, and sew it onto the edges of the quilt top.
4. Quilting and Binding the Stars Over Scott Quilt
Now that your quilt top is complete, it’s time to quilt the layers together. This step adds texture and durability to your quilt. Start by layering your quilt top, batting, and backing fabric. The batting provides warmth and thickness, while the backing fabric completes the quilt.
Pin or baste the layers together to prevent shifting during quilting. You can quilt by hand or use a sewing machine. If you’re using a machine, a walking foot will help feed the fabric evenly through the machine. Quilt along the seams of the star blocks to enhance the design, or create an all-over quilting pattern to add texture.
Once the quilt is quilted, it’s time to add the binding. The binding is the final touch that frames your quilt and gives it a polished look. Cut strips of fabric for the binding and sew them together to create one long strip. Attach the binding to the quilt edges by sewing it on with a quarter-inch seam. Fold the binding over to the back of the quilt and hand-stitch it in place for a clean, professional finish.
After you’ve attached the binding, your Stars Over Scott – Quilt is complete! You now have a beautiful, handcrafted quilt that you can be proud of.
Frequently Asked Questions (FAQ)
- How long does it take to make the Stars Over Scott quilt? The time it takes to make a Stars Over Scott quilt depends on your skill level and the amount of time you dedicate to the project. For beginners, it may take a few weeks, while experienced quilters may complete it in a few days.
- Can I use different fabric types for the quilt? Yes, you can experiment with different fabrics, but it’s important to choose fabrics that are suitable for quilting. Cotton is the most popular choice because it’s easy to work with and durable.
- How do I adjust the size of the quilt? To adjust the size of the quilt, simply add or remove rows and columns of star blocks. You can also adjust the size of the star blocks if you prefer a smaller or larger quilt.
- Can I quilt by hand instead of using a machine? Yes, hand quilting is an option for those who prefer a more traditional approach. Hand quilting can add a personal touch to your quilt, but it may take longer than machine quilting.
- How do I care for my Stars Over Scott quilt after it’s finished? Most quilts can be machine-washed on a gentle cycle, but be sure to check the care instructions on the fabric you used. To preserve the quilt’s beauty, wash it in cold water and tumble dry on low heat.
Join our VIP broadcast list and gain access to exclusive patterns, all for free. As a VIP member, you’ll receive the best patterns daily, delivered directly to your device. ✨📱 It’s a unique opportunity to stay up-to-date with the latest trends and designs, curated just for you. Don’t miss out on enhancing your projects and discovering new inspirations with the best patterns every day! 🎨🔝
Conclusion
In this Stars Over Scott – Quilt Tutorial, you’ve learned how to create a stunning quilt that features beautiful star blocks, a simple yet striking design, and a professional finish. From choosing your fabrics and creating the star blocks to assembling the quilt top and quilting the layers together, each step of the process has been covered in detail.
Whether you’re new to quilting or an experienced quilter, this tutorial offers clear instructions and helpful tips that ensure success.
We hope you enjoyed following along with this tutorial and that it inspires you to create your own Stars Over Scott quilt. Please feel free to leave a sincere opinion or share any suggestions in the comments below. Happy quilting!


