
Pie Carrier Sewing Pattern

The Strip Twist – A Quilting Tutorial is a perfect project for quilters of all skill levels who love working with fabric strips to create a visually dynamic design.
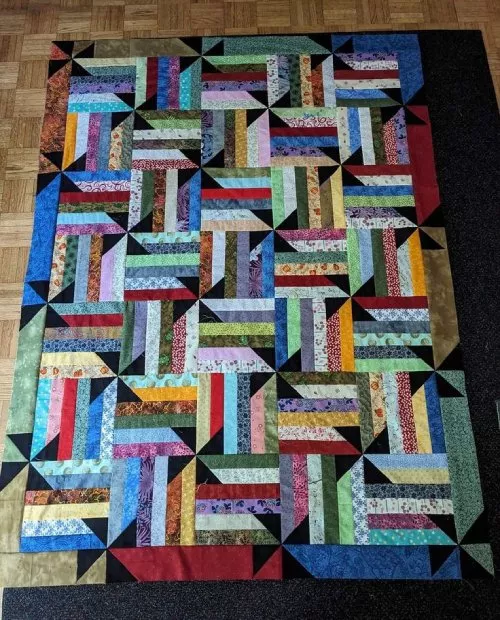
This technique uses fabric strips sewn together and then cut into blocks, which are rotated to create a stunning twist effect.
Whether you’re making a small table runner or a full-sized quilt, the Strip Twist pattern is an excellent choice for its simplicity and striking appearance.
The beauty of the Strip Twist quilt lies in its versatility. You can use scraps from previous projects, jelly rolls, or carefully selected fabrics to create a quilt that reflects your personal style.
This pattern is beginner-friendly but still engaging enough for experienced quilters who want to explore new layouts and color combinations.
In this tutorial, we will guide you step-by-step on how to create a Strip Twist quilt, from selecting your fabrics to assembling your blocks and finishing your quilt. Follow along, and soon you’ll have a beautiful quilt that showcases your quilting skills!
Selecting the right fabrics is the first step in creating a Strip Twist quilt. The colors and patterns you choose will define the final look of your quilt, so take your time selecting materials that complement each other.
When picking fabrics, consider using a mix of light, medium, and dark shades to create contrast. This contrast is essential for making the twisted design stand out. Jelly rolls, which are pre-cut 2.5-inch fabric strips, are an excellent choice for this project since they save time on cutting and ensure uniformity.
If you’re cutting your own strips, use a rotary cutter, quilting ruler, and cutting mat to ensure precision. Cut your fabric into 2.5-inch wide strips and organize them by color or pattern. This preparation step will make the piecing process smoother.
Once your strips are ready, decide on a layout. You can arrange them randomly for a scrappy look or coordinate colors for a more structured appearance. Having a general idea of how you want your quilt to look before sewing will help maintain consistency.
After selecting and organizing your strips, it’s time to sew them together. Take two or three strips at a time and sew them along the long edges with a 1/4-inch seam allowance. Press the seams open or to one side to reduce bulk and keep the quilt top flat.
Repeat this process until you have several strip sets. These will be the foundation for your Strip Twist blocks, which we will cut and assemble in the next section.
Once your strip sets are sewn and pressed, the next step is to cut them into squares and begin assembling the Strip Twist blocks. This is where the magic happens, transforming simple strips into a complex-looking pattern.
Lay your strip sets flat and use a quilting ruler to cut them into uniform squares. The size of your squares will determine the final quilt size, so plan accordingly. A common choice is to cut 8.5-inch squares, but you can adjust this depending on your preference.
After cutting your squares, you’ll begin the twisting process. Take each square and rotate it 90 degrees so that the strips run diagonally instead of horizontally or vertically. This creates the characteristic twist effect that makes this quilt so visually appealing.
Next, pair up squares with complementary color arrangements and sew them together along one edge. Continue sewing squares together in rows, making sure the twists align properly. Press seams after each step to keep the quilt top neat and even.
Once all your squares are joined into rows, sew the rows together, again ensuring alignment between the blocks. Keep pressing the seams as you go to maintain a flat and professional-looking quilt top.
At this stage, you’ll see the full Strip Twist design coming together. You can adjust the placement of blocks before finalizing the assembly to make sure the colors and twists look balanced.
To give your Strip Twist quilt a finished look, consider adding borders and sashing. These elements frame your quilt top and enhance the overall design.
Sashing strips can be placed between blocks to create a clean separation. Using a solid or neutral-colored fabric for sashing helps emphasize the twists in the pattern. Cut sashing strips to match the height of your blocks and sew them between each row before joining rows together.
Borders add another decorative element to your quilt. You can choose a simple border in a coordinating fabric or go for a multi-layered border to add depth. A narrow inner border followed by a wider outer border often works well.
Measure your quilt top and cut border strips accordingly. Sew the borders to the quilt top, starting with the side borders, followed by the top and bottom borders. Press the seams after attaching each border to ensure a smooth finish.
Once the borders are added, the quilt top is complete and ready for the next steps—layering and quilting!
Now that your Strip Twist quilt top is assembled, it’s time to quilt and bind it. Quilting secures the layers together and adds texture, enhancing the design of your quilt.
First, prepare your quilt sandwich by layering the quilt backing, batting, and quilt top. Smooth out any wrinkles and use quilting pins or basting spray to hold the layers in place.
Next, choose a quilting design. You can opt for simple straight-line quilting using a walking foot or go for free-motion quilting with loops, swirls, or other decorative patterns. The quilting stitches should complement the Strip Twist pattern without overwhelming it.
Once the quilting is complete, trim the edges to remove any excess batting and backing. Now, it’s time to add the binding, which finishes the raw edges and gives your quilt a polished look.
Cut binding strips, sew them together, and attach them to the quilt edges using a 1/4-inch seam allowance. Fold the binding over to the back and hand-stitch or machine-stitch it in place.
Your Strip Twist quilt is now complete! Give it a final press and admire your beautiful creation.
1. What size should I make my Strip Twist quilt? The size depends on your preference. Common sizes include baby quilts (36″ x 36″), lap quilts (50″ x 60″), and bed-sized quilts (80″ x 90″).
2. Can I use scraps for a Strip Twist quilt? Yes! This pattern is great for using fabric scraps. Mix and match colors to create a unique quilt.
3. What is the best quilting stitch for this pattern? Straight-line quilting or free-motion quilting work well. Choose a stitch that complements the design.
4. How do I keep my strips straight when sewing? Use a quilting ruler and rotary cutter to ensure precise cuts. Sew with an accurate 1/4-inch seam allowance to maintain alignment.
5. Do I need sashing for this pattern? Sashing is optional. It can add separation between blocks, but you can also sew the blocks together directly for a seamless look.
Join our VIP broadcast list and gain access to exclusive patterns, all for free. As a VIP member, you’ll receive the best patterns daily, delivered directly to your device. ✨📱 It’s a unique opportunity to stay up-to-date with the latest trends and designs, curated just for you. Don’t miss out on enhancing your projects and discovering new inspirations with the best patterns every day! 🎨🔝
The Strip Twist – A Quilting Tutorial provides a step-by-step guide to creating a stunning quilt using simple fabric strips.
We covered everything from fabric selection and cutting to assembly and finishing. This technique is perfect for quilters of all levels and offers endless possibilities for customization.
We hope you enjoyed this tutorial! If you try making a Strip Twist quilt, let us know your thoughts in the comments. Happy quilting!


