
Pie Carrier Sewing Pattern

Creating a Swirling Hexagon Quilt Block is a wonderful way to add dynamic design and texture to your quilt projects. Whether you’re an experienced quilter or a beginner, this tutorial will guide you through each step of making your very own hexagon quilt block.
With its circular pattern and striking geometry, the Swirling Hexagon Quilt Block is a visually appealing design that can be used in a variety of quilt patterns.
This quilt block offers a modern twist on traditional hexagon designs. The swirls within the hexagons can be arranged in numerous ways, allowing you to customize your quilt to suit your style.
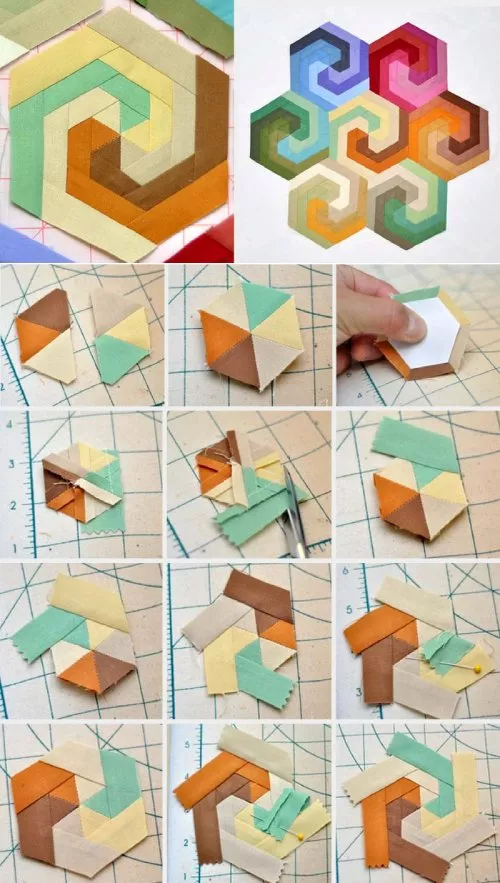
Image from google.
Plus, it’s a versatile block that works well with many fabric collections, whether you prefer bold prints, soft pastels, or a mix of both.
In this Swirling Hexagon Quilt Block – Tutorial, we will walk you through all the necessary steps, from fabric selection to the final stitches. Follow along as we explore the techniques and tips that will help you craft this eye-catching quilt block with ease and confidence.
Before you begin creating your Swirling Hexagon Quilt Block, it’s essential to gather all the materials you’ll need. By ensuring you have everything ready, you’ll make the process smoother and more enjoyable.
The primary materials required for this project are fabric, a quilting ruler, a rotary cutter, and a cutting mat. Choose high-quality quilting cotton fabric for the best results. You’ll need a few different fabrics for the swirl effect and a solid fabric for the background. The combination of bold colors and contrasting fabrics will help the swirls stand out beautifully.
A hexagon template is also important for this project. You can either purchase a pre-made template or create one yourself by cutting a hexagon shape out of sturdy cardstock. Make sure your template is the correct size for the quilt block you want to create.
You’ll also need quilting pins, thread that matches or complements your fabrics, and sewing machine (or you can hand-sew if you prefer). It’s also helpful to have an iron on hand to press the seams as you go.
Once you’ve gathered your materials, you’re ready to start cutting the fabric for your Swirling Hexagon Quilt Block.
The next step in creating your Swirling Hexagon Quilt Block is cutting the fabric pieces. Proper cutting is crucial to ensure that your quilt blocks are symmetrical and fit together perfectly.
First, take your hexagon template and use it to cut the fabric pieces for the swirls. Each swirl section will need to be cut from the fabric you’ve chosen to create that part of the swirl pattern. Use a rotary cutter and quilting ruler to ensure your cuts are clean and precise. You’ll need to cut several hexagon shapes for each block—usually six to eight hexagons per block, depending on the size of the quilt you’re making.
For the background fabric, cut enough hexagons to fill in the spaces between the swirls. If you are creating a quilt with multiple Swirling Hexagon Quilt Blocks, repeat this step for each block, using the same size template.
It’s also a good idea to label your pieces with fabric markers or pins so you know which pieces belong to each section of the swirl. This will keep everything organized and save you time later when you start piecing the hexagons together.
Once you’ve cut all the fabric pieces, you’re ready to move on to the next step: assembling the hexagon sections.
Assembling the pieces of your Swirling Hexagon Quilt Block is the most exciting part of the process, as you begin to see the swirl pattern take shape. This step involves sewing the hexagons together to create a cohesive block.
Start by laying out the hexagons in the order you plan to sew them together. Begin with the center hexagon and attach the surrounding hexagons one at a time. Use a quarter-inch seam allowance for each stitch to ensure your hexagons fit together neatly. Pin each piece in place before sewing to keep the fabric from shifting during stitching.
When sewing the hexagons, take care to match the edges precisely to avoid any gaps or unevenness. It’s helpful to use a sewing machine with a walking foot, as this can help feed the fabric evenly and prevent it from bunching.
As you work around the center hexagon, the swirls will start to form. The beauty of the Swirling Hexagon Quilt Block comes from the way the fabrics interact. Choose contrasting colors for the swirl segments and the background fabric to make the pattern pop. If you want to add more visual interest, experiment with different fabric placements for each quilt block.
Once all the hexagons are sewn together, press the seams to flatten them. This will ensure the block lies flat and looks clean and professional.
The final step in creating your Swirling Hexagon Quilt Block is adding the border and completing the block. The border helps frame the design and gives the block a finished, polished look.
To add the border, cut strips of fabric that are slightly larger than the size of your hexagon block. These strips will be sewn to the edges of your quilt block. Again, use a quarter-inch seam allowance when attaching the border strips.
Once the border is attached, press the seams to set them. This step will give the quilt block its final shape and smooth out any wrinkles or puckering.
At this point, your Swirling Hexagon Quilt Block is complete! If you are making several blocks for a quilt, repeat the process until you have enough blocks to create your desired quilt size. You can arrange the blocks in a variety of patterns to create a dynamic, swirling effect across the quilt.
1. What size should my hexagon template be for a quilt block?
The size of your hexagon template depends on the finished size of your quilt blocks. A typical size for a hexagon quilt block is 6 inches across, but you can adjust this based on your design preferences.
2. Can I make a Swirling Hexagon Quilt Block by hand?
Yes, you can hand-sew the hexagons together using the same techniques. Hand-sewing can be a more time-consuming process, but it allows for a more personalized touch.
3. How do I make sure the seams match up perfectly in a hexagon quilt?
To ensure that your seams match up perfectly, pin each hexagon in place before sewing and use a quarter-inch seam allowance. Take your time and make sure each seam is precise before sewing.
4. Can I use other shapes besides hexagons for this quilt block?
While this tutorial specifically focuses on hexagons, you can experiment with other shapes such as triangles, squares, or diamonds. However, keep in mind that the swirling effect might not be as fluid with different shapes.
5. How do I quilt the Swirling Hexagon Quilt Block once it’s pieced together?
Once your hexagon block is complete, you can quilt it by layering it with backing fabric and batting. Use a quilting machine or hand-quilt with a design of your choice, such as echo quilting, stippling, or custom motifs.
6. How do I care for my finished quilt?
To care for your quilt, wash it in cold water on a gentle cycle and tumble dry on low heat. Avoid using bleach, as it can damage the fabric and stitching.
Join our VIP broadcast list and gain access to exclusive patterns, all for free. As a VIP member, you’ll receive the best patterns daily, delivered directly to your device. ✨📱 It’s a unique opportunity to stay up-to-date with the latest trends and designs, curated just for you. Don’t miss out on enhancing your projects and discovering new inspirations with the best patterns every day! 🎨🔝
In this Swirling Hexagon Quilt Block – Tutorial, we’ve walked you through the process of creating a stunning, dynamic quilt block that adds movement and interest to any quilt project. From gathering materials to cutting, piecing, and finishing the block, every step is designed to help you create a beautiful finished product.
The Swirling Hexagon Quilt Block is a versatile design that can be used in countless ways, whether in a modern quilt or a more traditional setting. With its unique swirl pattern, this quilt block will undoubtedly become a favorite in your quilting repertoire.
We hope this tutorial has inspired you to try creating your own Swirling Hexagon Quilt Block. Please share your thoughts and suggestions in the comments below – we’d love to hear how your quilting project turns out! Happy quilting!


