
The Whirlwind Quilt Block is a dynamic and visually stunning pattern that adds movement and energy to any quilt project.
The swirling design of this block creates a sense of motion, making it a popular choice for quilters looking to add a unique touch to their creations.
In this detailed tutorial, we will walk you through each step of making the Whirlwind quilt block, from gathering materials to finishing the block. Whether you’re a seasoned quilter or just starting, this block is sure to enhance your skills and your quilt.
The Whirlwind Quilt Block is versatile and can be customized to fit a variety of quilt themes. It’s often chosen for its ability to blend traditional and modern styles, making it suitable for both vintage-inspired quilts and contemporary designs.
Throughout this article, we’ll break down the process into easy-to-follow steps, focusing on key techniques to ensure your quilt block turns out perfect every time.
Before we get started, it’s important to have the right materials and tools on hand. Having a clear understanding of each step will ensure your success in creating the Whirlwind Quilt Block. Let’s dive in and explore how to bring this beautiful block to life!
1. Materials Needed for The Whirlwind Quilt Block
To get started with the Whirlwind Quilt Block, it’s crucial to gather the proper materials. Here’s a list of everything you’ll need for the project:
Fabric Choices
The key to making a striking Whirlwind Quilt Block is selecting the right fabrics. Choose two or three contrasting fabrics for the block’s pieces. A combination of light and dark fabrics is ideal, as it will highlight the swirling design. For example, use a bold print for the background and a solid or semi-solid fabric for the swirling sections.
Rotary Cutter and Ruler
A rotary cutter and a quilting ruler are essential for cutting the fabric accurately. This ensures that all pieces are uniform, which is vital for the block’s success.
Cutting Mat
A self-healing cutting mat is a must-have for safe and precise cutting. It provides a clean surface that won’t dull your rotary cutter blades.
Sewing Machine
A sewing machine with a quarter-inch presser foot is perfect for piecing the block together. Consistent seam allowances are essential for achieving sharp points in the design.
Iron and Pressing Board
Pressing the seams as you sew will help your block stay flat and neat. An iron is crucial for setting seams and making sure everything lines up correctly.
Pins or Quilting Clips
Pins or quilting clips help hold your fabric pieces in place while sewing. They are especially helpful when joining the smaller, more intricate pieces of the block.
Fabric Marking Tool
A fabric marking tool, such as chalk or a disappearing ink pen, can be used to mark diagonal lines or seam allowances, ensuring accuracy when piecing the block together.
With these materials gathered, you’re all set to begin the process of making the Whirlwind Quilt Block!
2. Cutting the Fabric for The Whirlwind Quilt Block
Accurate fabric cutting is the first step to ensuring your Whirlwind Quilt Block turns out beautifully. Follow these steps to get the right pieces ready for assembly.
Step 1: Cut the Background Squares
Start by cutting your background fabric into squares. Typically, a 10-inch square is a common starting size, but you can adjust this based on your desired final block size.
Step 2: Cut the Triangular Pieces
Next, cut the fabric for the triangle sections of the block. You’ll need to cut equal-sized triangles from your contrast fabrics. These will form the “whirlwind” effect, so make sure your cuts are precise.
Step 3: Cut the Smaller Accent Pieces
For added detail, cut smaller pieces that will form the secondary sections of the block. These pieces help to balance the swirling effect of the larger triangles.
Step 4: Trim Excess Fabric
After cutting all the necessary pieces, use your quilting ruler to trim any excess fabric. This ensures that all pieces will fit together neatly when sewn.
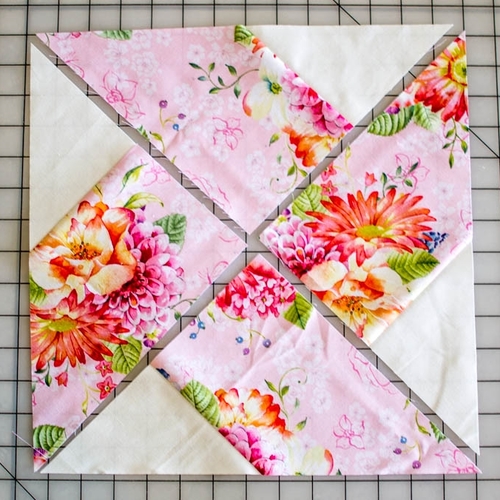
Step 5: Organize Your Pieces
Lay out all your cut pieces on a flat surface according to the block’s design. This allows you to check that you have all the correct pieces and helps you visualize how the final block will come together.
Step 6: Prepare the Pieces for Piecing
Before sewing, it’s important to mark any sewing lines or diagonal seams. This will help you keep everything aligned as you stitch the pieces together.
With all the fabric pieces cut and prepared, you’re ready to move on to the piecing stage.
3. Piecing Together the Whirlwind Quilt Block
The next step in creating the Whirlwind Quilt Block is piecing the cut fabric pieces together. This is where the block begins to take shape, and careful attention to detail is crucial for a successful result.
Step 1: Sew the Triangle Units
Begin by sewing the triangular pieces to the background squares. Align the fabric pieces so that the edges meet at the center, forming a triangle shape. Sew along the edges, making sure to maintain an accurate seam allowance.
Step 2: Press the Seams
After each seam is sewn, press the seams open or to the side, depending on your preference. Pressing will help the fabric lay flat and ensure sharp, clean points at the intersections.
Step 3: Assemble the Swirling Units
Next, combine the smaller triangle pieces with the larger triangles to form the swirling sections of the block. Pin or clip the pieces in place and sew them together, being careful to align the seams properly.
Step 4: Join the Rows
Sew the rows of fabric pieces together, making sure each row lines up perfectly. This step is crucial to maintaining the integrity of the Whirlwind Quilt Block’s swirling design.
Step 5: Connect the Rows
Once all the rows are sewn, it’s time to join them together to complete the block. Pin the rows together and sew along the seams, ensuring that the points align as you go.
Step 6: Trim and Square the Block
Finally, trim the edges of the block to square it up. This will ensure that the block fits properly with other blocks in your quilt.
Your Whirlwind Quilt Block is now pieced together, and it’s time to add the finishing touches!
4. Tips for Customizing The Whirlwind Quilt Block
While the basic Whirlwind Quilt Block is beautiful on its own, there are plenty of ways to customize it and make it your own. Here are some ideas for adding a personal touch to your block:
Experiment with Color Palettes
One of the easiest ways to make the Whirlwind Quilt Block unique is by experimenting with different color combinations. For a bold, dramatic effect, try using bright, contrasting colors. For a softer look, opt for pastel shades or a monochromatic color scheme.
Use Different Fabric Types
Incorporating a variety of fabric types, such as cotton, linen, or even batik fabrics, can add texture and depth to your block. Play around with different materials to see how they change the look of the design.
Scale the Block
The Whirlwind Quilt Block can be made in various sizes. You can create smaller blocks for intricate quilt designs or larger blocks for a bold statement. Adjust the size based on the project you’re working on.
Add Embellishments
To give your block an extra touch of flair, consider adding embellishments such as embroidery, appliqué, or fabric paint. These details can enhance the swirling effect and create a more personalized design.
Combine with Other Blocks
Mix and match the Whirlwind Quilt Block with other quilt blocks to create a complex and visually interesting quilt. Consider pairing it with simple blocks like squares or rectangles to allow the Whirlwind design to stand out.
Use for Table Runners or Home Décor
In addition to quilts, the Whirlwind Quilt Block can be used to create table runners, pillows, and other home décor items. Its striking design makes it perfect for accent pieces in any room.
These customization options allow you to tailor the Whirlwind Quilt Block to suit your style and needs.
FAQ: The Whirlwind Quilt Block – Tutorial
Q: What fabrics work best for the Whirlwind Quilt Block?
A: Fabrics with good contrast work best for this block. Choose bold colors, prints, or even solid fabrics to emphasize the swirling design.
Q: Is the Whirlwind Quilt Block difficult to make?
A: While the design involves several small pieces, the block is beginner-friendly with careful attention to cutting and piecing.
Q: How can I ensure the points are sharp?
A: Use a consistent quarter-inch seam allowance, press seams flat, and trim pieces to the correct size for perfect points.
Q: What is the best size for a Whirlwind Quilt Block?
A: The most common size is 12 inches, but you can scale the block to fit your project needs.
Q: Can I use scrap fabrics for this block?
A: Yes, the Whirlwind Quilt Block is perfect for scrap quilting. Just make sure the fabric pieces are cut accurately for the best result.
Q: How do I join the blocks together?
A: Simply align the seams and join the blocks with a consistent quarter-inch seam allowance to create your quilt top.
Join our VIP broadcast list and gain access to exclusive patterns, all for free. As a VIP member, you’ll receive the best patterns daily, delivered directly to your device. ✨📱 It’s a unique opportunity to stay up-to-date with the latest trends and designs, curated just for you. Don’t miss out on enhancing your projects and discovering new inspirations with the best patterns every day! 🎨🔝
Conclusion
The Whirlwind Quilt Block is a beautiful, dynamic design that will elevate any quilt project. This tutorial has walked you through the materials, cutting, piecing, and customization options to help you create a stunning block. Whether you’re a beginner or an experienced quilter, the Whirlwind block is a fun and rewarding project.
We hope this guide has been helpful! Please leave your thoughts and any suggestions for future tutorials in the comments. Happy quilting!


