
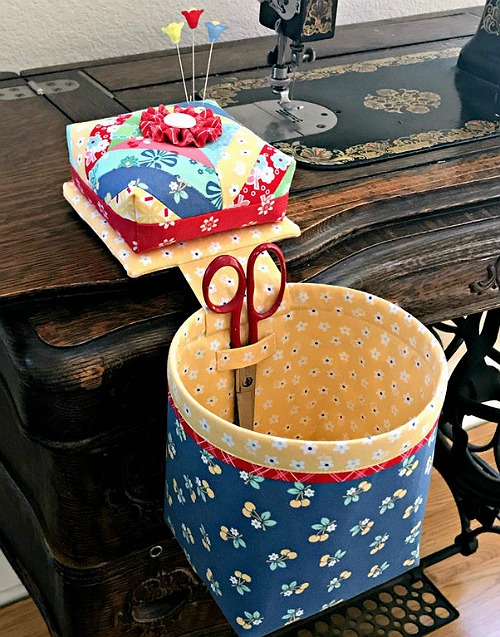
A Thread Catchers Free Tutorial is a wonderful way to keep your sewing and quilting workspace neat and tidy. If you’ve ever found yourself constantly picking up stray threads or dealing with a mess of fabric scraps, this project is for you.
A thread catcher is a simple but useful sewing tool that helps you collect fabric scraps, threads, and other small sewing debris as you work.
With just a few materials and some basic sewing skills, you can create your own personalized thread catcher that will help you stay organized during your sewing sessions. In this tutorial, we’ll guide you step-by-step through the process of making your very own thread catcher.
Thread catchers are not only functional but also fun to make. This project can be customized to match your sewing room decor or to make a thoughtful gift for fellow sewing enthusiasts.
Whether you are a beginner or an experienced sewer, this Thread Catchers Free Tutorial will walk you through all the necessary steps to create a beautiful and functional accessory for your sewing space. Plus, it’s a great way to practice your sewing skills while working on a practical project.
In this tutorial, we will cover the materials you need, provide clear instructions, and offer tips to help you create a durable and attractive thread catcher.
You’ll also learn how to make your thread catcher stand out by adding your own personal touch through fabrics and embellishments. Ready to get started? Let’s dive into the steps to make your own Thread Catcher.
1. Materials Needed for Making a Thread Catcher
Before you can start making your Thread Catchers Free Tutorial, you’ll need to gather a few basic supplies. Don’t worry – these materials are easy to find and affordable, so you can get started right away.
First, you’ll need cotton fabric for the outer and inner layers of your thread catcher. Choose two contrasting fabrics – one for the outside and one for the inside. You can also choose coordinating fabrics for a fun and colorful look. Each fabric piece should measure approximately 12 x 12 inches for the body of the thread catcher. If you want to add a lining or extra strength, you may choose a thicker cotton or a fusible interfacing.
Next, you’ll need batting or a similar material for padding. Batting helps to give your thread catcher structure and ensures it can stand upright when you’re working. A small piece of cotton batting measuring 12 x 12 inches should be sufficient for this purpose.
You will also need sewing thread that matches the color of your fabrics, along with pins or clips to hold everything together while sewing. Scissors will be needed to cut your fabric and batting, and you may also want a rotary cutter for precise cuts.
To make your thread catcher functional, you’ll need a drawstring or ribbon. This will allow you to close the top of the thread catcher and keep all the collected scraps inside. Choose a sturdy ribbon or cord that matches or contrasts with your fabrics for added flair.
Finally, be sure to have a sewing machine or hand sewing needle on hand, as well as an iron to press your seams and edges. Having all of your materials ready will ensure that your project goes smoothly.
2. Step-by-Step Instructions for Making a Thread Catcher
Once you have your materials ready, it’s time to start making your Thread Catcher Free Tutorial! Here is a simple step-by-step guide to help you create a functional and stylish thread catcher.
Start by cutting your fabrics and batting. You’ll need to cut two squares of fabric, one for the outer fabric and one for the lining, both measuring 12 x 12 inches. Additionally, cut a piece of batting the same size. If you want extra durability, you can also cut a piece of fusible interfacing to reinforce the outer fabric.
Next, place the batting between the outer fabric and the lining fabric. Use pins or clips to hold everything in place. Carefully sew around the edges of the three layers, leaving a small seam allowance of about 1/4 inch. Make sure to sew along all four sides.
Once you’ve completed the sewing, you will need to trim the corners of the fabric to reduce bulk and make the corners sharp. After trimming, turn the fabric right side out, so the batting and lining are on the inside. Press the edges of the thread catcher to make it neat and smooth.
Now, fold the top edge of the thread catcher over to create a casing for the drawstring. Fold about 1/2 inch of fabric and press with an iron. Sew around the folded edge to create the casing, making sure to leave a small gap through which you can thread the drawstring.
Once the casing is finished, cut your drawstring or ribbon to a length of about 24 inches. Use a safety pin or bodkin to thread the drawstring through the casing. Once you’ve threaded it all the way around, tie the ends of the drawstring into a secure knot.
3. Adding Personal Touches and Customizing Your Thread Catcher
One of the best things about this Thread Catchers Free Tutorial is that you can easily personalize your thread catcher to suit your style. Customizing your thread catcher is a great way to make it stand out and make it your own.
First, consider adding embellishments to the outside of your thread catcher. You can sew on decorative buttons, patches, or even small fabric flowers to give your thread catcher a unique look. Another fun idea is to stitch a simple design or monogram onto the fabric before you start assembling it.
You can also play around with the fabric choices. Try using scrap fabrics from previous sewing projects to create a patchwork design. This adds a lot of character and is a great way to use up leftover fabric. Don’t be afraid to experiment with bright colors or fun patterns that reflect your personality.
If you want to make your thread catcher even more special, consider making it as a gift. You can personalize it by choosing fabrics that reflect the recipient’s favorite colors or interests. If the person loves a particular season, theme, or hobby, choose fabrics that match their preferences for a thoughtful and handmade gift.
Another way to add a personal touch is by adding pockets to the outside of your thread catcher. You can use the pockets to store small sewing tools like needles, pins, or scissors, keeping everything organized and within reach while you sew.
4. Troubleshooting Tips and Common Mistakes
While making your Thread Catchers Free Tutorial, you might encounter a few challenges. Here are some troubleshooting tips and common mistakes to watch out for:
If your thread catcher isn’t standing up properly, it could be because the batting is too thin. Try using a thicker batting or adding an extra layer for more structure. If you don’t have batting, you can use fusible interfacing to reinforce the fabric and help it hold its shape.
When turning your thread catcher right side out, the corners might not be as sharp as you’d like. To fix this, use a point turner or the tip of your scissors to gently push out the corners for a cleaner, sharper look.
If your drawstring casing is too tight to thread the drawstring through, it may be because the casing seam is too narrow. In this case, just unpick a small portion of the seam and make it wider to allow the drawstring to move freely.
Finally, if your thread catcher is too large or too small for your sewing needs, don’t worry. You can always adjust the size by cutting larger or smaller fabric pieces. Just be sure to adjust the batting and drawstring accordingly.
FAQ: Frequently Asked Questions about Thread Catchers
1. What is a thread catcher used for?
A thread catcher is used to collect fabric scraps, threads, and other small debris while you sew. It helps keep your workspace neat and organized during sewing projects.
2. Can I make a thread catcher with any fabric?
Yes, you can use any fabric, but cotton is the most common choice for thread catchers due to its durability and ease of use. You can also experiment with different fabrics to make your thread catcher unique.
3. How long does it take to make a thread catcher?
Depending on your sewing experience, making a thread catcher usually takes between 1 to 2 hours.
4. Can I use a thread catcher for other things besides thread?
Yes! While it’s designed for collecting thread and fabric scraps, a thread catcher can also be used for storing small items like buttons, pins, or other sewing notions.
5. What kind of drawstring should I use for my thread catcher?
You can use a variety of materials for the drawstring, such as ribbon, cord, or even fabric strips. Choose one that matches your thread catcher’s style and is sturdy enough to hold everything inside.
6. Can I wash my thread catcher?
Yes, you can wash your thread catcher. Simply follow the care instructions for the fabric you used, and be sure to remove the drawstring before washing.
Join our VIP broadcast list and gain access to exclusive patterns, all for free. As a VIP member, you’ll receive the best patterns daily, delivered directly to your device. ✨📱 It’s a unique opportunity to stay up-to-date with the latest trends and designs, curated just for you. Don’t miss out on enhancing your projects and discovering new inspirations with the best patterns every day! 🎨🔝
Conclusion
In this Thread Catchers Free Tutorial, you’ve learned how to create a practical and customizable accessory to keep your sewing space tidy.
By following the step-by-step instructions, you can make a thread catcher that suits your style and needs. Whether you’re using it to collect threads or small sewing tools, this project is a great way to add a personal touch to your sewing routine.
We hope you enjoyed this tutorial and would love to hear your thoughts! Feel free to leave a sincere opinion or any suggestions you may have. Your feedback is always appreciated!


