
Pie Carrier Sewing Pattern

If you are looking for a fun and rewarding quilting technique, English Paper Piecing (EPP) is a great option.
Whether you’re a seasoned quilter or a beginner, Top 10 Tips for English Paper Piecing – Tutorial will help you master this technique and create beautiful, intricate quilt designs.
In this tutorial, we will cover the essential tips that can enhance your EPP experience, from fabric selection to stitching techniques. With a little practice, you’ll be able to create perfect paper-pieced quilts that are sure to impress.
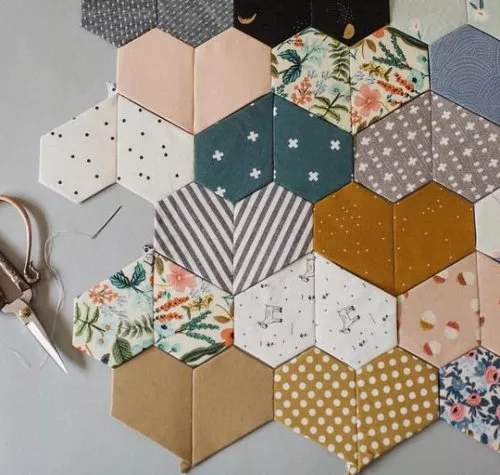
Image from google.
English Paper Piecing is a method of hand-piecing fabric shapes onto paper templates, which are later removed to leave behind a crisp, well-constructed piece.
It’s perfect for creating geometric patterns and intricate designs that can’t be easily made using a sewing machine. This method also allows for precision and control, giving you a unique, personalized touch for your quilts.
In this article, we’ll go over some helpful techniques, common mistakes to avoid, and essential tools to use when working on your English Paper Piecing projects. Let’s dive in!
The first tip in this Top 10 Tips for English Paper Piecing – Tutorial is selecting the perfect fabric. Choosing the right fabric will make all the difference in how your project turns out.
For English Paper Piecing, it’s important to choose fabrics that are easy to handle, and quilting cotton is the most common fabric used. It holds its shape well and provides enough structure to make the piecing process easier. When selecting fabrics, consider using prints that complement each other for your desired pattern, or go for a bold contrast if you’re making a modern design.
Avoid fabrics that are too thin or stretchy, as they can be harder to work with and may not maintain their shape during piecing. Additionally, make sure the fabrics are pre-washed to prevent shrinkage later on. When cutting your fabric pieces, give yourself enough room for seam allowances so that everything aligns perfectly when pieced together.
Lastly, don’t be afraid to mix different patterns, textures, or colors for an interesting effect. English Paper Piecing is a great technique to showcase your creativity and fabric collection.
The second tip for your Top 10 Tips for English Paper Piecing – Tutorial involves choosing the right paper templates. The quality of your templates plays a significant role in the accuracy and ease of the process.
You can buy pre-cut paper templates in various shapes from quilting shops, or you can make your own by cutting template paper into desired shapes. Many quilters prefer cardstock paper or lightweight chipboard for templates, as they’re sturdy but still easy to remove later. These materials also resist bending or warping as you work.
When choosing templates, make sure they are the correct size for your project and pattern. It’s always a good idea to create a test block using scrap fabric and paper templates before diving into your final project to ensure everything fits together properly.
For more intricate patterns, you may want to consider using a rotary cutter and ruler to cut the paper shapes with precision, especially if you’re working with small or detailed templates.
Basting is an essential part of the English Paper Piecing process. This is the technique where you temporarily attach your fabric pieces to the paper templates. There are several methods for basting, and it’s important to choose the one that works best for you.
Some quilters prefer to use hand-basting with needle and thread, which involves stitching through the fabric and paper along the edges of the shape. Others may opt for a quicker method such as glue basting, using fabric glue to adhere the fabric to the paper. This method eliminates the need for hand stitching and can speed up the process.
If you prefer to baste by hand, it’s essential to use a small running stitch to keep the fabric in place without creating bulky seams. Be sure not to stitch through the paper template, as this will make it difficult to remove later.
Regardless of the method you choose, basting should be neat and secure to ensure that your fabric remains aligned while you stitch.
One of the most important aspects of English Paper Piecing is achieving small, even stitches. This ensures that your quilt pieces come together neatly, with smooth seams and no visible stitching.
When stitching your fabric pieces together, use a needle with a fine tip and choose a strong thread such as cotton or polyester. A matching thread color can help your stitches blend in, making them less noticeable. If you’re using contrasting fabrics, a neutral thread color is often a safe choice.
Start stitching by joining two pieces of fabric at their edges, working with small, even stitches. It’s important to keep the stitches close together and consistent in length to avoid any puckering or gaps between the fabric pieces. Don’t pull the stitches too tight; instead, let the stitches hold the pieces gently together.
For added precision, some quilters use a thimble to protect their fingers while sewing, especially when working with small shapes. Take your time, and avoid rushing through the process.
1. What is the best thread for English Paper Piecing?
The best thread for English Paper Piecing is a strong, fine cotton or polyester thread that blends well with your fabric. Some quilters prefer to use cotton quilting thread because it’s strong and durable but still thin enough for delicate stitching.
2. Can I machine sew my English Paper Piecing project?
While English Paper Piecing is traditionally done by hand, it’s possible to machine sew some parts of the process. However, it’s important to maintain the precision of the piecing, and some quilters prefer the control and flexibility of hand stitching for the best results.
3. How do I remove the paper templates after piecing?
Once your pieces are stitched together, you can carefully remove the paper templates. Some quilters use a seam ripper or a small pair of scissors to gently lift the paper from the fabric. If you used a basting method with glue, it’s especially important to remove the paper slowly to avoid tearing the fabric.
4. Can I use English Paper Piecing for larger quilt designs?
Yes, English Paper Piecing can be used for large quilts. You can create larger blocks by combining smaller pieced units. The key is to be patient and work on one section at a time, ensuring that each piece is accurately sewn together.
5. How do I make sure my fabric pieces line up perfectly?
To ensure your fabric pieces line up correctly, use a quarter-inch seam allowance for each stitch and always press your seams carefully. Keeping your stitches consistent and even will help prevent fabric from shifting.
6. Can I use patterns that are not hexagons?
Absolutely! While hexagons are the most common shapes used in English Paper Piecing, you can create quilts using any shape, such as diamonds, triangles, or even complex shapes like stars.
Join our VIP broadcast list and gain access to exclusive patterns, all for free. As a VIP member, you’ll receive the best patterns daily, delivered directly to your device. ✨📱 It’s a unique opportunity to stay up-to-date with the latest trends and designs, curated just for you. Don’t miss out on enhancing your projects and discovering new inspirations with the best patterns every day! 🎨🔝
In this Top 10 Tips for English Paper Piecing – Tutorial, we’ve covered essential tips that will help you master this traditional quilting technique.
From choosing the right fabric and paper templates to perfecting your stitches and basting method, these tips will ensure that your English Paper Piecing projects are precise, smooth, and beautiful.
Remember, patience is key when working with English Paper Piecing. With time and practice, you’ll gain more confidence and refine your skills, allowing you to create stunning quilt blocks with ease.
Whether you are making small projects or large quilts, this technique will allow you to craft intricate, customized designs that are full of character and charm.
We hope these tips inspire you to start or continue your English Paper Piecing journey. Don’t forget to share your thoughts and suggestions in the comments below. We’d love to hear about your experience and any additional tips you’ve discovered along the way!


