
Pie Carrier Sewing Pattern

If you’ve been saving narrow fabric pieces from past projects and wondering what to do with them, it’s time to get excited! With the creative idea to Turn thin strips into charming potholders – Free Quilt Pattern, you can bring new life to leftover materials while making something both beautiful and useful.
These small and satisfying quilting projects are ideal for beginners and experienced quilters alike, offering a quick win that adds charm to any kitchen.
Not only do these potholders serve a practical purpose, but they also allow you to experiment with colors, textures, and patchwork techniques on a smaller scale. The simplicity of this free quilt pattern makes it accessible, yet the possibilities for personalization are endless.
You can match them to your home decor, gift them to friends, or simply enjoy a satisfying afternoon sewing session.
In this tutorial, we’ll explore how to turn thin strips into charming potholders, step by step. We’ll focus on choosing materials, planning your layout, assembling your quilt sandwich, and finishing techniques that will ensure your potholders are both functional and visually appealing. This is a great way to sharpen your quilting skills and reduce fabric waste at the same time.
To start your Turn thin strips into charming potholders – Free Quilt Pattern project, selecting the right fabric is key. Since potholders need to withstand heat, it’s important to choose 100% cotton fabric, which resists melting and holds up well under frequent washing. Avoid synthetic materials that can easily scorch or melt when exposed to high temperatures.
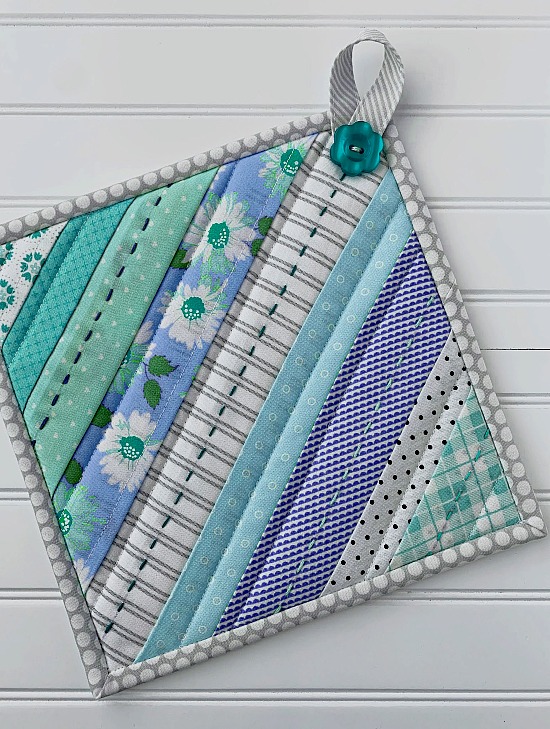
Your fabric strips don’t need to be uniform in length, but aim for strips between 1.5 and 2.5 inches wide. These dimensions work well for creating balanced designs and give enough surface area for quilting. Look for vibrant colors and bold prints that will stand out when sewn together. Scraps from past projects are perfect for this.
Consider sorting your strips by color family or theme. For example, a red-and-white scheme gives a farmhouse look, while rainbow colors create a cheerful, eclectic design. Even monochromatic combinations can look elegant and refined. Think about where the potholder will be used and choose your palette accordingly.
Prewash your fabrics to avoid shrinkage later. Washing also helps remove any chemical sizing from the fabric, which can affect how it sews or how the colors appear. Once washed, press each strip to ensure crisp, straight edges that will be easier to piece together during assembly.
If you’re planning to make several potholders at once, consider grouping strips into bundles by size and color. This not only makes the process more efficient but helps you maintain consistency if you want to create a matching set. A little preparation at this stage can make your sewing session flow smoothly.
Don’t forget to include batting and a heat-resistant layer like Insul-Bright in your materials. These layers provide insulation to protect your hands from hot pans, ensuring that your potholders are safe as well as stylish. You’ll sandwich them between your pieced top and a cotton backing fabric during construction.
The heart of this Turn thin strips into charming potholders – Free Quilt Pattern project is assembling your quilt top. Start by laying out your strips in a way that pleases your eye. You can go for a classic strip piecing layout, alternating dark and light tones, or get creative with diagonal arrangements or even a log cabin style design.
Begin sewing your strips together lengthwise, using a 1/4-inch seam allowance. Press each seam to one side before adding the next strip. Consistent pressing ensures a flat, polished appearance and prevents bulk when you quilt through all layers. A good pressing routine can really elevate your finished project.
After piecing enough strips together to make a square approximately 8×8 inches, square off the edges using a rotary cutter and ruler. Trimming ensures that your layers will align properly when it’s time to quilt and bind. Don’t worry if your edges aren’t perfect—small imperfections add charm and personality.
Next, cut your heat-resistant batting and backing fabric to the same size as your quilt top. Stack the three layers: backing on the bottom (right side down), batting and heat-resistant layer in the middle, and quilt top on top (right side up). Pin or baste the layers together to keep them stable.
Now it’s time to quilt! Use straight lines, a simple grid, or free-motion quilting—whatever your machine and skill level allow. This step not only secures your layers but also adds beautiful texture and detail. For a beginner, stitching “in the ditch” (along the seam lines) is a good, neat option.
When quilting is complete, trim the edges again if needed. This is your last chance to correct any uneven sides before adding the binding. Keep your lines clean and your corners square, as it makes the next steps easier and your potholder look professionally finished.
Now that you’ve quilted your piece, it’s time to give it a clean, finished edge. This part of the Turn thin strips into charming potholders – Free Quilt Pattern is where your project truly comes together. Cut a binding strip about 2.5 inches wide and long enough to go around the entire perimeter of your potholder.
Fold your binding strip in half lengthwise and press. Begin attaching it to the front of your potholder with raw edges aligned, starting at one corner and working your way around. Miter the corners for a neat finish. Once attached, fold the binding over to the back and stitch it down by hand or machine.
For added charm and functionality, consider adding a fabric loop to one corner of the potholder before finishing the binding. This allows it to hang easily in your kitchen. You can use leftover strip fabric for the loop—just fold and stitch a 4-inch strip and tuck it into the binding seam.
Check for any loose threads or uneven stitches. Taking time for these final details ensures your potholder will hold up to use and washing. If gifting your creation, consider sewing a small personalized label or note on the back for a thoughtful touch.
Some crafters like to add embroidery or decorative stitching at this stage. A simple heart, initial, or flower can make the potholder uniquely yours. These embellishments don’t take long but can greatly increase the personal value of the item.
Once finished, admire your work! You’ve just turned thin scraps into something beautiful, practical, and handmade. The process is satisfying, and the final result is a piece you can use or share with pride. It’s another reminder of how creative and rewarding quilting can be.
Now that you’ve completed the Turn thin strips into charming potholders – Free Quilt Pattern, you may be wondering what to do with your new creations. Of course, they serve their original purpose in the kitchen, but there are many more ways to use and enjoy them.
Potholders make excellent handmade gifts. Whether for holidays, housewarmings, or birthdays, they are thoughtful, functional, and easy to personalize. Tie them with a ribbon and pair with a kitchen utensil or recipe card for an adorable present that’s sure to be appreciated.
You can also use them as mug rugs or mini-placemats. Their compact size makes them ideal for catching spills or protecting surfaces from hot dishes and drinks. They add a splash of color and warmth to your dining table or coffee nook.
Try using them in seasonal decor. Make a set in holiday fabrics or seasonal colors and place them around your kitchen. They’re an easy and festive way to switch up your home’s style with the changing seasons without a big investment.
Another idea is to create matching sets with aprons, tea towels, or napkins. Using the same fabric strips throughout these items ties everything together and elevates your kitchen’s look with handmade charm.
If you enjoy selling your crafts, these potholders can be a popular and profitable product at local markets. They’re quick to make, and people love the combination of beauty and usefulness. Offering themed or color-coordinated sets can help increase appeal.
Lastly, consider teaching someone else how to make these potholders. Sharing the process helps keep quilting traditions alive and encourages creativity in others. Whether it’s a child, a friend, or a community group, these small projects are perfect for learning and bonding.
What size should my fabric strips be?
Ideally, strips should be between 1.5 and 2.5 inches wide. The length can vary, but using consistent widths makes assembly easier.
What type of batting is best for potholders?
Use cotton batting and include a heat-resistant layer like Insul-Bright. This ensures the potholder is safe to use with hot cookware.
Can I use fabric scraps of different materials?
Stick to 100% cotton for best results. Synthetics can melt under heat and aren’t as durable for kitchen use.
How do I care for handmade potholders?
Wash in cold water with mild detergent and air dry or tumble dry on low. Avoid bleach or harsh chemicals to preserve fabric color.
Can I make these potholders without a sewing machine?
While it’s possible to sew by hand, using a machine makes the process faster and gives more durable results, especially for binding and quilting.
Are these good projects for beginners?
Absolutely! This project is simple, forgiving, and great for practicing basic quilting skills like piecing, layering, and binding.
Turning fabric scraps into something practical and beautiful is always a joy, and with the Turn thin strips into charming potholders – Free Quilt Pattern, you have a creative, beginner-friendly way to do just that. This project is perfect for using up thin strips, exploring new color combinations, and honing your quilting skills.
We’ve covered everything from selecting materials and piecing your strips to quilting, binding, and creative ways to use your finished potholders. Whether you’re keeping them for your home, giving them as gifts, or selling them at a market, the process is rewarding and fun.
If you enjoyed this tutorial, please leave a sincere comment sharing your thoughts, your version of the project, or any tips and suggestions you might have. Your feedback helps others and keeps our creative community thriving!


