
Pie Carrier Sewing Pattern

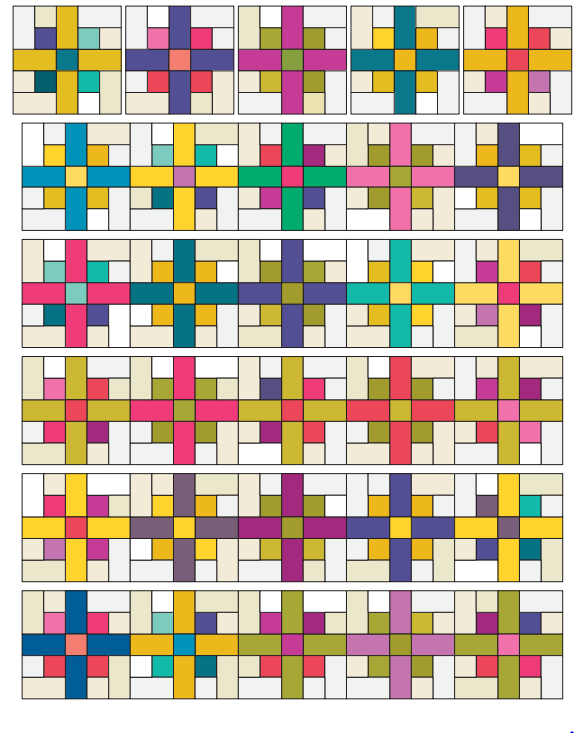
Creating a Vivid Grid Quilt is a perfect way to add a burst of color to your home while showcasing your quilting skills. The Vivid Grid Quilt Free Pattern offers an opportunity to create a stunning quilt that features a bold, grid-based design.
This quilt is ideal for quilters of all skill levels and allows you to explore a variety of color combinations to make the finished project uniquely yours.
In this guide, we will walk you through the steps of creating the Vivid Grid Quilt from start to finish. Whether you’re an experienced quilter or a beginner, you’ll find helpful tips and tricks to make the process smoother and more enjoyable.
The Vivid Grid Quilt Free Pattern can be customized to fit your personal style, making it an incredibly versatile project. Get ready to dive into the world of quilting with this simple yet vibrant design!
The Vivid Grid Quilt is designed to showcase the beauty of the grid layout, with each square standing out in its own colorful block. It’s an excellent project for those who love working with color and want to create a striking visual effect.
By following this tutorial, you’ll be able to make a quilt that reflects your personal taste and creativity, all while using a free pattern!
Before you can start making your Vivid Grid Quilt, you’ll need to gather a few essential materials. The first and most important item is fabric. For this quilt, you will need fabric in various bright and bold colors, so you can create the vivid grid effect that this design is known for. Choose quilting cottons in a range of colors to ensure the quilt has depth and contrast.
You’ll also need a cutting mat, rotary cutter, and quilting ruler. These tools will help you cut your fabric into squares with precision. A cutting mat is especially helpful because it provides a safe surface for cutting, while a quilting ruler ensures straight edges, which are essential for a clean, professional-looking quilt.
For stitching, you’ll need a high-quality quilting thread. Polyester or cotton thread works well, as it’s durable and strong. Choose a color that complements your fabric choices, or opt for a neutral shade if you prefer the stitching to blend in with the quilt top.
Don’t forget to have a quilting needle on hand. While a regular sewing needle can be used, a quilting needle is specifically designed to go through multiple layers of fabric, ensuring that your stitches are even and secure. You will also need a quilting foot for your sewing machine to help you maintain an even stitch length throughout the quilt.
Lastly, you will need batting for the quilt’s interior and fabric for the backing. Choose a batting that provides the right amount of warmth and texture for your quilt. For the backing, you can select a solid color or a patterned fabric, depending on the look you want to achieve.
Once you have gathered all your materials, it’s time to begin cutting your fabric for the Vivid Grid Quilt. The key to creating a successful grid design is to make sure each square is cut to the correct size and that the pieces are uniform.
Start by cutting your fabric into squares. Depending on the pattern you are following, the size of each square may vary, but a common size for this type of quilt is 5 inches by 5 inches. Make sure to cut enough squares to complete your quilt top, as you’ll need a variety of colors to create the vivid grid effect.
When cutting your fabric, always use a rotary cutter, cutting mat, and quilting ruler for accuracy. These tools will ensure that your fabric pieces are straight and consistent in size. Take your time while cutting to ensure the squares are perfectly aligned.
Once your fabric squares are cut, organize them by color. This will help you plan out your quilt top and give you a better idea of how the colors will interact with each other. You can arrange the squares in a random pattern, or follow a more structured design by grouping certain colors together to create a specific effect.
If you prefer to have a more controlled layout, you can also use graph paper to sketch out your quilt design before you start laying out the fabric. This can be especially helpful if you want to create a particular pattern or geometric design within the grid.
Once your fabric squares are ready, you can move on to the next step: piecing the quilt top together.
The next step in creating your Vivid Grid Quilt is to assemble the quilt top. Start by arranging your fabric squares in the desired grid pattern. Whether you choose a random layout or a more structured design, make sure the colors are distributed evenly across the quilt top.
Once you’re happy with the layout, begin stitching the squares together. Use a quarter-inch seam allowance, which is the standard for quilting. Start by stitching together two squares at a time, ensuring that the edges align perfectly. Press the seams as you go to keep the quilt top flat and neat.
After you’ve stitched all the rows of squares, join them together to form the complete quilt top. Be sure to line up the seams carefully to maintain the grid pattern and prevent any fabric from shifting out of place.
As you work, take the time to check the alignment of your quilt top. It’s essential that the rows and columns remain straight to maintain the visual impact of the grid design. If you notice any misalignments, gently rip out the stitches and redo the section to ensure everything lines up properly.
Once the quilt top is pieced together, press all the seams flat to remove any wrinkles. This will help create a smooth surface for the next steps in the quilting process.
With the quilt top completed, you can now move on to adding the batting and backing.
Now that your quilt top is ready, it’s time to add the batting and backing to complete your Vivid Grid Quilt. Lay out the quilt top on a flat surface and then position the batting underneath. The batting should be slightly larger than the quilt top to ensure that it covers the entire surface.
Next, lay the backing fabric over the batting. The backing should also be larger than the quilt top to allow for any shrinkage during quilting. Smooth out any wrinkles in the fabric to ensure the quilt layers are flat.
Once the quilt layers are in place, secure them using quilting pins or a basting spray. This will prevent the layers from shifting while you quilt. Be sure to pin or baste along the edges and in the center of the quilt to keep everything aligned.
Now, it’s time to quilt! You can either hand quilt or machine quilt your Vivid Grid Quilt. If you’re machine quilting, set your sewing machine to a quilting stitch and quilt through all the layers, following the grid pattern of the quilt top. If you prefer hand quilting, use a running stitch or a more decorative stitch to add texture and visual interest to the quilt.
Once you’ve finished quilting, trim any excess batting and backing fabric to match the edges of the quilt top. Then, you can add a quilt binding to finish the edges and give the quilt a polished look.
1. What size should my fabric squares be for the Vivid Grid Quilt?
The standard size for fabric squares in a Vivid Grid Quilt is 5 inches by 5 inches, but you can adjust this size depending on your preference or the pattern you are using.
2. Can I use different types of fabric for this quilt?
Yes, you can use a variety of fabric types for the Vivid Grid Quilt. Quilting cotton is the most common choice, but you can also experiment with other fabrics, such as linen or flannel, depending on the look you want.
3. How do I make sure the quilt top stays flat while piecing it together?
Press the seams as you go to keep the quilt top flat. Use a pressing cloth to avoid damaging the fabric, and be sure to align the squares carefully as you stitch them together.
4. Can I use a pre-cut fabric bundle for this quilt?
Yes, using a pre-cut fabric bundle like charm squares or jelly rolls can save time and add variety to your Vivid Grid Quilt. Just make sure the fabric pieces are the right size for your pattern.
5. What’s the best way to quilt the Vivid Grid Quilt?
You can hand quilt or machine quilt the Vivid Grid Quilt. Machine quilting is faster, but hand quilting adds a more personal touch. Choose the method that best fits your skill level and the look you want.
6. How do I care for my quilt after it’s finished?
To keep your quilt in good condition, wash it gently in cold water and air dry. If you want to give your quilt a vintage look, you can also tumble dry it on low heat.
Join our VIP broadcast list and gain access to exclusive patterns, all for free. As a VIP member, you’ll receive the best patterns daily, delivered directly to your device. ✨📱 It’s a unique opportunity to stay up-to-date with the latest trends and designs, curated just for you. Don’t miss out on enhancing your projects and discovering new inspirations with the best patterns every day! 🎨🔝
The Vivid Grid Quilt Free Pattern is an exciting project that allows you to showcase your creativity with color and design. By following this tutorial, you’ve learned how to cut your fabric, piece together the quilt top, and finish your quilt with a beautiful backing and batting.
Whether you’re new to quilting or an experienced quilter, this pattern is a great way to practice your skills and create a stunning quilt that you’ll be proud to display.
We hope this tutorial has been helpful! Feel free to leave a comment with your thoughts or share any suggestions you have for others who want to try out this pattern. Your feedback is always appreciated!


