
Crochet Multi-Purpose Blouse, Shawl, Runner Model

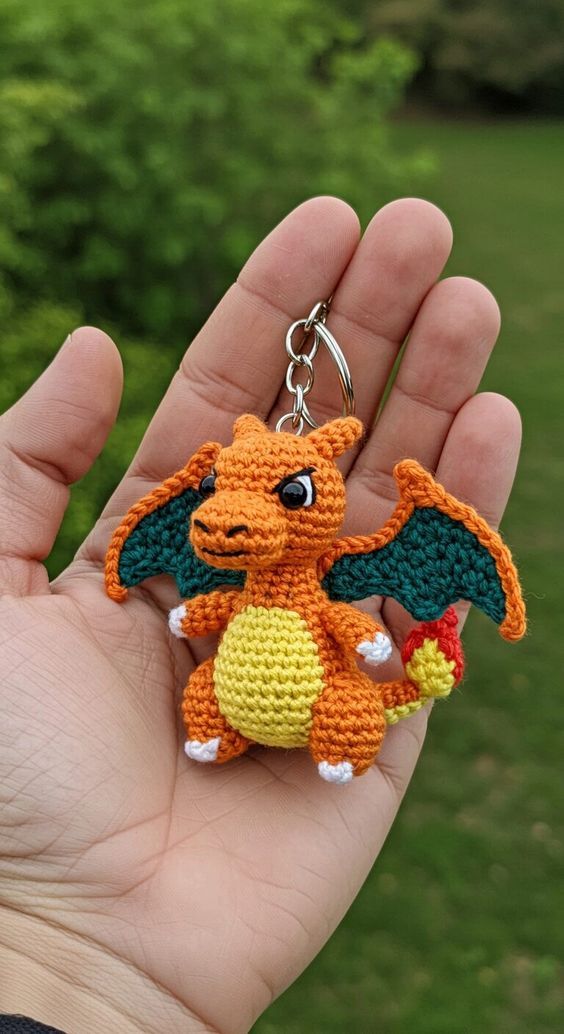
Crochet Charizard Keychain – Free Pattern is a fun and creative project that combines the love for crochet with the excitement of Pokémon. If you enjoy handmade crafts and want to carry a touch of nostalgia with you wherever you go, this keychain is a perfect choice.
The project is simple enough for beginners yet detailed enough to satisfy more experienced crocheters. With this guide, you can make your own mini Charizard that fits in your hand and adds personality to your keys, backpack, or even as a gift for someone who loves Pokémon.
The idea of creating a Crochet Charizard Keychain – Free Pattern appeals to many because it blends two popular worlds: crochet and gaming culture. Charizard is one of the most beloved Pokémon, often recognized for its dragon-like appearance and fiery personality.
By turning this powerful character into a miniature crochet piece, you create something adorable yet recognizable. This combination makes the keychain both practical and collectible, serving as a unique accessory that sparks conversations wherever you take it.
Another reason this project is so popular is its adaptability. You can follow a Crochet Charizard Keychain – Free Pattern to make the original orange Charizard, or you can play with different yarn colors to create your own variation.
Whether you prefer the traditional design or want to experiment with shiny versions, the project allows you to express creativity. Plus, making your own crochet keychain is affordable, and it gives you the joy of crafting something handmade with a personal touch.
To start your Crochet Charizard Keychain – Free Pattern, the first thing you need is the right set of materials. For this project, lightweight yarn is recommended so the final keychain is not too bulky. Most crafters prefer cotton yarn because it holds its shape well and is durable enough for everyday use. The classic Charizard color is orange, but you will also need small amounts of white, black, yellow, and light blue yarn for the details.
A crochet hook is another essential tool. For amigurumi projects like this, smaller hooks are preferred to ensure tight stitches that prevent stuffing from showing through. A 2.0mm or 2.5mm hook usually works perfectly. Along with this, you will need fiberfill stuffing to give your mini Charizard a plush and firm shape. Using safety eyes is also recommended to add expression, but you can stitch the eyes with black yarn if you prefer a fully yarn-based design.
Don’t forget to prepare a tapestry needle. This tool helps you sew different parts together and weave in loose ends neatly. Keychain hardware is another important item, as it will allow you to turn your crochet Charizard into a functional accessory. A simple metal ring or lobster clasp works well, depending on your preference. Having scissors and stitch markers at hand will also make the process smoother and more organized.
It is worth noting that using high-quality yarn can make a big difference in the appearance of your keychain. While budget yarns are fine for practice, choosing yarn with good texture and vibrant colors will make your finished Crochet Charizard Keychain – Free Pattern stand out even more. The durability of the yarn also matters, as keychains are often handled daily and may face wear and tear. Durable yarn ensures your creation remains beautiful for a long time.
Before starting, it’s also helpful to organize all your materials in one place. Setting up a clean and comfortable workspace helps you focus on the crafting process without interruptions. Having everything ready means you can enjoy the project without having to stop midway to search for tools. This level of preparation is often overlooked but plays a huge role in creating a stress-free crochet experience.
In summary, gathering the right tools and materials is the foundation of a successful project. A Crochet Charizard Keychain – Free Pattern requires only a small set of supplies, making it accessible to beginners and cost-friendly. With these items ready, you are one step closer to bringing your mini Pokémon to life.
The process of making a Crochet Charizard Keychain – Free Pattern begins with the body. Start with a magic ring and work in continuous rounds using orange yarn. This technique creates a smooth, seamless look, which is essential for amigurumi. As you increase stitches, the body gradually takes shape, forming a round and compact base. It’s important to keep track of each round so your piece stays symmetrical.
Once the body is completed, move on to the head. The head is crocheted separately and later sewn onto the body. The head should be slightly larger than the body to give Charizard its characteristic look. Adding fiberfill stuffing as you crochet helps maintain the shape. Tight, consistent stitches are key to making sure the stuffing doesn’t leak through. Always check that the proportions are balanced, as this makes the final keychain more recognizable.
After finishing the body and head, it’s time to add the wings. Use light blue yarn for the inner part of the wings and orange yarn for the outer part. Crochet small triangular pieces and attach them securely to the back. The wings are a defining feature of Charizard, so paying attention to their shape and placement is important. Even though they are small, they give your keychain authenticity and charm.
The arms and legs are simple cylindrical shapes that are crocheted separately and stitched onto the body. These small details may seem minor, but they complete the character’s look. For the tail, use orange yarn and create a long tube-like piece, finishing it with a tuft of yellow or red yarn to represent Charizard’s flame. The flame is an iconic part of Charizard’s design, so this little detail adds a lot of personality to the finished piece.
When all the parts are crocheted, the final step is assembly. Carefully sew the head, body, wings, arms, legs, and tail together. Position the safety eyes on the head and stitch small nostrils with black yarn. You can also embroider a smile to give Charizard a friendly appearance. Once the assembly is complete, attach the keychain hardware to the top of the head using a small loop of yarn. Now your crochet Charizard is ready to shine as a keychain.
These steps may seem detailed, but they are easy to follow with practice. A Crochet Charizard Keychain – Free Pattern is designed to be beginner-friendly while still allowing room for creativity. By following the process step by step, you will end up with a charming accessory that you can proudly use or gift to others.
One of the most enjoyable aspects of working with a Crochet Charizard Keychain – Free Pattern is the ability to personalize your project. Customization allows you to make each keychain unique, whether you want to stay true to the original Pokémon design or create something entirely new. Small changes in color or detail can completely transform the look of your Charizard.
For example, you might want to make a shiny Charizard version, which features black instead of orange. This variation is highly popular among fans and adds a bold twist to the keychain. You can also experiment with different yarn textures, such as using glitter yarn for the flame to make it sparkle. This adds an extra layer of charm and creativity to your project.
Another idea for customization is adding accessories. A tiny scarf, hat, or even a little Pokéball attached to the tail can make your keychain stand out. Since crochet allows endless creativity, you can play with these details to reflect your own personality or match the keychain to a special occasion. Handmade items are all about self-expression, so don’t hesitate to try new ideas.
Size adjustments are also a great way to personalize the pattern. Using thicker yarn and a larger hook will result in a bigger Charizard plush instead of a keychain. On the other hand, finer yarn and a smaller hook can make an even more delicate mini version. This flexibility makes the Crochet Charizard Keychain – Free Pattern suitable for different purposes beyond keychains, such as charms for bags or decorative figures.
If you are making the keychain as a gift, think about the preferences of the person who will receive it. Using their favorite colors or adding initials to the keychain loop can make it more personal. Handmade gifts always carry more meaning, and customizing your Charizard shows care and thoughtfulness.
Lastly, remember that the most important part of customization is enjoying the process. A Crochet Charizard Keychain – Free Pattern is not just about following instructions—it’s about creating something that makes you smile. Whether you make one or a whole collection, every keychain will be a reflection of your creativity and love for the craft.
A Crochet Charizard Keychain – Free Pattern is especially appealing to beginners for many reasons. First, the project is small in size, which means it doesn’t take weeks to complete. Unlike large blankets or sweaters, a mini keychain can often be finished in a single afternoon. This quick turnaround keeps motivation high and provides instant satisfaction.
The pattern itself uses basic stitches, making it accessible for those still learning the craft. Techniques like the magic ring, single crochet, and increasing or decreasing are fundamental in crochet, and this project helps beginners practice them in a fun and rewarding way. Once you complete one Charizard, you’ll feel more confident to try other amigurumi projects.
Another reason this project is beginner-friendly is the minimal material requirement. You don’t need large amounts of yarn or complicated tools. Most of the items can already be found in a basic crochet kit. This makes it cost-effective and less intimidating for those just starting out.
The finished product is also practical. Beginners often worry about what to do with their first projects, but a Crochet Charizard Keychain – Free Pattern results in something useful and adorable. You can attach it to your keys, gift it to a friend, or even sell it at craft fairs. The small size and cute design make it appealing to a wide audience.
Additionally, the project encourages learning assembly skills, such as sewing pieces together and attaching hardware. These are valuable techniques for anyone interested in making more crochet items in the future. By starting small, beginners build confidence step by step without feeling overwhelmed.
Finally, making a crochet Charizard is simply fun. It combines the joy of crafting with the nostalgia of Pokémon, which makes the process more engaging. For beginners, this combination is a perfect motivator to keep learning and practicing the art of crochet.
What level of crochet skill do I need for this project?
This pattern is suitable for beginners. It uses simple stitches like single crochet and basic shaping techniques, making it a great introduction to amigurumi.
How long does it take to complete a Crochet Charizard Keychain?
Most crafters can finish the project in 3 to 5 hours, depending on experience. Beginners may take a little longer, but the process is enjoyable and rewarding.
Can I use different yarn types for this pattern?
Yes, you can use cotton, acrylic, or blended yarn. However, cotton yarn is recommended for durability, especially since keychains face frequent handling.
Do I need safety eyes, or can I crochet the eyes?
Safety eyes add a polished look, but crocheted or embroidered eyes are perfectly fine if you prefer a fully yarn-based design. This is also safer for young children.
Is this pattern only for keychains?
No, the same pattern can be adjusted for other uses. By changing the yarn size and hook, you can create larger Charizard plush toys or smaller charms for bags.
Can I sell the keychains I make with this pattern?
Yes, many crafters sell handmade crochet keychains. Just make sure to credit the inspiration as a fan project and highlight that each item is handmade.
The Crochet Charizard Keychain – Free Pattern is a delightful project that blends creativity, nostalgia, and practicality. From gathering materials to customizing your own Charizard, this pattern is accessible for beginners while still exciting for experienced crocheters. The small size makes it quick to complete, and the endless customization options allow for unique creations every time. If you’ve been looking for a fun and rewarding crochet project, this one is a perfect choice.
I’d love to hear your thoughts! Share your honest opinion and suggestions in the comments—your feedback helps improve future tutorials and inspires more creative crochet ideas.


