
Crochet Multi-Purpose Blouse, Shawl, Runner Model

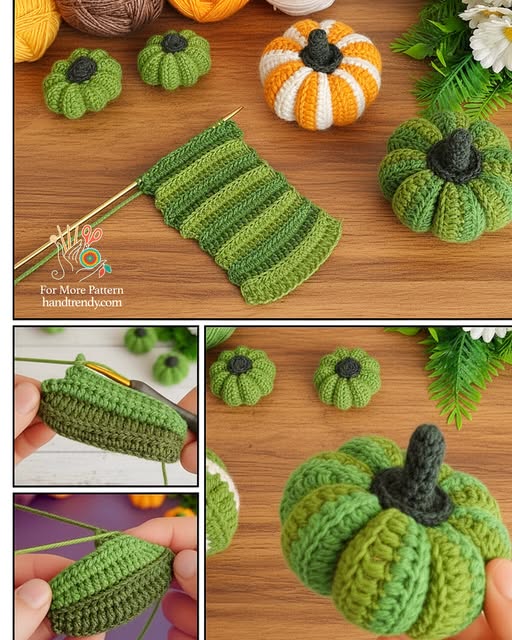
The Crochet Pumpkin – Free Pattern is one of the most charming and versatile crochet projects you can create for the fall season. These adorable pumpkins are perfect for decorating your home, adding a handmade touch to your autumn displays, or even gifting to friends and family.
With soft yarn textures and vibrant orange hues, this project combines the coziness of crochet with the warm feeling of the harvest season. Whether you’re an experienced crocheter or a beginner, this pattern offers a fun and rewarding experience that celebrates the beauty of handmade art.
Making a Crochet Pumpkin – Free Pattern allows you to explore creativity in shape, size, and color. You can make tiny pumpkins as table decorations or large ones for centerpieces. By using different yarn weights and hook sizes, you can easily achieve varied results that make each pumpkin unique.
The process involves simple stitches that build up beautifully into the recognizable round pumpkin shape. It’s an ideal pattern for practicing crochet techniques like increasing, decreasing, and stitching in the round.
What makes this project even more enjoyable is its adaptability. You can customize your Crochet Pumpkin – Free Pattern with embellishments such as leaves, stems, or even a touch of glitter for a festive sparkle. Some crocheters love making sets of pumpkins in different shades of orange, cream, and brown to complement their fall décor.
This project doesn’t require much yarn, making it a great stash-busting pattern that’s budget-friendly and beginner-approved.
To get started on your Crochet Pumpkin – Free Pattern, you’ll need a few basic materials that are easy to find. The beauty of this project is that it doesn’t require anything too complicated or expensive. With just some yarn, a crochet hook, and a bit of stuffing, you can bring your pumpkin to life. Choosing the right materials ensures your pumpkin has the perfect texture and appearance.
Start by selecting a soft yarn in your preferred color. Classic orange works beautifully for a traditional pumpkin look, but you can also experiment with cream, mustard, or even gray for a more modern twist. A medium-weight (worsted) yarn works perfectly for most pumpkin sizes, but you can use thicker or thinner yarn to adjust the overall size. Pair your yarn with an appropriate crochet hook — typically between 4 mm and 5 mm, depending on your tension.
In addition to yarn and hook, you’ll need fiberfill or polyester stuffing to give your pumpkin its round, plump shape. You can also use yarn scraps as stuffing if you prefer an eco-friendly option. To finish off your pumpkin, use brown or green yarn for the stem, and consider adding a small leaf for a charming detail. Scissors and a yarn needle will help you weave in ends neatly and complete the final touches.
Another great aspect of the Crochet Pumpkin – Free Pattern is how easily you can adapt it. Want a more rustic texture? Try using cotton yarn. Prefer a softer look? Go for acrylic or velvet yarn. Each type of material changes the final feel and appearance, making every pumpkin one of a kind. The flexibility of this project means you can easily personalize it to match your seasonal decorations or personal style.
Lastly, remember that lighting can affect how your colors appear. If you plan to display your pumpkins together, hold your yarns under natural light before starting to ensure they complement each other. A cohesive palette can make a big difference in your final arrangement, especially if you plan to crochet several pumpkins of varying sizes.
Once you’ve gathered everything, set aside a cozy space, grab your yarn, and get ready to enjoy the soothing rhythm of crochet. The process itself can be relaxing and meditative — the perfect activity for a quiet autumn evening.
To create your Crochet Pumpkin – Free Pattern, you’ll start with a simple base using basic stitches. Begin with a magic ring, a common technique used in amigurumi and circular crochet projects. This allows your pumpkin to have a neat, tight center with no gaps. Work single crochet stitches into the ring and gradually increase each round to form the pumpkin’s body.
Once your base starts taking shape, continue crocheting in the round until you achieve your desired height. The number of rounds will determine how tall or squat your pumpkin appears. As you build, remember to maintain even tension to keep your stitches uniform. This consistency helps your pumpkin look smooth and professional once it’s stuffed.
After completing the body, it’s time to close the top. Begin decreasing the stitches gradually until the opening becomes small enough to secure. Before closing completely, fill the pumpkin with stuffing. Adjust the amount depending on how firm or soft you want your finished piece. Too much stuffing may distort the shape, while too little can make it collapse easily.
When the pumpkin is stuffed to your liking, sew the top closed using a yarn needle. To create the signature pumpkin segments, thread a long piece of yarn through the center and pull it tightly around the pumpkin several times, dividing it into sections. This detail gives it that realistic, plump appearance we associate with pumpkins.
Finally, add the stem using brown yarn. Crochet a small tube or simply wrap the yarn around itself and sew it securely on top. If you’d like to include a leaf, you can crochet a small green one using simple chain stitches and slip stitches. This extra detail adds charm and completes your Crochet Pumpkin – Free Pattern beautifully.
Don’t worry if your first pumpkin isn’t perfect. Each handmade piece carries its own charm, and slight variations only make your collection more unique and special. With each attempt, your technique will improve, and your pumpkins will look even more polished.
Your Crochet Pumpkin – Free Pattern creations can be used in countless creative ways around your home. They add warmth and charm to any room, instantly creating a cozy autumn atmosphere. You can display them on your mantel, dining table, or even on window sills for a lovely seasonal touch.
Consider arranging several pumpkins of different sizes and colors together to create a decorative centerpiece. Mixing shades of orange, cream, and gold can evoke the feeling of fall leaves, while adding textures like burlap or wood enhances the rustic aesthetic. These combinations make your display visually interesting and welcoming.
Crochet pumpkins also make thoughtful handmade gifts. Whether you’re visiting a friend for Thanksgiving or simply want to share some seasonal joy, a set of crocheted pumpkins is sure to be appreciated. They’re easy to personalize by adding small tags or initials, making each one meaningful and memorable.
For a more whimsical display, consider adding your Crochet Pumpkin – Free Pattern pieces to a garland or wreath. Attach small pumpkins to a crocheted string or grapevine wreath to create festive décor that can be hung on doors or walls. It’s a fun way to celebrate the season and showcase your crochet skills.
Another charming idea is to use them as photo props. Their soft texture and handmade charm make them perfect for autumn photo shoots, especially with kids or pets. You can even crochet mini pumpkins to place on gifts or as table place markers for fall gatherings.
The versatility of this pattern means you can keep using it beyond fall. By changing the colors — for example, using white and silver — you can adapt it for winter decorations. The Crochet Pumpkin – Free Pattern is truly timeless and flexible enough to suit any style or occasion.
As with any crochet project, there are small details that can make a big difference in the final result. To make your Crochet Pumpkin – Free Pattern look polished, always check your tension. Consistent tension ensures even stitches and prevents lumps or uneven shaping.
Using a stitch marker can help you track your rounds, especially if you’re crocheting multiple pumpkins at once. It prevents confusion and makes it easier to keep your stitches consistent. This small tool can be a game changer for beginners.
Experiment with different yarn types to achieve various effects. For example, velvet yarn gives your pumpkin a luxurious, soft feel, while cotton yarn provides a firm, rustic texture. Don’t hesitate to try metallic or glitter yarn for a festive sparkle during the holidays.
Stuffing evenly is another key factor. Be sure to add small amounts at a time and adjust as needed to keep the pumpkin’s shape balanced. After sewing the sections, gently mold the pumpkin with your hands to smooth out any uneven areas.
If you plan to make several pumpkins, consider creating them in batches — crochet all the bodies first, then add the stems and details later. This method helps maintain consistency and saves time. It’s especially helpful if you’re making pumpkins to sell or gift in sets.
Finally, have fun and let your creativity guide you. The Crochet Pumpkin – Free Pattern is not just about following instructions; it’s about expressing your own style. Add beads, buttons, or embroidery if you’d like to personalize your work even more.
1. Can beginners make the Crochet Pumpkin – Free Pattern?
Yes! This project is beginner-friendly, requiring only basic stitches like single crochet, increases, and decreases.
2. How long does it take to make a crochet pumpkin?
Depending on your speed and the size, most pumpkins can be completed in one to two hours.
3. What type of yarn works best for crochet pumpkins?
Worsted-weight yarn is ideal, but you can use any yarn you prefer. The texture and size will vary based on your choice.
4. Can I wash my crochet pumpkins?
Yes, but hand washing is recommended to preserve the shape. Let them air dry completely before displaying again.
5. How do I make my pumpkins look more realistic?
Adding defined sections with yarn and shaping the stem properly gives a natural, realistic look to your pumpkins.
6. Can I sell crochet pumpkins made from this pattern?
Yes, you can sell your finished pumpkins, as long as the design is your own creation and not directly copied from a copyrighted source.
The Crochet Pumpkin – Free Pattern is a beautiful and rewarding project that brings together creativity, relaxation, and seasonal charm. From selecting your favorite yarn colors to shaping each pumpkin with care, every step adds a personal touch to your handmade décor. With a few simple materials and techniques, you can create stunning fall decorations that reflect your love for crochet.
Now that you’ve learned how to make your own crochet pumpkins, why not give it a try? Share your thoughts, suggestions, or experiences in the comments — I’d love to know how your pumpkins turned out and what unique touches you added to them!


