The Cross and Crown Quilt – Free Pattern Tutorial is a fantastic project for quilters who love classic designs with a touch of elegance. This traditional quilt block has been a favorite among quilters for generations, thanks to its striking symmetry and meaningful symbolism.
Whether you are a beginner looking for an easy-to-follow pattern or an experienced quilter wanting to refine your skills, this tutorial will guide you through every step of the process.
Advertising
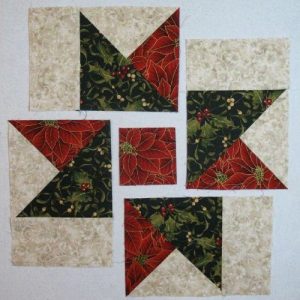
The Cross and Crown Quilt is composed of geometric shapes that come together beautifully, creating a bold and intricate pattern. This design works well with a variety of fabrics, from solid colors to vibrant prints, making it a versatile choice for any quilt project.
Image from google.
The contrast between the cross and the surrounding crown-like elements gives the block a visually dynamic effect that can be used in traditional, modern, or even scrappy quilt styles.
In this free pattern tutorial, we’ll cover everything you need to know to create your own Cross and Crown Quilt, from gathering materials to assembling the quilt blocks.
We will also explore variations and offer tips for achieving the best results. Whether you’re making a full quilt, a wall hanging, or a decorative pillow, this tutorial will help you bring this stunning design to life.
Advertising
1. Materials and Fabric Selection
Before starting your Cross and Crown Quilt – Free Pattern Tutorial, gathering the right materials is essential. Selecting high-quality fabrics and the correct tools will make the quilting process smoother and ensure a beautiful final result.
Fabric Choices: This pattern looks stunning in contrasting fabrics. Choose two or three complementary colors for a bold look or use a scrappy mix of fabrics for a vintage feel.
Quilting Cotton: Cotton fabric is the best choice for this quilt pattern because it is durable, easy to sew, and widely available in various prints and colors.
Cutting Tools: A rotary cutter, self-healing cutting mat, and quilting ruler are essential for precise cutting, ensuring that all your pieces fit together perfectly.
Thread and Needles: Choose a high-quality cotton thread that matches your fabric colors. Ensure you have extra sewing machine needles in case one breaks.
Sewing Machine and Accessories: While this quilt can be sewn by hand, a sewing machine will speed up the process. A ¼-inch foot for your sewing machine is useful for achieving consistent seam allowances.
Iron and Pressing Tools: Pressing each seam as you sew will help achieve crisp, professional-looking quilt blocks. A steam iron and a pressing board are highly recommended.
Now that you have all your materials ready, let’s move on to the step-by-step instructions for making the Cross and Crown Quilt Block.
2. Step-by-Step Instructions for the Quilt Block
Creating the Cross and Crown Quilt Block requires careful cutting and piecing, but following these steps will make the process easy and enjoyable.
Cut the Fabric Pieces: Begin by cutting squares and rectangles in your chosen colors. A traditional block consists of a central cross surrounded by triangular and square elements.
Sew the Cross Section: Assemble the center of the block by sewing together the rectangles that form the cross. Use a ¼-inch seam allowance and press seams open.
Add the Corner Triangles: Attach triangle pieces to the corners of the block, ensuring they align properly. This step requires careful positioning to maintain the block’s symmetry.
Sew the Outer Sections: Piece together the remaining squares and triangles, following the layout of the Cross and Crown Quilt pattern. Double-check your alignment before sewing.
Press and Trim the Block: Once all pieces are assembled, press the block flat with an iron and trim any excess fabric to ensure a clean, square shape.
Repeat for Multiple Blocks: If making a full quilt, repeat the process until you have the desired number of blocks. Arrange them in rows to create your quilt top.
With your blocks complete, let’s explore some creative variations for customizing your quilt.
3. Variations and Customization Ideas
The Cross and Crown Quilt – Free Pattern Tutorial allows for creative flexibility. By adjusting colors, fabric choices, and layouts, you can create a quilt that perfectly suits your style.
Scrappy Version: Use leftover fabric scraps in different colors and patterns for a vibrant, eclectic look. This variation adds a cozy, vintage charm to the quilt.
Monochrome Theme: Stick to shades of a single color for a modern and sophisticated effect. This approach works well in minimalist décor.
Reversed Colors: Switch the placement of light and dark fabrics to create a strikingly different visual effect while keeping the same quilt block structure.
Adding Borders: Frame each quilt block with sashing or decorative borders to highlight the pattern and add extra dimension to the design.
Mixing Block Sizes: Combine large and small versions of the Cross and Crown Quilt Block to create a dynamic, eye-catching quilt layout.
Seasonal Quilts: Use holiday-themed fabrics for festive versions of this quilt, such as warm autumn hues or Christmas-inspired prints.
These variations give you the freedom to make a quilt that reflects your personality and creativity.
4. Quilting and Finishing Touches
Once you have pieced together all the blocks for your Cross and Crown Quilt, it’s time to complete your project with quilting and finishing techniques.
Assemble the Quilt Top: Arrange your blocks in the desired layout and sew them together with sashing or directly for a seamless pattern.
Add Batting and Backing: Choose a soft batting to provide warmth and structure, and select a backing fabric that complements the quilt’s front design.
Quilt the Layers Together: Use straight-line quilting, free-motion quilting, or hand quilting to secure the layers and enhance the quilt’s texture.
Binding the Quilt: Finish the edges by adding a quilt binding, ensuring a polished and durable final piece.
Press and Inspect: Give your quilt a final press, checking for any loose threads or uneven seams before displaying or gifting it.
Enjoy Your Handmade Quilt: Whether draped over a bed, used as a cozy throw, or gifted to a loved one, your finished Cross and Crown Quilt will be a cherished creation.
FAQ About Cross and Crown Quilt
Is the Cross and Crown Quilt suitable for beginners? Yes! While it requires precision, the block construction is straightforward and great for learning piecing techniques.
What size should the quilt blocks be? The block size can vary depending on your project. A common size is 12×12 inches, but you can adjust as needed.
Can I hand-sew this quilt instead of using a machine? Absolutely! Hand-sewing takes more time but can add a beautiful, traditional touch to the quilt.
What is the best fabric for this pattern? 100% cotton quilting fabric is the best choice due to its durability and ease of handling.
How do I make my quilt more durable? Use high-quality fabric, secure seams properly, and quilt the layers thoroughly to ensure longevity.
Join our VIP broadcast list and gain access to exclusive patterns, all for free. As a VIP member, you’ll receive the best patterns daily, delivered directly to your device. ✨📱 It’s a unique opportunity to stay up-to-date with the latest trends and designs, curated just for you. Don’t miss out on enhancing your projects and discovering new inspirations with the best patterns every day! 🎨🔝
The Cross and Crown Quilt – Free Pattern Tutorial is a wonderful project that blends tradition and creativity. Whether you’re a beginner or an experienced quilter, this pattern offers endless possibilities for customization and personal expression. By following this tutorial, you’ll be able to create a stunning quilt that can be cherished for years to come.
We’d love to hear from you! Have you tried making the Cross and Crown Quilt? Share your experience, suggestions, or questions in the comments below. Happy quilting!


