
Crochet Multi-Purpose Blouse, Shawl, Runner Model

The Crochet Mommy and Me Messy Bun Hats – FREE PATTERN is a delightful project for anyone who loves crocheting stylish and practical accessories.
These hats are designed for moms and their little ones, allowing them to match in a fun and fashionable way. Perfect for all seasons, the messy bun hats keep your head warm while leaving room for your bun or ponytail to shine.
What makes these hats special is their versatility and ease of customization. Whether you prefer a simple, solid-colored design or want to incorporate vibrant patterns, this Crochet Mommy and Me Messy Bun Hats – FREE PATTERN can be adjusted to fit your personal style. Plus, it’s an excellent way to bond with your child while wearing matching accessories that showcase your creativity.
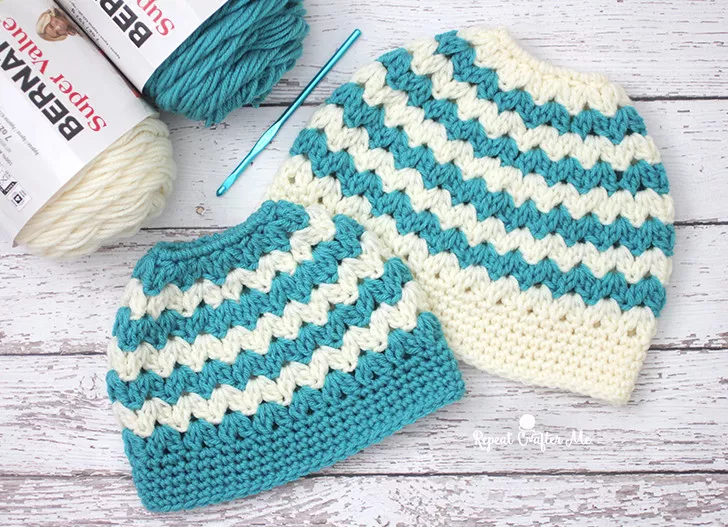
Image from google.
In this tutorial, we will guide you step-by-step through the process of creating these charming hats. From gathering materials to adding the final touches, you’ll learn everything you need to make your own Crochet Mommy and Me Messy Bun Hats with confidence and flair.
To start your Crochet Mommy and Me Messy Bun Hats – FREE PATTERN, it’s important to gather all the necessary materials. Having everything on hand will make the process smooth and enjoyable.
Begin with the yarn. Choose a soft, medium-weight yarn that is comfortable to wear and easy to crochet with. Acrylic or cotton blends are great choices as they’re durable, washable, and available in a variety of colors.
You’ll also need a crochet hook that matches the yarn weight. Check the yarn label for the recommended hook size or adjust based on your personal tension. A 5.0mm (H-8) hook is commonly used for this type of project.
Other essential tools include scissors for cutting yarn, a tape measure for sizing the hats accurately, and a yarn needle for weaving in loose ends. Stitch markers can also be helpful to keep track of rounds and sections in your pattern.
For embellishments, consider adding buttons, pom-poms, or even a small bow for extra charm. These details can make your hats truly unique and personalized.
Finally, have your pattern instructions ready. This tutorial will guide you through the steps, but you can also download or print the Crochet Mommy and Me Messy Bun Hats – FREE PATTERN for reference.
The foundation of the Crochet Mommy and Me Messy Bun Hats is the hat base, which determines the shape and fit. This section covers the essential steps for starting and completing the base.
Begin with a magic ring or chain 4 and slip stitch to form a circle. This creates the adjustable opening at the top of the hat where the messy bun or ponytail will fit. Work your first round of stitches into the ring, ensuring the opening is large enough for comfort.
Increase evenly in each round to expand the crown of the hat. Use double crochet (DC) stitches to maintain a consistent texture. As you progress, measure the diameter of the crown to ensure it matches the required size for the wearer’s head.
Once the crown is the correct size, stop increasing and work even rounds to form the sides of the hat. Adjust the number of rounds based on the desired height. For the Mommy version, you may want a slightly taller hat, while the Me version can be shorter for a snug fit.
Check the fit by trying the hat on or measuring it against the head circumference. This ensures a comfortable and secure fit. If adjustments are needed, add or remove rounds as necessary.
End the base with a slip stitch and cut the yarn, leaving a long tail for finishing. Use a yarn needle to weave in any loose ends and secure your work.
One of the joys of the Crochet Mommy and Me Messy Bun Hats – FREE PATTERN is the ability to customize the design for both the parent and child. Here are some tips for making each hat unique.
Choose different color schemes for each hat to reflect individual personalities while maintaining a matching theme. For example, use a neutral base color with colorful stripes or accents.
Add texture by incorporating different stitch patterns. Shell stitches, puff stitches, or post stitches can create interesting designs that add character to the hats.
For extra warmth, consider adding a fleece lining inside the hats. This is especially useful for colder climates and adds a layer of softness.
Personalize each hat with embellishments. Add initials, small appliqués, or decorative buttons to distinguish between the Mommy and Me versions.
Experiment with the size of the opening at the top of the hat. Some may prefer a smaller opening for a sleek ponytail, while others may want a larger opening to accommodate a fuller bun.
Finally, create matching accessories such as scarves or mittens to complete the Mommy and Me set. This adds a cohesive look to your crochet creations.
Once you’ve completed the main structure of the Crochet Mommy and Me Messy Bun Hats, it’s time to add the finishing touches. These details can elevate the overall look and ensure durability.
Begin by blocking the hats to give them a polished shape. Lightly dampen the hats and lay them flat to dry, shaping them as needed. Blocking helps set the stitches and ensures a professional finish.
Secure all loose ends by weaving them into the stitches with a yarn needle. This step prevents unraveling and keeps the hats looking neat.
If you’ve added embellishments, double-check that they are securely attached. Sew buttons tightly and use fabric glue if necessary for appliqués.
For long-term care, follow the washing instructions for your chosen yarn. Most acrylic and cotton yarns are machine washable, but handwashing is recommended for delicate embellishments.
Store your hats in a cool, dry place to prevent damage. If gifting the hats, consider packaging them in a decorative box or bag for an added touch of elegance.
Enjoy wearing or gifting your Crochet Mommy and Me Messy Bun Hats, knowing they were made with love and creativity.
1. Can I adjust the size of the Crochet Mommy and Me Messy Bun Hats?
Yes, simply add or reduce the number of rounds when working on the hat base to adjust the size for different head circumferences.
2. What type of yarn works best for these hats?
Medium-weight acrylic or cotton yarn is ideal due to its durability and comfort. Choose soft, washable yarns for the best results.
3. How do I ensure the opening at the top fits properly?
Measure the wearer’s bun or ponytail size and adjust the initial circle’s diameter accordingly.
4. Can I use this pattern for other hat styles?
Absolutely! By modifying the top opening or changing the stitch pattern, you can create different hat styles using this base.
5. How do I make the hats warmer for winter?
Add a fleece lining or use thicker yarn to increase warmth and insulation.
6. Are these hats suitable for beginners?
Yes, the Crochet Mommy and Me Messy Bun Hats – FREE PATTERN is beginner-friendly, with simple stitches and clear instructions.
Join our VIP broadcast list and gain access to exclusive patterns, all for free. As a VIP member, you’ll receive the best patterns daily, delivered directly to your device. ✨📱 It’s a unique opportunity to stay up-to-date with the latest trends and designs, curated just for you. Don’t miss out on enhancing your projects and discovering new inspirations with the best patterns every day! 🎨🔝
The Crochet Mommy and Me Messy Bun Hats – FREE PATTERN is a versatile and enjoyable project that brings creativity and practicality together. With this guide, you’ve learned how to create stylish matching hats that celebrate the bond between a parent and child. From selecting materials to adding finishing touches, every step is designed to be approachable and rewarding.
We’d love to hear your thoughts on this tutorial. Share your experiences, opinions, and suggestions in the comments below. Happy crocheting!


