Turtle Coaster Crochet Ideas: Add Whimsy and Functionality to Your Decor offer the perfect way to bring both fun and practicality into your home.
These adorable, handmade coasters not only protect your furniture from cup rings but also serve as charming decor pieces.
Whether you’re a seasoned crochet enthusiast or just starting out, these turtle coasters are a delightful project that can be personalized to suit your style.
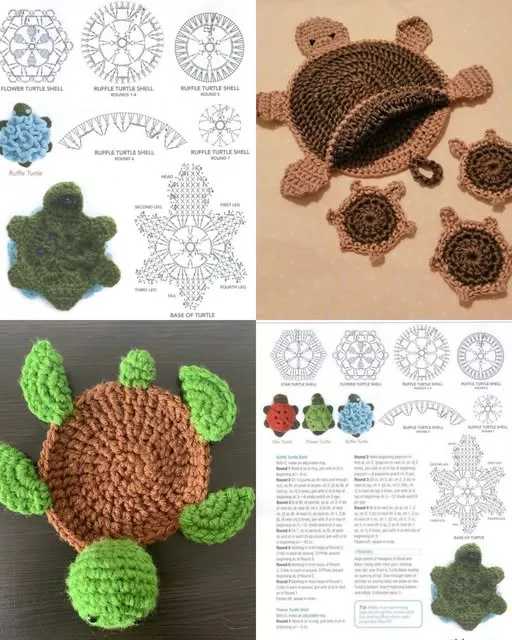
Image from google.
In this article, we’ll explore various turtle coaster crochet ideas, including step-by-step instructions to create your own set.
SEE MORE PATTERNS
Incorporating Turtle Coaster Crochet Ideas into your decor can instantly add a touch of whimsy. The unique turtle design works perfectly with various color schemes and can be adapted for different occasions.
From beachy vibes to a cute animal-themed look, turtle coasters are versatile enough to complement any space. Not only do they serve a functional purpose, but they can also serve as a conversation starter for your guests.
Crocheting turtle coasters is a fantastic way to express your creativity while crafting something useful.
In the following sections, we’ll provide a detailed guide on how to make these coasters, offer tips for customizing the design, and explore various yarn choices. Let’s get started on making these delightful additions to your home decor!
1. Materials Needed for Turtle Coaster Crochet Ideas
Before you start creating your Turtle Coaster Crochet Ideas, it’s essential to gather the right materials. Using high-quality yarn and the right tools will ensure that your coasters are both durable and visually appealing.
- Yarn: For a sturdy yet soft coaster, consider using 100% cotton yarn. Cotton yarn is absorbent and can handle heat, making it perfect for coasters. Choose colors that reflect your personal style or match the theme of the room you’re decorating.
- Crochet Hook: A 3.5mm or 4mm crochet hook is usually ideal for coasters. It allows you to create a dense, tight stitch that will give your coaster the durability it needs to serve its purpose.
- Scissors: Sharp scissors will help you cut your yarn with precision, ensuring clean edges and minimizing fraying.
- Yarn Needle: You’ll need a yarn needle to weave in the ends once your coasters are completed. This tool helps tidy up your work and ensures that no loose strands ruin the look of your coasters.
- Stitch Marker: A stitch marker can help keep track of the rounds and prevent you from losing your place while crocheting. It’s especially helpful for beginners.
- Optional Embellishments: If you want to add a personal touch to your turtle coasters, consider embellishments like small buttons for eyes or embroidery floss for extra detail.
By gathering these materials, you’ll be prepared to begin your turtle coaster project with everything you need to create beautiful, functional coasters.
2. Step-by-Step Guide to Creating Turtle Coaster Crochet Ideas
Now that you have your materials ready, let’s dive into creating the Turtle Coaster Crochet Ideas. This step-by-step guide will walk you through the process of crocheting your very own turtle-shaped coasters.
- Start with the Turtle Shell: Begin by making a magic ring, which will form the center of your turtle’s shell. Crochet six single crochet (sc) stitches into the magic ring. Pull the ring tight to close, and join the round with a slip stitch.
- Increase to Form the Shell: In the next round, increase the number of stitches to create the round shape of the shell. Make two single crochet stitches into each stitch around for the second round.
- Build the Shell Shape: Continue crocheting in the round, adding increases every few rounds to shape the shell properly. Work the increases gradually until you have the desired size for the turtle’s shell. You should end up with a circle that’s large enough to comfortably hold a cup or glass.
- Add the Turtle’s Head, Legs, and Tail: Once the shell is complete, it’s time to crochet the head, legs, and tail of the turtle. For each, create small ovals or rounded shapes using the same technique as the shell. Attach them to the edges of the shell using slip stitches or a whip stitch.
- Assemble the Turtle: Once all parts of the turtle are crocheted, sew the head, legs, and tail to the appropriate spots on the shell. Be sure to attach them securely so that they hold up during use.
- Finishing Touches: To complete the coaster, weave in any loose ends with your yarn needle. You can also add tiny eyes or a smile using embroidery thread or small buttons to bring the turtle’s face to life. If you want your coasters to have a polished look, you can add a border around the edge of the shell.
With these steps, you’ll be able to create a set of charming, functional turtle coasters that add whimsy and charm to any space.
3. Customizing Your Turtle Coaster Crochet Ideas
One of the best things about Turtle Coaster Crochet Ideas is that they are highly customizable. You can change up the colors, sizes, and details to create unique versions that match your style and home decor.
- Color Choices: While green is the classic color for a turtle, you can experiment with other colors for the shell and body. Consider using pastel shades for a softer look, or go for bright, bold colors for a more modern design.
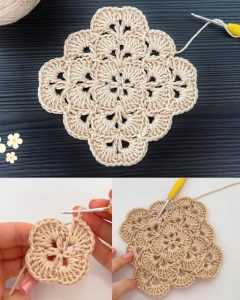
- Shell Pattern: You can customize the turtle’s shell by adding different textures or patterns. For example, try a striped or chevron pattern for a more decorative look. You can also crochet a more textured shell using puff stitches or bobble stitches for added visual interest.
- Add Fun Faces: Giving your turtle a personality is easy! Use small buttons, beads, or embroidery floss to create quirky eyes or a smiling mouth. Each coaster can have a different facial expression, adding a playful touch to your set.
- Use Variegated Yarn: If you prefer a more colorful and dynamic look, consider using variegated yarn. This type of yarn has multiple colors that change throughout the piece, making the turtle coasters even more eye-catching.
- Change the Size: You don’t have to stick to the standard coaster size. Customize the size of the turtle coasters to fit different drinks or purposes. For larger cups, you can create a bigger turtle design, or for smaller cups, make the turtles more compact.
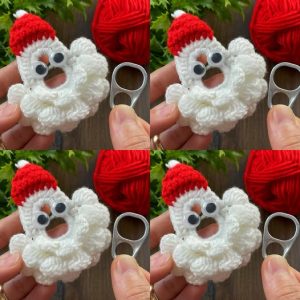
- Holiday or Theme Variations: Add a festive twist to your coasters by changing the yarn colors to match different holidays. Red, green, and white for Christmas, or orange and black for Halloween, can make your turtle coasters perfect for any occasion.
These customization ideas allow you to personalize your Turtle Coaster Crochet Ideas and create a set that reflects your unique taste.
4. Benefits of Turtle Coaster Crochet Ideas for Your Home
Adding Turtle Coaster Crochet Ideas to your home decor not only brings a touch of whimsy but also offers practical benefits. These coasters are the perfect combination of form and function, making them a great choice for any home.
- Protects Your Furniture: The primary function of any coaster is to protect your furniture from water rings, heat, and spills. By crocheting your own turtle coasters, you can ensure your tables and countertops remain in great condition.
- Adds Personality: A set of handmade turtle coasters instantly adds personality and charm to your home. Whether you display them on your coffee table or use them daily, they’re sure to draw attention and start conversations.
- A Fun, Crafty Project: Crocheting turtle coasters is a fun, creative project for anyone who enjoys crafting. It’s a great way to unwind and relax while creating something useful and beautiful.
- Great Gift Idea: Handmade coasters make excellent gifts for friends and family. Whether you’re making them for a birthday, housewarming, or holiday, turtle coasters are a thoughtful and unique gift.
- Easy to Maintain: Cotton yarn is easy to clean, and you can simply throw your coasters in the wash if they get dirty. This makes them practical and low-maintenance while still looking great.
- Versatile Decor: Turtle coasters can complement a variety of home styles, from coastal and beach-themed homes to whimsical and nature-inspired spaces. They add a playful touch to any room and can be used year-round.
These benefits make Turtle Coaster Crochet Ideas a perfect addition to any home, providing both function and style.
FAQ About Turtle Coaster Crochet Ideas
1. Can I use other yarn types for these coasters?
Yes, while cotton yarn is ideal for durability and absorbency, you can also experiment with other types like acrylic or bamboo yarn, depending on the look and feel you want.
2. How do I make sure my coasters stay flat?
To keep your coasters from curling up, make sure you’re using tight stitches and working in consistent rounds. Blocking the finished coaster can also help keep it flat.
3. Can I crochet these coasters without the turtle shape?
Absolutely! If you prefer a simpler design, you can crochet regular circular coasters and still enjoy the same functionality and beauty.
4. How long does it take to make one coaster?
Depending on your skill level, making one turtle coaster can take between one to two hours. It’s a quick project that’s perfect for a weekend crafting session.
5. Can I make matching items for my table?
Yes! You can create matching placemats, table runners, or even napkin rings using the same turtle theme to tie the entire look together.
6. Are turtle coasters suitable for outdoor use?
While they are primarily designed for indoor use, you can make them from more durable materials like waterproof yarn if you plan to use them outdoors.
Join our VIP broadcast list and gain access to exclusive patterns, all for free. As a VIP member, you’ll receive the best patterns daily, delivered directly to your device. ✨📱 It’s a unique opportunity to stay up-to-date with the latest trends and designs, curated just for you. Don’t miss out on enhancing your projects and discovering new inspirations with the best patterns every day! 🎨🔝
JOIN NOW
Conclusion
Turtle Coaster Crochet Ideas are a fun and functional way to add a whimsical touch to your home decor. With a few simple materials and techniques, you can create a set of charming coasters that protect your furniture while showing off your creative skills.
PATTERN HERE
Whether you’re crocheting them for yourself or as a gift, these coasters are sure to be a hit. We hope this tutorial has inspired you to start crocheting your own turtle coasters! Don’t forget to leave your thoughts and suggestions in the comments below. Happy crocheting!


