
Crochet Multi-Purpose Blouse, Shawl, Runner Model

Granny Square Baskets – FREE PATTERNS are the perfect project for crochet lovers looking to combine functionality with charm.
These versatile baskets can be used for storage, decoration, or gifting, and the best part is that they’re customizable.
Whether you’re an experienced crocheter or a beginner, granny square baskets offer endless possibilities to showcase your creativity.
The beauty of granny squares lies in their simplicity and adaptability. You can use vibrant colors, intricate patterns, or stick to a classic look.
The Granny Square Baskets – FREE PATTERNS in this tutorial will guide you through the process, ensuring that you create something both beautiful and practical.
Before diving into the details, gather your materials, choose your color palette, and get ready to bring your ideas to life. Let’s explore how to make these delightful baskets step by step.
Before starting your Granny Square Baskets – FREE PATTERNS, ensure you have all the necessary materials and tools.
Having these tools ready ensures a smooth and enjoyable crochet experience.
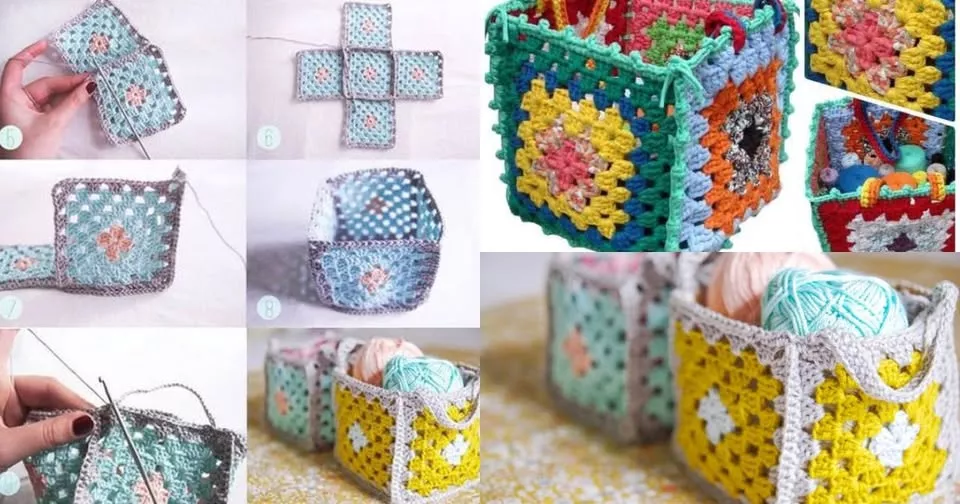
The foundation of Granny Square Baskets – FREE PATTERNS is, of course, the granny squares themselves. Here’s how to create them step by step.
Taking time to craft well-made granny squares sets a solid foundation for your basket.
Now that you’ve completed your granny squares, it’s time to assemble them into a basket. Follow these steps for a seamless process.
This stage transforms your granny squares into a functional and stylish basket.
One of the best aspects of Granny Square Baskets – FREE PATTERNS is the opportunity to personalize your design. Here are some ideas:
These customizations allow you to make a basket that truly reflects your style and needs.
Q1: What type of yarn is best for granny square baskets? A: Cotton yarn is recommended for its durability and ability to maintain the basket’s shape.
Q2: Can beginners make these baskets? A: Absolutely! The Granny Square Baskets – FREE PATTERNS are beginner-friendly, with simple stitches and clear instructions.
Q3: How long does it take to complete a basket? A: The time varies based on the basket’s size and your crochet speed. Small baskets can take a few hours, while larger ones may require a weekend.
Q4: Can I use leftover yarn for this project? A: Yes! Granny square baskets are a great way to use up leftover yarn from other projects.
Q5: How do I clean a granny square basket? A: Hand wash the basket in cool water with mild detergent and reshape it while drying.
Q6: Can these baskets be made in different shapes? A: Yes, you can adapt the pattern to create round, oval, or hexagonal baskets by adjusting the granny square design.
Join our VIP broadcast list and gain access to exclusive patterns, all for free. As a VIP member, you’ll receive the best patterns daily, delivered directly to your device. ✨📱 It’s a unique opportunity to stay up-to-date with the latest trends and designs, curated just for you. Don’t miss out on enhancing your projects and discovering new inspirations with the best patterns every day! 🎨🔝
The Granny Square Baskets – FREE PATTERNS tutorial offers a fun and creative way to enhance your crochet skills while making something practical and beautiful.
From selecting materials to customizing your design, this project is both enjoyable and rewarding.
We hope this guide inspires you to create your own unique baskets. Share your experiences, feedback, and suggestions in the comments below. Happy crocheting!


