
Crochet Multi-Purpose Blouse, Shawl, Runner Model

If you’re looking to add some fun and creativity to your crochet projects, learning how to crochet cat stitch can be an exciting and rewarding endeavor. The cat stitch is a unique and playful crochet technique that results in adorable, textured patterns resembling the shape of a cat’s face.
Whether you’re a beginner or an experienced crocheter, mastering this stitch will open up new possibilities for your projects, from blankets to clothing and accessories. In this guide, we’ll walk you through every step to help you successfully incorporate the cat stitch into your crochet repertoire.
The cat stitch is loved for its charm and simplicity. Once you understand the basics, you can easily create playful motifs that bring your crochet work to life. By following this tutorial, you’ll learn how to crochet this cute design, perfect for adding whimsical details to your projects.
Whether you’re crafting for yourself, friends, or family, the cat stitch is bound to make your crochet creations stand out.
Before diving into the steps, let’s take a moment to appreciate the beauty of the cat stitch. It’s versatile, which means you can adjust it to suit various projects.
This textured stitch can be used in everything from small decorative items to larger, functional pieces. The addition of cat-like features such as ears and whiskers creates a distinct, eye-catching pattern that’s sure to bring joy to anyone who sees it.
When learning how to crochet cat stitch, it’s important to start with the basics and gather all the necessary materials. The stitch itself is not overly complicated, but it does require some understanding of crochet fundamentals. Here’s what you’ll need:
First, make sure you have yarn that’s suitable for the project you’re working on. While any yarn can technically be used for the cat stitch, medium-weight yarn is often the easiest to work with, especially for beginners. Choose a yarn color that complements the design you’re aiming for—classic gray or black yarn can be ideal for a cat-themed project, but you can opt for any color that fits your vision.
Next, you will need a crochet hook. The size of the hook will depend on the yarn you’re using, but for medium-weight yarn, a 4mm to 5mm hook is typically recommended. A larger or smaller hook will alter the tightness of your stitches, so it’s important to select the right size for the look you want to achieve.
Before starting, it’s helpful to familiarize yourself with basic crochet stitches such as chain stitch (ch), slip stitch (sl st), single crochet (sc), and double crochet (dc). These are the building blocks of many crochet projects, including the cat stitch. If you’re unfamiliar with these stitches, we recommend practicing them first to ensure you’re comfortable with the crochet process.
Once you have your materials ready and are comfortable with the basic stitches, you’re ready to begin learning how to crochet the cat stitch!
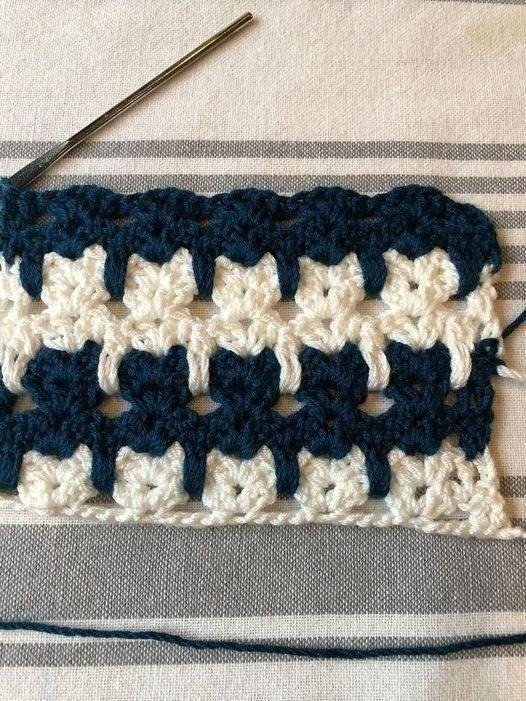
The cat stitch involves a combination of basic crochet stitches worked together in a specific way to create the shape of a cat. The pattern is simple and works by forming a rounded shape with two pointed ears, making it resemble a cat’s face. Here is how you can start:
Start with a foundation chain. This is typically a chain of 4 or 5 stitches, depending on the size of your project. Once your foundation chain is complete, connect the last chain to the first using a slip stitch to form a small loop, which will serve as the base for the cat motif.
After forming the loop, you’ll crochet around the loop using single crochet stitches (sc). These create the base of the cat stitch. Continue working in a spiral, increasing the number of stitches until the shape starts to resemble the rounded part of the cat’s face. Pay close attention to the tension of your stitches; if they are too tight, the shape might become distorted, so aim for a comfortable tension as you crochet.
The ears of the cat stitch are created by increasing the stitch count at specific intervals. To make the ears, work additional increases at the top of the circle. You’ll begin to notice the distinctive pointed shape that resembles a cat’s ears. These increases are often made by working two single crochet stitches (sc) into one stitch at the top of the round.
At this point, the face of your cat is beginning to take shape. You can make it as large or small as you want, adjusting the number of stitches or rounds to fit the proportions you’re aiming for. The basic shape is the foundation of your design, and you can now begin to add details such as whiskers, eyes, and a nose to complete the cat’s face.
Once you have the basic structure of the cat stitch, it’s time to add the fun details that make the cat look even more lifelike. The features of the cat’s face, including the eyes, nose, and whiskers, are what bring the design to life. Here’s how you can enhance your cat stitch:
For the eyes, use small black yarn or safety eyes to create a pair of simple, round eyes. Position them evenly within the face, slightly below the top of the head, ensuring they’re symmetrical. If you’re using yarn, simply sew small circles of black yarn onto the face, making sure to knot them securely at the back.
Next, create a small triangular shape for the cat’s nose. You can use a contrasting color for this, such as pink or red, to make the nose stand out. Sew the nose just below the eyes, in the center of the face. This small detail will add a lot of character to your cat stitch.
Whiskers can be made using yarn or embroidery thread. Attach three or four strands of thread or yarn to either side of the cat’s nose, giving it a cute, cat-like appearance. The whiskers can be long or short, depending on your preferences. For added flair, you can even experiment with different textures or colors for the whiskers.
If you’d like to add more depth to your design, consider incorporating ears made from separate crochet pieces. These can be sewn onto the top of the head, adding a touch of dimension to your cat stitch design.
Finally, consider adding small decorative elements such as a bow or collar around the cat’s neck, especially if you’re working on a larger project like a blanket or bag. This small touch can make your crochet project feel even more personalized.
While the cat stitch is a fun and rewarding technique, like any crochet project, it can come with its challenges. Here are some common issues you might encounter and how to resolve them:
One common problem is uneven stitches. If the stitches aren’t consistent, the cat’s face might appear distorted. To avoid this, ensure that you’re using even tension throughout your work. If necessary, count your stitches as you go to make sure you’re following the pattern correctly.
Another issue might be difficulty in shaping the ears. If the ears aren’t forming as expected, try adjusting your increases. Remember that the ears should be formed by increasing stitches in the right spots, so don’t hesitate to rip back a few rounds and try again if the shape isn’t quite right.
If you’re having trouble with the placement of the features, such as the eyes or whiskers, consider using a stitch marker to mark the correct spot for each feature. This will ensure that everything is symmetrical and evenly spaced. You can also use a fabric pen to lightly mark the placement of features before you sew them on.
In some cases, you may find that your cat’s face is too small or too large for your project. To resolve this, adjust the number of stitches or rounds at the beginning to better suit the scale of your design. Crochet is flexible, so don’t be afraid to experiment with the size until you get the perfect look.
Lastly, if you’re not happy with the finished product, don’t be afraid to unravel and start over. Crochet allows for plenty of do-overs, and it’s all part of the learning process. Take your time, and enjoy the journey of making a fun cat stitch!
1. How do I crochet the cat’s ears?
To crochet the cat’s ears, increase stitches at the top of the circle to form the pointed shape. Work two single crochet stitches (sc) into one stitch at the top to create the ears.
2. Can I use any yarn for the cat stitch?
Yes, you can use any yarn, but medium-weight yarn is recommended for beginners. Choose a color that complements your design.
3. What should I use for the cat’s eyes?
For the eyes, you can use small black yarn circles or safety eyes. If you’re using yarn, sew small black circles onto the face.
4. How do I make the whiskers for the cat stitch?
Use yarn or embroidery thread to create the whiskers. Attach three or four strands of yarn to either side of the nose.
5. Can I adjust the size of the cat stitch?
Yes, you can adjust the size by increasing or decreasing the number of stitches or rounds you work at the beginning.
Join our VIP broadcast list and gain access to exclusive patterns, all for free. As a VIP member, you’ll receive the best patterns daily, delivered directly to your device. ✨📱 It’s a unique opportunity to stay up-to-date with the latest trends and designs, curated just for you. Don’t miss out on enhancing your projects and discovering new inspirations with the best patterns every day! 🎨🔝
In this guide, you’ve learned how to crochet cat stitch, from the basics of starting the pattern to adding the finishing touches like eyes, whiskers, and ears.
This charming stitch is perfect for adding personality to your crochet creations, whether you’re making small accessories or larger items like blankets or cushions.
Don’t be afraid to experiment with different colors and styles to personalize your designs. We hope you enjoyed this tutorial—please leave a comment with your thoughts, and feel free to share any suggestions or questions you may have!


