
Pie Carrier Sewing Pattern

Log Cabin Quilt – Free Tutorial is your perfect guide to creating one of the most timeless and beginner-friendly quilt patterns in the world of quilting. Known for its structured design and rich history, the Log Cabin Quilt has been a beloved favorite for generations.
In this Free Tutorial, you will discover step-by-step instructions, tips for success, and inspiring layout ideas that will make your quilting journey both joyful and fulfilling.
This Log Cabin Quilt – Free Tutorial focuses not only on technique but also on helping you create a quilt that’s full of warmth, symbolism, and personal expression.

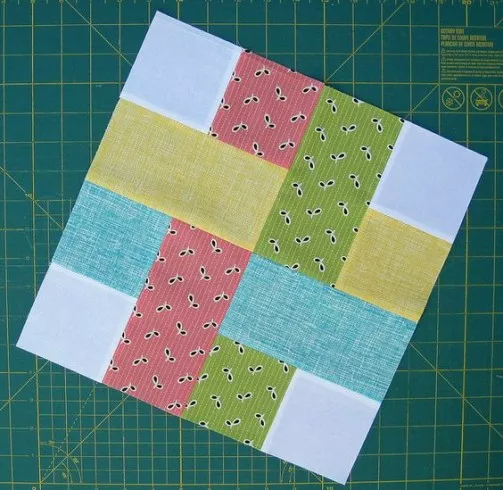
The log cabin block starts with a central square, often called the “hearth,” and builds outward with strips of fabric known as “logs.” These blocks represent the heart of a home and have long been used to express comfort and security.
Whether you’re just starting in quilting or looking to add a classic piece to your handmade collection, the Log Cabin Quilt – Free Tutorial gives you everything you need.
From selecting fabrics to assembling your first block, this guide offers helpful tips, encourages creativity, and follows Google AdSense policies to ensure safe, useful, and user-friendly content.
The Log Cabin Quilt design is deeply symbolic. Traditionally, the center square represents the hearth of a home—commonly made in red or yellow—while the surrounding strips symbolize walls. This makes every block a cozy, structured representation of a house.
One of the reasons this pattern is so beloved is because of its simplicity and versatility. The methodical, strip-by-strip construction is relaxing and beginner-friendly while still offering creative complexity for advanced quilters.
The structure of the block also makes it incredibly adaptable. You can experiment with color, contrast, and fabric texture to achieve modern or traditional looks. No matter your style, the Log Cabin Quilt – Free Tutorial helps you tailor the design to suit your aesthetic.
Another appeal is its use of fabric scraps. You can create stunning quilts by recycling leftover strips from previous projects. This eco-friendly aspect makes the log cabin quilt a practical choice for sustainable crafting.
The layout possibilities are endless. Popular designs include Barn Raising, Courthouse Steps, and Streak of Lightning. Each one offers a unique visual effect, and this tutorial will introduce you to several of these options.
Lastly, the modular block format allows you to build your quilt at your own pace. You can start with a small project—like a pillow cover—and expand it into a full-sized quilt as your confidence grows.
To follow this Log Cabin Quilt – Free Tutorial, start by gathering your materials. You’ll need basic quilting tools: rotary cutter, cutting mat, acrylic ruler, pins or clips, and a sewing machine. A reliable iron and ironing board are also essential for pressing seams.
Fabric selection plays a huge role in your final result. Traditional quilts use a mix of light and dark fabrics to create contrast. Choose 100% cotton quilting fabric for its ease of use and durability.
For beginners, precut fabric bundles like jelly rolls are a great option. These precut 2.5” strips eliminate cutting time and offer coordinated color palettes that take the guesswork out of matching.
You’ll also need a neutral thread—preferably 100% cotton—for both piecing and quilting. Neutral shades like gray or beige blend well with a variety of colors and fabrics.
Don’t forget batting and backing. Batting adds softness and warmth, while your backing fabric finishes off the quilt’s underside. Cotton or flannel work beautifully for both comfort and structure.
Finally, a seam ripper is your best friend when starting out. Mistakes happen, and having the right tool to fix them will make the experience more forgiving and enjoyable.
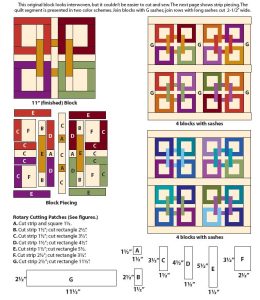
Begin your block with the center square. Cut this piece to 2.5” x 2.5”. This will be the foundation of your log cabin, and every strip will build around it in a clockwise or counterclockwise direction.
Next, sew the first “log” (strip of fabric) to one side of the center square using a ¼” seam allowance. Press the seam outward before adding the next strip. This keeps the block flat and tidy.
Continue adding strips around the square, always working in the same sequence. Most blocks have two light sides and two dark sides to preserve the classic design contrast.
Trim each log to fit as you go. This ensures accuracy and helps your blocks line up evenly when it’s time to assemble the quilt top. A ruler and rotary cutter make this step quick and precise.
When your block reaches the desired size—typically 12.5” x 12.5”—give it a final press. Repeat the process to make multiple blocks, arranging them into your chosen layout before sewing them together.
Once the top is assembled, layer it with batting and backing. Quilt as desired using straight-line or free-motion techniques, then bind the edges to complete your quilt.
The layout you choose will define the final look of your quilt. Traditional patterns like Barn Raising arrange blocks in concentric diamonds, while the Fields and Furrows layout uses diagonal striping for a dynamic finish.
Courthouse Steps is a popular variation that alternates strip placement symmetrically. This layout offers balance and structure, making it great for beginners. You can experiment with different color schemes for a modern twist.
Adding sashing between blocks can help highlight each design and create more visual separation. Use a contrasting or neutral fabric to frame your log cabin blocks.
Borders and cornerstones give the quilt a polished look. You can add one or more borders to increase the size and tie the color scheme together. Simple, solid borders keep the focus on the blocks.
For a personalized touch, consider embellishing your quilt with embroidery or appliqué in the center squares. This is a fun way to incorporate initials, dates, or special symbols into your design.
Finally, label your finished quilt with your name, date, and a message. Handmade quilts often become heirlooms, and a label ensures your work is remembered and appreciated for years to come.
What size should I cut my fabric strips for a log cabin quilt?
Most traditional log cabin quilts use 2.5” wide strips, which finish at 2” after sewing. You can adjust the width based on your desired block size and overall quilt dimensions.
Do I need a quilting ruler to make a log cabin quilt?
Yes, a quilting ruler is highly recommended for accurate cutting. It helps ensure all your strips are consistent in width, which is crucial for a well-aligned quilt.
Can I hand-sew a log cabin quilt instead of using a machine?
Absolutely! While machine sewing is faster, hand-sewing is possible and offers a meditative experience. It’s especially useful for portable projects or slow stitching enthusiasts.
Is it necessary to prewash fabric before quilting?
Prewashing is optional but helps prevent shrinkage and color bleeding. If you’re mixing fabrics from different manufacturers, prewashing can ensure consistency.
How do I quilt the finished top?
You can quilt with straight lines, echo quilting around the block shapes, or free-motion designs. Stitch in the ditch is a popular choice for beginners as it follows the seam lines.
What’s the best way to bind a log cabin quilt?
Use double-fold binding made from 2.5” strips. Attach it by machine on one side and finish by hand on the other for a neat, professional look.
The Log Cabin Quilt – Free Tutorial has walked you through the timeless appeal and step-by-step process of making a beautiful, meaningful quilt. From choosing your fabrics and tools to assembling and finishing your quilt top, each stage has been designed to be approachable and enjoyable.
This classic pattern remains a favorite because of its rich symbolism, modular simplicity, and endless design potential. Whether you’re quilting for the first time or revisiting a beloved tradition, the Log Cabin Quilt – Free Tutorial offers a satisfying and creative journey.
We’d love to hear from you! Have you tried making a log cabin quilt? What layout did you choose? Share your experience, thoughts, or suggestions in the comments. Your feedback helps us continue providing content that inspires and supports your quilting journey.


