
Crochet Multi-Purpose Blouse, Shawl, Runner Model

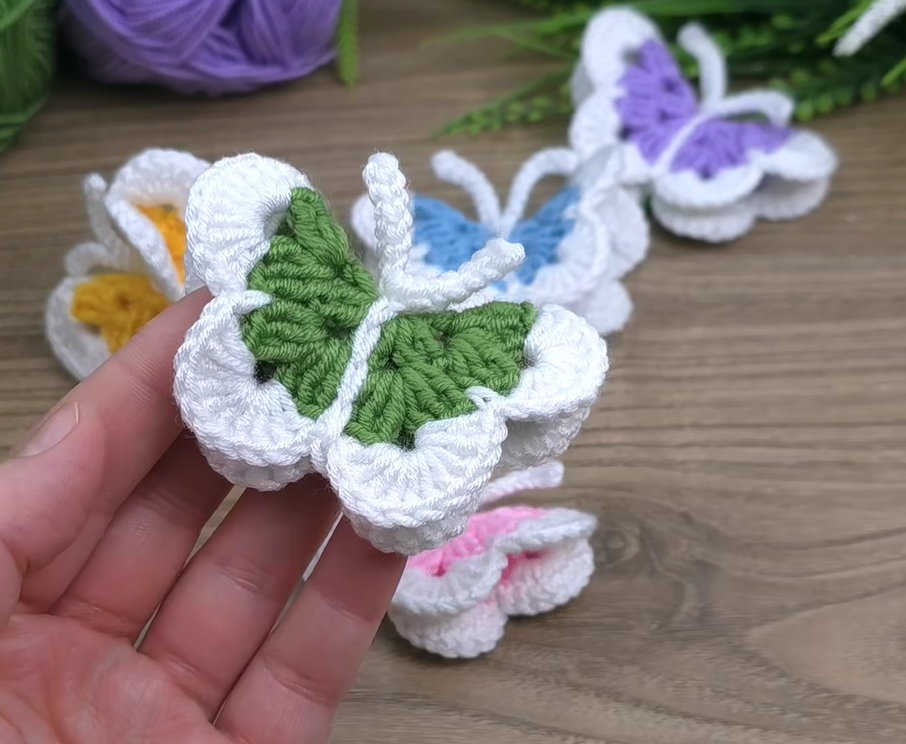
If you’re looking for a delicate and charming crochet project, the Sweet Butterflies – Free Pattern might be exactly what you need.
These adorable little butterflies bring joy, color, and lightness into any craft or home décor project. Whether you’re creating a decorative garland, embellishing a baby blanket, or adding sweet touches to accessories, this pattern is simple yet full of creative possibilities.
The Sweet Butterflies – Free Pattern is perfect for beginners who want to practice shaping techniques and color changes while creating something beautiful.
Each butterfly can be made in minutes using leftover yarn, making this project ideal for using up scraps. It’s a quick, relaxing, and rewarding experience that can lead to a fluttering collection of handcrafted cuties.
In this article, you’ll discover how to make your own butterflies, what materials to use, creative ways to apply them, and why this free pattern is becoming a favorite among crocheters.
We’ll also cover SEO-friendly details and ensure that everything shared aligns with Google AdSense policies for safe and enriching content.
Before diving into the Sweet Butterflies – Free Pattern, it’s important to gather a few basic supplies. This is a low-cost, beginner-friendly project that doesn’t require anything fancy, which makes it even more appealing.
The main materials you’ll need are small amounts of yarn in various colors. Cotton or acrylic yarns work wonderfully, and lighter weights like DK or sport are ideal for delicate butterfly wings.
A small crochet hook, usually between 2.5 mm and 4 mm depending on your yarn, will help you create clean, defined shapes. Check your yarn label for recommended hook sizes.
You’ll also need a yarn needle to weave in the ends, and optionally a pair of scissors and some stitch markers if you like extra precision in your work.
Once your materials are ready, it’s time to learn the basic construction of the butterflies. Most patterns start with a magic circle or a small chain, followed by a combination of double and treble crochets to form the wings.
The beauty of this project lies in its versatility. You can finish one butterfly in under 10 minutes and move on to creating many more in different colors, making it a fantastic option for handmade gifts or decorations.
The structure of the Sweet Butterflies – Free Pattern relies on shaping techniques that give each butterfly a realistic and symmetrical appearance. With just a few rounds of stitches, you can form wings that look elegant and lifelike.
The pattern typically begins with a round circle which becomes the base. From there, you’ll use shell stitches or clusters to form each wing segment.
Color changes are often used between the upper and lower wings. This adds depth and contrast, making the butterfly look more dynamic and vivid.
If you’re using multicolor yarn, you might get a naturally variegated look without needing to change colors manually. This can save time and add a surprise element to each butterfly.
After crocheting the wings, the next step is shaping the body. This is often done with a row of chain stitches in a contrasting color, wrapped around the center of the wings.
Finishing details like antennae can be added with a few strands of yarn or embroidery floss. These small additions bring extra charm and character to each butterfly.
Now that you’ve made your first few butterflies, you may wonder how to use them. The Sweet Butterflies – Free Pattern isn’t just about making cute shapes—it’s about bringing them into your daily life through creative expression.
One popular way to use these butterflies is by attaching them to hair clips or headbands. They make adorable accessories for children and even festive touches for adults.
You can also stitch them onto tote bags, backpacks, or denim jackets to add a personal, whimsical flair. It’s a simple way to turn ordinary items into something special.
Another great idea is to use them in greeting cards or gift wrapping. Secure them with a bit of hot glue or thread and turn any gift into a handmade treasure.
If you enjoy home décor, try making a butterfly garland to hang across windows, shelves, or even above a baby crib. It brings a touch of springtime into any room.
Butterflies can also be added to afghans or baby blankets as colorful appliqués. This adds texture and visual interest while keeping the blanket playful and cheerful.
Lastly, you can create keychains or zipper pulls by attaching a butterfly to a ring or clasp. It’s a quick way to turn your project into a useful and portable item.
The Sweet Butterflies – Free Pattern leaves a lot of room for personalization. By playing with size, texture, and embellishments, you can make each butterfly truly one-of-a-kind.
Try using sparkly or textured yarn for a more magical effect. Metallic threads or yarns with a slight shimmer can turn a simple butterfly into something dazzling.
If you’d like larger butterflies, switch to bulkier yarns and a larger hook. This will create more prominent decorations suitable for wall art or pillows.
For tiny versions, use lace thread or embroidery floss with a steel hook. These miniature butterflies are great for jewelry making or as delicate details on clothing.
You can also add beads or sequins to the wings for extra sparkle. Just make sure any embellishments are securely attached, especially if the item is for a child.
When presenting your butterflies as gifts, consider arranging a set in a small box or sewing them onto a card. This thoughtful packaging shows care and creativity.
Don’t be afraid to mix and match colors boldly. Nature is full of vibrant butterflies, and your projects can be too. The more fun you have, the more joy you’ll bring to others.
Is the Sweet Butterflies – Free Pattern beginner-friendly?
Yes! This is one of the easiest crochet projects to start with. It uses basic stitches and can be completed in just a few minutes per butterfly.
What yarn works best for crochet butterflies?
Lightweight cotton or acrylic yarns are ideal. DK or sport weight helps keep the wings light and delicate, which suits this pattern perfectly.
Can I use this pattern for commercial purposes?
Always check the source of the pattern. Many free patterns are available for personal use only, but some do allow small-scale selling of finished items.
How do I attach the butterflies to other items?
You can use sewing thread, hot glue, or safety pins, depending on the surface. For wearables, stitching is the most secure and long-lasting option.
Can children help make these butterflies?
Yes, especially older kids or teens with beginner crochet skills. It’s a great project for teaching crochet due to the short and simple nature of each butterfly.
How do I store finished butterflies?
Store them flat in a box or between sheets of paper to keep their shape. Avoid crushing or folding them to preserve their delicate appearance.
The Sweet Butterflies – Free Pattern is a wonderful way to explore your creativity while making something heartfelt and beautiful. Whether you’re adding a special touch to a gift, decorating your space, or simply enjoying the process of crafting, this pattern offers endless joy.
You’ve learned how to choose the right materials, shape your butterflies, use them in imaginative ways, and personalize them with style. It’s a small project with a big impact—perfect for all skill levels and occasions.
We hope you’ve enjoyed this guide! If you’ve tried the Sweet Butterflies – Free Pattern, leave us a sincere comment below with your thoughts, experiences, and suggestions. We love hearing from fellow makers and sharing ideas that help our community grow.


