
Pie Carrier Sewing Pattern

If you’ve ever wondered how to make a beautiful apron with a pattern – free pattern, you’re in for a treat. Aprons are timeless, practical, and a joy to create. Whether you’re a beginner at sewing or an experienced crafter looking for your next project, this article will guide you step by step on how to sew your very own apron using a free pattern.
This project is not only fun but also incredibly satisfying, allowing you to create something stylish and useful from scratch.
Making aprons is a great way to add personality to your kitchen, workshop, or studio. With a free apron pattern, you can make a beautiful apron for yourself, a loved one, or even as a thoughtful handmade gift. The process requires only basic sewing tools and some creativity, making it accessible to everyone.
In this detailed tutorial, you’ll learn how to make a beautiful apron with a pattern – free pattern, including what materials to use, how to cut your fabric correctly, and how to add finishing touches that truly personalize your apron. Let’s get started and bring your handmade apron idea to life!
The first step in how to make a beautiful apron with a pattern – free pattern is selecting the right materials. This can make a big difference in the look and feel of your finished apron.
Start with choosing your fabric. Cotton is an excellent option because it’s durable, washable, and easy to sew. Look for medium-weight cotton with a bit of structure so your apron holds its shape well.
Consider choosing fabrics that reflect your style or the purpose of the apron. Floral prints are perfect for gardening, neutral tones suit kitchen use, and bold patterns can make a statement in a craft space.
You’ll also need coordinating thread, pins, scissors or a rotary cutter, a measuring tape, and of course, the free apron pattern. If you’re a beginner, stick to simple tools and avoid overly stretchy or slippery fabrics.
Don’t forget any optional embellishments you’d like to add, such as lace, ruffles, pockets, or trims. These extras allow you to personalize your apron and make it even more special.
Finally, make sure you prewash your fabric before cutting it. This helps prevent any shrinkage after your apron is sewn and ensures the final result is clean and professional.
Now that your materials are ready, it’s time to move on to the actual construction. Here’s where you’ll learn how to make a beautiful apron with a pattern – free pattern by following step-by-step instructions.
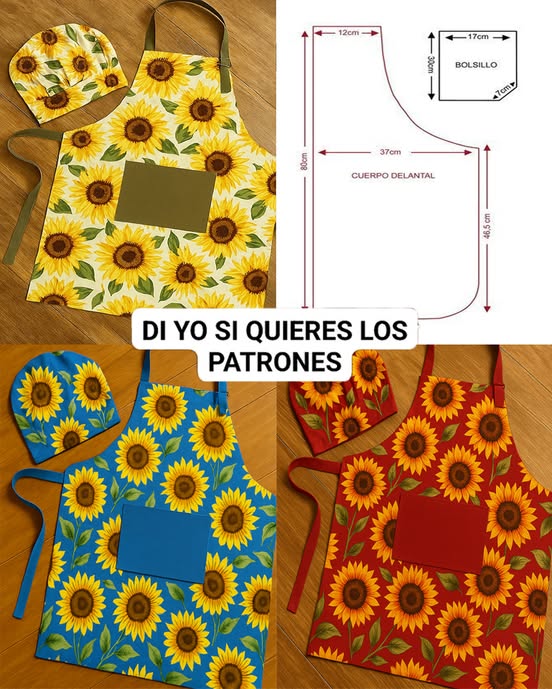
Start by printing and assembling your free apron pattern. Most free patterns come as downloadable PDFs. Be sure to print them at 100% scale without resizing to maintain correct measurements.
After assembling the paper pattern, pin or tape it to your fabric. Take your time cutting around the pattern edges, ensuring smooth and precise lines. Accuracy here will help your final apron look polished.
Depending on your pattern, you’ll likely have to cut a front panel, a waistband, ties, and perhaps a pocket or two. Some apron designs also include a lining, which adds structure and helps it last longer.
With your pieces cut, begin by sewing any pockets or embellishments to the front panel. It’s easier to do this before the apron is assembled. Be creative with placement, and don’t hesitate to try something fun.
Next, attach the waistband and ties. These pieces can be folded, pressed, and topstitched for a neat finish. Make sure your ties are long enough for comfortable wearing and adjust for personal fit if needed.
Understanding sewing techniques is essential in how to make a beautiful apron with a pattern – free pattern. Even if you’re new to sewing, this is a great opportunity to practice and build confidence.
Start by pressing all your seams as you sew. This step might seem small, but it makes a huge difference in the finished look and ensures your apron lies flat and even.
Use a straight stitch with a standard stitch length, unless the pattern recommends otherwise. Don’t forget to backstitch at the beginning and end of each seam to secure your threads.
Consider finishing your raw edges using a zigzag stitch or pinking shears to prevent fraying. If you have a serger, you can use it to give your seams a professional finish.
Personalize your apron by adding decorative topstitching, embroidery, or fabric paint. These small touches can reflect your personality and turn a simple apron into a treasured item.
If you want your apron to be more functional, try adding extra pockets or loops for tools. Think about how you’ll use the apron and tailor it to your daily needs.
Lastly, try your apron on as you sew, especially before attaching final pieces. This helps you adjust fit, tie placement, and overall look, ensuring a comfortable and flattering final piece.
One of the joys of learning how to make a beautiful apron with a pattern – free pattern is discovering how versatile aprons can be in both use and style. They make wonderful personal items and even better gifts.
For a kitchen-themed gift, choose fabric with baking prints and add a matching hand towel. It’s a thoughtful present for holidays, birthdays, or housewarming celebrations.
Gardeners will love aprons with deep pockets and earth-tone fabrics. Add a seed packet and gardening gloves to complete the look.
If you’re giving an apron to an artist or crafter, use colorful, paint-friendly fabrics and add loops or brush holders. Consider using waterproof lining for extra practicality.
Hosting a bridal shower? Matching aprons for the bride and guests are both functional and memorable. Customize each with names or initials using iron-on vinyl or embroidery.
You can also use aprons as seasonal decorations. Create one with festive fabric for holidays like Christmas or Halloween and wear it while cooking or entertaining.
Sharing your creations online can also inspire others. Post your apron on crafting forums or social media using tags like #freeapronpattern to connect with others who love making things by hand.
Is this pattern suitable for beginners?
Yes! The free apron pattern is designed to be beginner-friendly. As long as you can sew a straight line and follow simple instructions, you can make a beautiful apron.
Where can I find the free apron pattern?
There are many crafting websites and blogs that offer downloadable patterns. Look for reputable sources that provide clear measurements and instructions.
How much fabric do I need?
Most apron patterns require about 1 to 1.5 yards of fabric. However, this can vary depending on the size and style of the apron you’re making.
Can I use different fabrics like denim or linen?
Absolutely! Just be sure to adjust your needle and machine settings for heavier or thicker fabrics. Linen, denim, and canvas are all great for sturdier aprons.
What if I don’t have a sewing machine?
You can still make an apron by sewing by hand, although it will take longer. Use strong, even stitches and reinforce high-stress areas like straps and pockets.
Can I sell aprons made from this free pattern?
That depends on the pattern’s license. Many free patterns allow personal use only, so always check the terms provided by the creator before selling finished items.
Now that you’ve learned how to make a beautiful apron with a pattern – free pattern, you’re ready to start your own project with confidence. From choosing the right materials to sewing techniques and creative touches, each step brings you closer to a handmade item you’ll love.
This project is more than just sewing—it’s about creating something beautiful and practical with your own hands. Whether you’re making it for yourself or gifting it to someone special, the experience is rewarding.
We’d love to hear from you! If you tried this free apron pattern, please leave a sincere comment below. Share your experience, ideas, and any tips you’d like to pass on to fellow makers. Your feedback helps our community grow!


