
Pie Carrier Sewing Pattern

If you’ve been dreaming about making your own handbag but feel intimidated by zippers, linings, or complicated patterns, this is your moment! In this complete tutorial, we’ll explore the easiest way to sew a stylish bag simply and quickly, using beginner-friendly techniques, minimal materials, and maximum charm.
Whether you’re new to sewing or just want a fun and fast project, this guide will walk you through it all—no stress involved.
Sewing your own bag has many benefits. It allows you to personalize your accessory with fabric you love, it’s eco-friendly, and it gives you that satisfying “I made this!” feeling. Plus, with the right method, it doesn’t have to be difficult.
The trick is in using straightforward construction techniques that don’t require complex tools or skills. Once you learn the easiest way to sew a stylish bag simply and quickly, you’ll be making more for friends, gifts, or even to sell.
Throughout this article, we’ll guide you through the materials you need, the simple cutting and sewing steps, and how to finish your bag beautifully. You’ll also find a helpful FAQ section to answer common questions and a final encouragement to keep your creativity flowing. Let’s get started on this stylish sewing journey!
The first step in the easiest way to sew a stylish bag simply and quickly is gathering the right materials and setting up your workspace.
You’ll need 2 fabric pieces: one for the outside and one for the lining. Cotton or canvas works best for durability and ease of sewing.
A piece of fusible interfacing helps give structure to your bag without adding bulk. Choose medium-weight interfacing for a soft but stable finish.
Prepare basic sewing tools: sewing machine, thread, pins or clips, scissors, measuring tape, and an iron. A rotary cutter and mat are helpful but not essential.
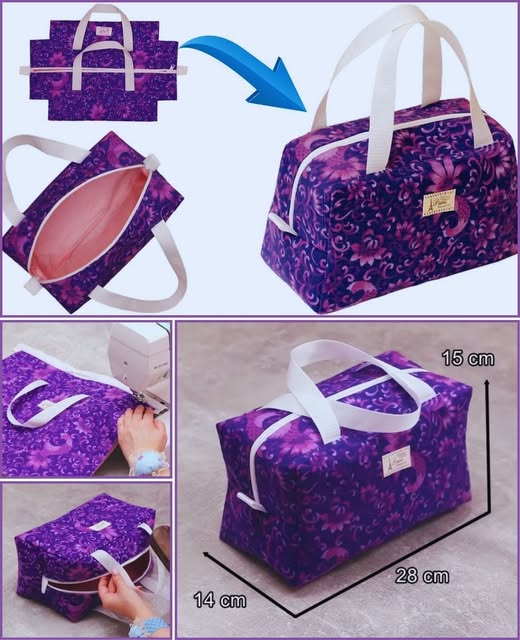
Decide on your bag dimensions. A great starter size is 14” wide by 12” tall with 2 sturdy handles. Use a template if needed for accuracy.
Cut your fabric and interfacing according to your chosen size. Fuse the interfacing to the wrong side of your exterior fabric with a hot iron.
Optional: Choose embellishments such as buttons, fabric labels, or pockets if you’d like to add personal touches later.
Now that your pieces are cut and fused, it’s time to begin sewing the easiest way to sew a stylish bag simply and quickly by starting with the main panels.
Place the exterior fabric pieces right sides together. Sew along the sides and bottom using a ½ inch seam allowance.
Repeat the same process with the lining fabric, but leave a 3-inch gap unsewn at the bottom. This will be used to turn the bag inside out later.
To create a flat bottom for your bag, pinch each bottom corner so the side seam meets the bottom seam, forming a triangle. Sew across the triangle about 2 inches from the tip.
Trim off the triangle tips from both exterior and lining corners to reduce bulk inside the bag.
Turn the exterior bag right side out and press all seams flat. Keep the lining inside out for now.
This step sets up a professional-looking bag base with very little complexity, making it ideal for fast sewing success.
We’re getting closer to completing the easiest way to sew a stylish bag simply and quickly. Now we’ll add the handles and connect the layers.
Cut two fabric strips or use pre-made cotton webbing for handles. A good size is 20” long by 1.5” wide. Fold and sew fabric strips if making your own.
Pin the handles to the top edge of the right side of the exterior fabric, 3 inches in from each side seam. Make sure they are not twisted.
Place the lining over the exterior, right sides together, with the handles sandwiched between. Pin around the entire top edge.
Sew all around the top edge with a ½ inch seam allowance, securing the handles and joining the layers.
Carefully pull the entire bag through the opening in the lining. Once right side out, press the top seam and lining gap.
Sew the lining gap closed with a neat topstitch or hand-sew it invisibly. Then, tuck the lining into the bag and press everything again.
The beauty of the easiest way to sew a stylish bag simply and quickly is how easy it is to personalize once the base is done.
Topstitch around the entire top edge of the bag. This gives a finished look and secures the handles further.
Add embellishments like fabric flowers, embroidered initials, or contrast stitching to make the bag your own.
Want a pocket? You can stitch a simple patch pocket inside or outside using leftover fabric before assembly.
Add a magnetic snap or button closure if desired. Sew it between the lining and exterior fabric before final assembly.
Use coordinating thread or contrasting colors for a bolder look. This simple trick instantly elevates a basic design.
Feel free to play with different fabric textures: denim, canvas, quilting cotton, or linen all bring unique charm to your project.
Can I sew this bag by hand if I don’t have a sewing machine?
Yes, though it will take more time. Use strong backstitching and durable thread to ensure the seams hold up.
What’s the best fabric for a beginner to use?
Cotton fabric is ideal—it’s stable, easy to cut, and sews smoothly. Avoid stretchy or slippery fabrics for your first bag.
Can I add a zipper to this pattern?
While the basic version doesn’t require a zipper, you can add one with extra steps. For beginners, stick to open-top or button closures at first.
Is interfacing really necessary?
Interfacing adds structure and helps your bag hold its shape. If you skip it, your bag will be floppier but still usable.
How long does this project take from start to finish?
About 1–2 hours, depending on your experience level and whether you’re adding custom details.
Can I wash my handmade bag?
Yes, as long as you’ve used washable fabric and interfacing. Machine wash cold and air dry, or spot clean for longevity.
Now you’ve learned the easiest way to sew a stylish bag simply and quickly, from choosing fabric and cutting to stitching and finishing. With only basic tools and some enthusiasm, you can create a beautiful, functional accessory that reflects your personal style. Once you’ve made one, you’ll be inspired to try different shapes, fabrics, and details—this is just the beginning!
Have you tried this bag project? Leave a comment with your thoughts, tips, or questions! We’d love to hear your experience and see your creative results. Your feedback also helps shape future tutorials for the community!


