
Crochet Multi-Purpose Blouse, Shawl, Runner Model

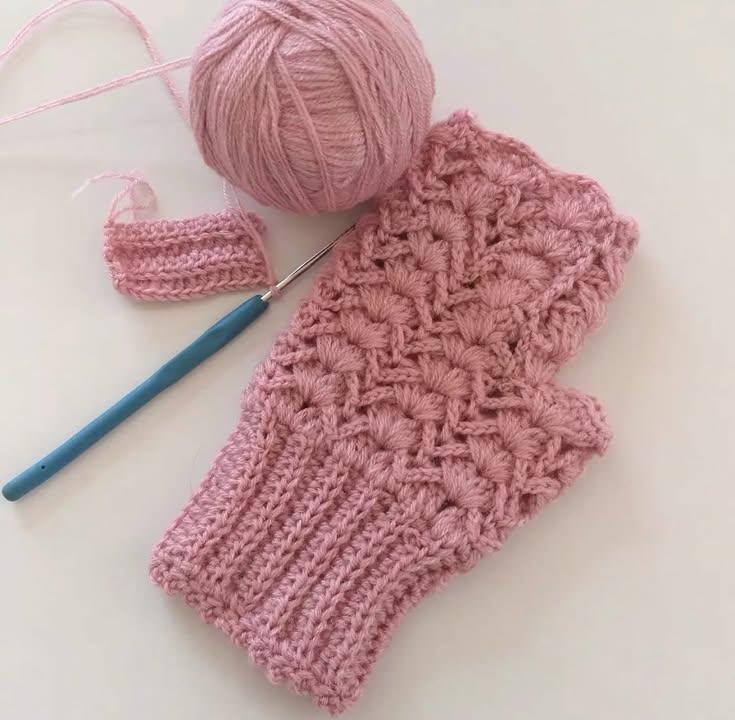
Crochet Fingerless Gloves with Shell Stitch – Free Pattern is the perfect project for crafters looking for a balance between functionality, elegance, and creativity.
These stylish gloves not only keep your hands warm during chilly seasons but also allow full finger movement—perfect for texting, typing, or even crocheting more projects!
With this free pattern, you’ll learn how to crochet a pair of beautiful fingerless gloves using the delicate and textured shell stitch.
This pattern is beginner-friendly, yet visually impressive. Whether you’re gifting them to a friend or making a cozy accessory for yourself, these gloves are a fantastic way to practice and display your crochet skills. The shell stitch adds charm and dimension, making each glove look sophisticated and handcrafted with love.
Throughout this guide, you’ll learn step-by-step how to make your own Crochet Fingerless Gloves with Shell Stitch – Free Pattern, from materials to finishing touches. The pattern can be adjusted to any hand size, and the color combinations are endless. Let’s explore how you can turn a simple skein of yarn into something both beautiful and practical.
The shell stitch is one of the most elegant and classic crochet techniques, forming fan-like groups of stitches that resemble seashells. It’s perfect for Crochet Fingerless Gloves because it adds a delicate texture without being too bulky, allowing your hands to stay warm and stylish at the same time.
Another benefit of using the shell stitch is its stretchiness. This means that the gloves naturally adjust to different hand sizes, giving them a snug, comfortable fit without needing too many complicated increases or decreases.
The visual beauty of the shell stitch makes even a simple pair of gloves look luxurious. You can use solid yarn colors for a clean look or multicolored yarn to highlight the wavy pattern of the stitches. Both options work wonderfully and add personality to your finished project.
The shell stitch is also repetitive and relaxing to work with. Once you master the basic sequence, it flows naturally, making the entire crochet process enjoyable and stress-free.
Not only are these gloves beautiful and practical, but they are also a fantastic project to gift. Handmade accessories like these show thoughtfulness and care, especially during holiday seasons, birthdays, or even “just because” moments.
In addition, these gloves make a great option for craft fairs or online handmade shops. With this Crochet Fingerless Gloves with Shell Stitch – Free Pattern, you can create multiple variations in color and size, making your inventory more appealing.
To start your Crochet Fingerless Gloves with Shell Stitch, you’ll need some basic supplies, most of which you probably already have in your crochet kit. You’ll be surprised how affordable and accessible this project is.
Choose a medium-weight yarn (category 4) in your favorite color. Acrylic or a wool blend works great for these gloves because they provide warmth, comfort, and a bit of stretch. If you’re making gloves for sensitive skin, look for a soft cotton or bamboo blend.
You’ll need a crochet hook in size 5.0mm (H/8) or whatever size achieves the correct gauge for your stitch. It’s always good to make a small swatch using the shell stitch to check the tension before starting the actual gloves.
Scissors and a yarn needle will help you finish off and weave in ends cleanly. Stitch markers can be useful for tracking the beginning and end of each round if you are working in the round, especially if you are customizing the size.
Optional but helpful tools include a measuring tape (to ensure glove length) and a row counter if you want to keep track of rounds or stitches without guesswork. These tools streamline the process and improve accuracy.
Lastly, have a printed or digital copy of the Crochet Fingerless Gloves with Shell Stitch – Free Pattern on hand so you can follow along and make notes. You’ll find the process easier when you can refer back to the instructions as needed.
To begin your Crochet Fingerless Gloves with Shell Stitch – Free Pattern, you’ll start by creating a base chain that matches the desired circumference of your wrist or lower palm. Be sure that your chain is a multiple of the stitch count required for shell stitch—usually multiples of 6 + 1.
Join the chain into a ring using a slip stitch, being careful not to twist it. Chain 3 and begin the first round of shell stitches. This typically involves skipping stitches and creating multiple double crochets in the same stitch to form the shell shape.
Continue working in rounds, building up the glove from the wrist toward the fingers. You can customize the length by adding or reducing rounds. Try the glove on as you go to make sure the fit is just right.
When you reach the thumb area, create a small opening by chaining and skipping a few stitches, then rejoining to continue the round. This creates a space for the thumb while keeping the rest of the hand covered and cozy.
After passing the thumb, continue working shell stitch rounds until you reach the base of the fingers or your desired length. Most fingerless gloves stop around the first knuckle, but you can go shorter or longer based on personal preference.
Finish off your last round with a slip stitch, fasten off the yarn, and weave in the ends. Repeat the same process for the second glove. And just like that, your beautiful shell stitch gloves are complete!
One of the most fun aspects of making Crochet Fingerless Gloves with Shell Stitch is how easy it is to personalize each pair. From colors to embellishments, the possibilities are endless and can make each creation feel uniquely yours.
If you’re going for a feminine and romantic look, soft pastel shades or heathered yarns work beautifully. For something more modern or gothic, choose darker tones like charcoal, burgundy, or forest green.
Add finishing touches like buttons, ribbons, or even tiny embroidered flowers on the cuffs for a unique look. These details turn a simple glove into a conversation piece and are perfect for gifts.
For gifting purposes, wrap the gloves in a cute box or hand-tie them with twine and a handwritten note. Recipients will appreciate the time and love poured into their handmade gift.
You can also experiment with different yarn textures. Try a shimmering yarn for a holiday set, or a bulky yarn for extra warmth. Just adjust your hook size accordingly to maintain the structure of the shell stitch.
If you’re selling at markets, offer size options like small, medium, and large. The stretchy shell stitch helps, but slight changes in base chains can make a big difference in how the gloves fit.
Q: Is the shell stitch suitable for beginners?
A: Yes! The shell stitch is beginner-friendly and easy to memorize. Once you practice the pattern for a few rows, it becomes second nature.
Q: How do I adjust the size of the gloves?
A: Adjust the starting chain to match the hand circumference and increase or decrease the number of rounds to modify the length.
Q: Can I use different yarn weights?
A: You can, but you’ll need to adjust your hook size and may need to modify the pattern slightly to maintain the correct fit and texture.
Q: What if I want to add a thumb?
A: You can crochet a separate thumb or continue the glove above the thumb hole using simple increases and decreases for shaping.
Q: How long does it take to make one glove?
A: On average, one glove takes about 1.5 to 2 hours depending on your skill level and how fast you crochet.
Q: Are these gloves washable?
A: Yes, most yarns used for these gloves are machine washable, but always check the yarn label for care instructions.
In this article, we explored how to make Crochet Fingerless Gloves with Shell Stitch – Free Pattern, covering everything from materials to customization tips. You’ve learned why the shell stitch is a great choice, how to crochet the gloves step-by-step, and how to style or gift them with care.
Creating your own gloves not only improves your crochet skills but also allows you to express your personal style through your craft. Plus, it’s a thoughtful way to warm someone’s hands—and heart.
If you enjoyed this pattern or have any questions, we’d love to hear from you! Please leave a sincere opinion or suggestion in the comments and let us know how your project turned out. Happy crocheting!


