
Pie Carrier Sewing Pattern

Creating a Cute Bag in a Very Easy and Simple Way – Pattern is one of the most satisfying projects for crochet and knitting lovers. Whether you are a beginner or an experienced crafter, making a bag that is both stylish and practical can be a delightful experience.
This project combines beauty and simplicity, making it a great entry point for those wanting to create handmade accessories.
The charm of the Cute Bag in a Very Easy and Simple Way – Pattern lies in its minimalism. With just a few easy steps and delicate stitches, you can achieve a professional-looking result.
This pattern is highly adaptable, so you can experiment with yarn colors, textures, and handle styles. Best of all, it doesn’t require advanced skills, which makes it a favorite among DIY enthusiasts.
In this guide, we will walk you through everything you need to know about making a Cute Bag in a Very Easy and Simple Way – Pattern.
From selecting materials to finishing touches, you’ll find each step clearly explained. We’ll also answer common questions in our FAQ section and wrap up with a helpful summary to reinforce the key points.
Before diving into the crafting process, it’s essential to gather all necessary materials. Choosing the right yarn and hook or needle size will affect the final look of your bag. For this Cute Bag in a Very Easy and Simple Way – Pattern, soft cotton or acrylic yarns work best, offering flexibility and durability.
You should also think about the purpose of your bag. Will it be a casual tote for everyday use, or a decorative handbag for special occasions? Your answer can help determine the size and color scheme. Keep in mind that even with minimal materials, this pattern can yield beautiful results.
If you’re new to crocheting or knitting, consider practicing the basic stitches first. For this project, you’ll mostly use single crochet, half-double crochet, or simple knit stitches. Once you feel comfortable, you can begin your bag confidently and enjoy the process.
Many crafters also love to personalize their work. Adding small embellishments like buttons, tassels, or even a fabric lining can give your bag a unique look. These finishing touches don’t require much effort but can make a big visual impact.
Another aspect to consider is sustainability. Making your own Cute Bag in a Very Easy and Simple Way – Pattern can be an eco-friendly option. Instead of buying plastic or mass-produced bags, you’re creating something handmade, reusable, and durable.
Lastly, don’t rush. Enjoy every stitch as part of a relaxing and rewarding journey. Crafting can be therapeutic, and this simple pattern is perfect for a peaceful afternoon project.
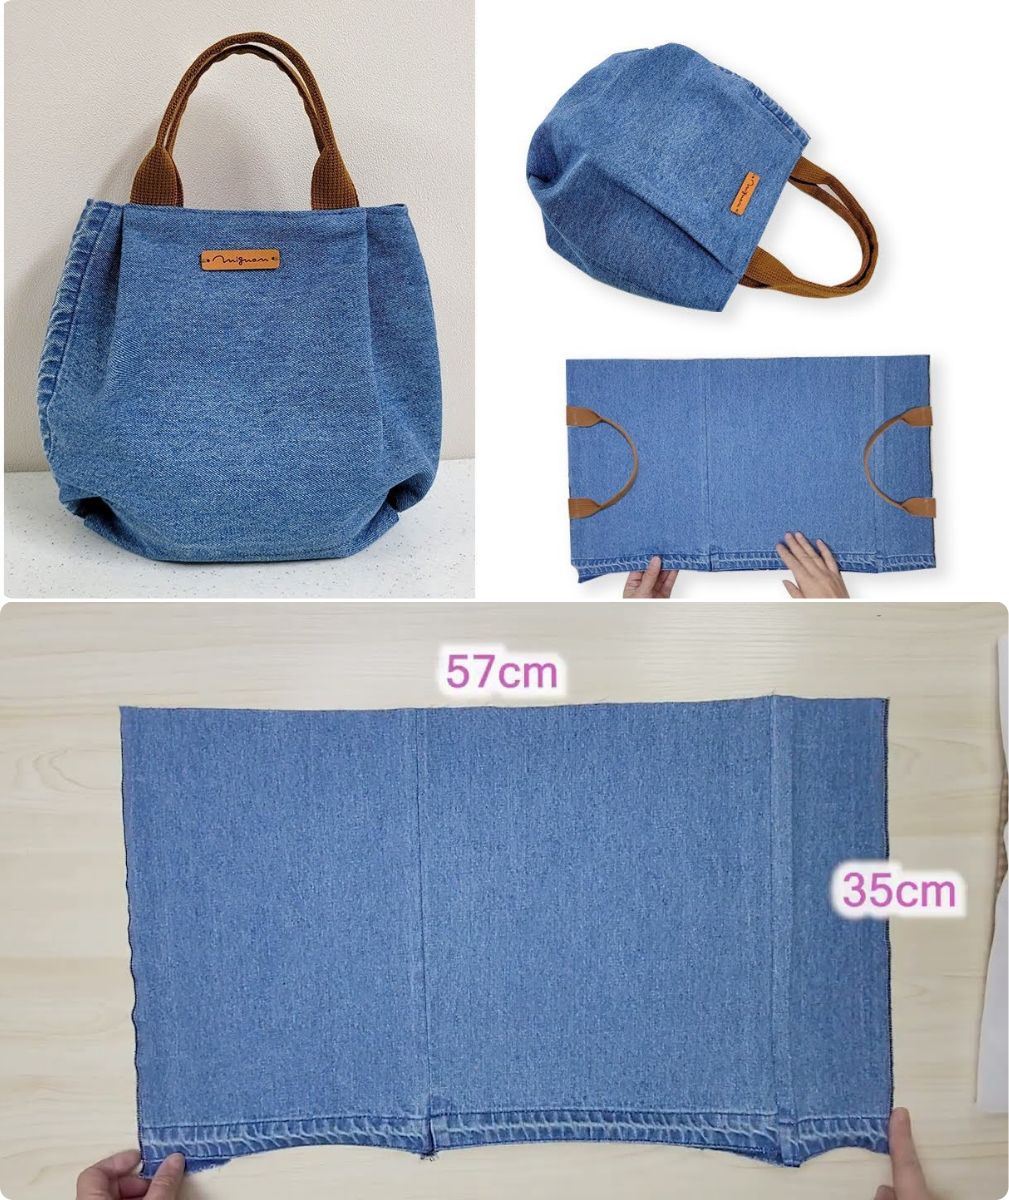
Start by creating a foundation chain. The number of stitches will determine your bag’s width. For a small handbag, chain 25 to 30 stitches. Use a medium-sized crochet hook (5mm to 6mm) or corresponding knitting needles, depending on your method.
Next, build the body of the bag by working rows of single or half-double crochet stitches. Continue until your work measures the desired height—usually 25 to 30 rows. Make sure to keep your tension even to ensure a uniform texture.
Once the main panel is complete, fold it in half to form the bag’s shape. Seam the sides using slip stitches or whip stitches. This gives your Cute Bag in a Very Easy and Simple Way – Pattern a clean, polished look.
Now it’s time to create the handles. You can crochet short handles directly onto the bag or make longer ones and sew them on. For a tote-style bag, chain 50–60 stitches and attach each end to the top corners of the bag.
If you’d like more structure, consider adding a fabric lining. Simply cut a rectangle of fabric the same size as your finished bag, sew the edges, and attach it inside with a needle and thread. This step is optional but gives your bag more strength.
Finish off by weaving in all loose ends and checking for any uneven stitches. Once everything looks neat, your handmade bag is ready to use or gift!
One of the joys of the Cute Bag in a Very Easy and Simple Way – Pattern is the creative freedom it allows. Changing colors, textures, or adding design elements can turn a simple bag into a statement piece. Consider using variegated yarn for a colorful effect or adding a color block pattern with two or three different shades.
If you like adding a bit of sparkle, consider threading beads or metallic thread into your stitches. This technique can be subtle or bold, depending on your taste. You can also sew small appliqués or motifs onto the bag for a playful touch.
Another fun option is to add a flap closure or zipper. While this adds a bit more complexity, it also enhances the functionality of your bag. Closures are particularly useful for bags meant to carry small or valuable items.
You might also explore different bag shapes. While the basic pattern is rectangular, you can adjust the stitch count and shaping to make a circular, oval, or even triangular bag. Let your imagination lead the way.
For a boho or vintage vibe, try adding fringe or macramé elements. This is a quick way to elevate your Cute Bag in a Very Easy and Simple Way – Pattern and give it an artisanal look. Use contrasting yarn or even leather strips for added interest.
Finally, don’t be afraid to make matching accessories. A small pouch, coin purse, or keychain can complement your bag and use leftover yarn efficiently. It’s a great way to practice consistency in your stitching and color choices.
Keep your pattern notes handy. Writing down your stitch count, yarn type, and hook size helps you replicate or modify the design later. It’s especially helpful when gifting or selling your finished bags.
Try not to overcomplicate the design. The beauty of the Cute Bag in a Very Easy and Simple Way – Pattern is in its simplicity. Sticking to clean lines and even stitches will produce the best results.
Practice makes perfect. If your first try isn’t flawless, that’s okay. Every project improves your skills and helps build confidence. Don’t rip it out unless necessary—sometimes imperfections give handmade items their charm.
Join crafting groups or online communities to share your progress. Seeing how others interpret the same pattern can be inspiring. Plus, you might get tips or tricks that make your next project even better.
Take care of your handmade bag. Wash it gently by hand in cool water with mild detergent and let it air dry. Proper care ensures your work stays beautiful for a long time.
Always remember to enjoy the process. Creating something with your hands from just yarn and creativity is a powerful, joyful experience. The satisfaction you’ll feel when your Cute Bag in a Very Easy and Simple Way – Pattern is complete is unbeatable.
What kind of yarn works best for this bag?
Cotton or sturdy acrylic yarns are ideal for structure and durability. Choose a medium weight for the best balance of softness and strength.
Is this pattern suitable for beginners?
Yes! The Cute Bag in a Very Easy and Simple Way – Pattern was designed with simplicity in mind. It uses basic stitches and is easy to follow, even if you’re new to crochet or knitting.
Can I use this pattern for knitting instead of crochet?
Yes, the bag can be adapted for knitting. Just follow the same basic structure and use simple knit stitches to build your panels.
How long does it take to complete the bag?
Depending on your speed and experience, it can take anywhere from 3 to 6 hours. You can easily complete it in an afternoon or over a relaxing weekend.
Can I sell the finished bags made from this pattern?
Absolutely! Handmade bags are popular at craft fairs and online. Just make sure you add your own creative touch if using a common pattern.
How can I make the bag more secure?
Add a zipper, snap button, or drawstring closure to keep your items safe inside. You can also line it with fabric for extra durability.
The Cute Bag in a Very Easy and Simple Way – Pattern is more than just a project—it’s a doorway to creativity and self-expression. By following this pattern, you’ve learned how to create a functional and beautiful bag using simple techniques. From the first stitch to the final detail, the process is accessible, enjoyable, and deeply satisfying.
We hope this guide helped you understand each step clearly and inspired you to add your own personal flair. Whether you’re keeping the bag for yourself or gifting it to someone special, the handmade quality will always stand out. We’d love to hear your thoughts! Leave a sincere comment below with your experience or suggestions. What other patterns would you like to see?


