
Pie Carrier Sewing Pattern

If you’re searching for a creative way to decorate your kitchen, the Stitch Up Some Veggies for Your Kitchen – Quilt Pattern is a delightful and vibrant option. Combining functionality with playful design, this project brings warmth and color into one of the most beloved spaces in the home.
Whether you’re a beginner or a seasoned quilter, you’ll enjoy making each veggie-themed block come to life with fabric and thread.
The Stitch Up Some Veggies for Your Kitchen – Quilt Pattern is designed to capture the essence of nature’s bounty—tomatoes, carrots, peppers, and more—through clever fabric choices and smart piecing. Not only is this quilt visually appealing, but it also adds a homey, handmade touch to your kitchen décor. It’s a fantastic conversation starter and a fun way to express your love of both cooking and quilting.
As you embark on creating this charming quilt, you’ll explore a range of quilting techniques, color coordination strategies, and fabric textures that simulate the natural look of vegetables.
This quilt pattern is also a great stash buster, letting you use up those green, red, yellow, and orange fabric scraps you’ve been saving. Let’s dive into how to get started with this colorful journey.
Before starting your Stitch Up Some Veggies for Your Kitchen – Quilt Pattern, it’s important to gather inspiration and define the size of the project. Will it be a wall hanging, table runner, or full-sized quilt? Depending on your kitchen space, your choices may vary. Sketching a layout can help you visualize how each veggie block will come together.
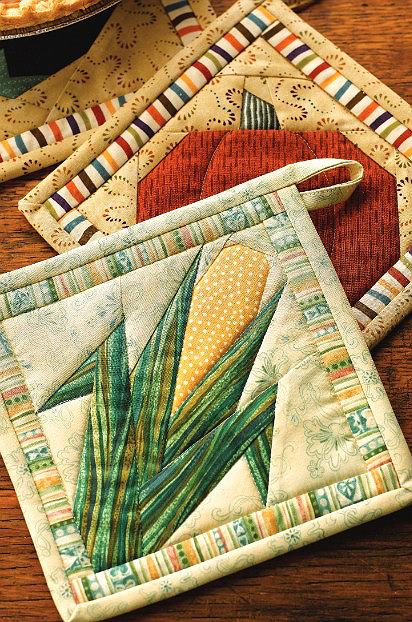
Next, consider the types of vegetables you want to include in your quilt. Popular choices include tomatoes, corn, peas, carrots, eggplants, and even lettuce or bell peppers. You can find free block templates online or draw your own simplified veggie shapes that translate well into patchwork form.
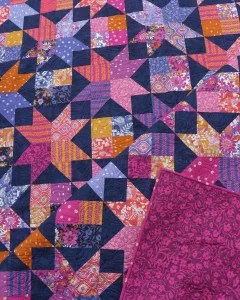
Choose fabrics that reflect the natural tones of vegetables. Think green batiks for leafy veggies, vibrant reds for tomatoes, and warm oranges for carrots. Try mixing solids and small prints for a nice balance of texture and contrast. Keeping your color palette cohesive helps the final quilt look polished.
Make a list of materials you’ll need, including quilting cottons, fusible web (if using appliqué), background fabric, batting, and backing. Having all your supplies ready helps avoid interruptions once you start piecing.
Consider your quilt’s layout. Will you use sashing between veggie blocks? A border with garden-themed prints can enhance the design and frame your work beautifully. A scrappy border made from leftover fabric strips also adds charm.
Lastly, decide if your quilt will include text—such as “Fresh Veggies” or the name of each vegetable. Embroidered or appliquéd text can add a personalized touch and help viewers identify each veggie more easily.
Start each veggie block by carefully cutting your fabric pieces based on your pattern templates. Accuracy is important here, especially if the design includes small parts like leaves or stems. Rotary cutters, rulers, and a clean cutting surface make this step smoother and more precise.
Once your pieces are cut, it’s time to begin piecing. If you’re working with traditional patchwork, arrange the pieces in order and sew them together using a ¼-inch seam allowance. Press your seams open or to the side, depending on the complexity of the block.
If you’re using appliqué, arrange your vegetable shapes on a background square. Use fusible web to adhere the fabric, then stitch around the edges using a blanket stitch, zigzag, or straight stitch. Appliqué allows for more organic, curvy veggie shapes that might be harder to achieve with piecing alone.
Make sure to trim each block to a consistent size once complete. This makes assembling the final quilt top easier and ensures your quilt remains squared and balanced. A square ruler is helpful for this task.
Add embellishments if desired—embroidery, small buttons, or decorative stitches can bring your vegetables to life. For example, use a few seed beads on a corn cob or French knots on strawberries to mimic seeds.
As you work through each block, lay them out on a design wall or floor to see how they interact together. Consider the color balance and placement to avoid clusters of similar hues or tones. Adjust as needed before final assembly.
Once all your vegetable blocks are complete, begin assembling the quilt top. If you’re using sashing, cut strips and sew them between each block. Use cornerstones for added detail or a cleaner look. Take your time aligning seams and pressing after each addition.
Next, add borders if you’ve planned to include them. Borders can be made from coordinating fabric or from leftover veggie-themed prints. Borders not only enhance the quilt visually but also increase the size for functionality if needed.
Prepare your quilt sandwich—top, batting, and backing. Baste the layers together using your preferred method: safety pins, spray adhesive, or hand basting. Make sure the layers are smooth and free of wrinkles.
Choose your quilting style. Straight-line quilting works well for a modern look and is beginner-friendly. You can quilt around each veggie block or add custom quilting motifs like vines, leaves, or checkerboard patterns that enhance the garden theme.
Use coordinating thread to blend into the background or contrasting thread for added detail. Decorative stitches can also add interest. Take your time quilting, as this step can really elevate the final appearance of your quilt.
Once quilting is complete, trim the excess batting and backing. Add binding around the edges using your favorite technique—machine or hand-sewn. A striped or gingham binding adds a farmhouse feel and ties everything together.
Now that your Stitch Up Some Veggies for Your Kitchen – Quilt Pattern is complete, it’s time to find the perfect way to display it. If you’ve made a wall hanging, use a rod pocket on the back and hang it near your dining nook or cooking space.
If it’s a table runner or mat, lay it across a kitchen island or dining table for a festive, seasonal look. These quilts make wonderful centerpieces and can be paired with matching napkins or placemats for a complete kitchen set.
You can also use small blocks individually as hot pads, trivets, or mug rugs. Adding a layer of heat-resistant batting in these cases makes them both beautiful and functional.
To care for your quilt, always wash it gently using cold water and a mild detergent. Air drying or tumble drying on low prevents fabric shrinkage and helps maintain vibrant colors. Avoid harsh chemicals or bleach.
If your quilt will hang in the kitchen, consider rotating it out seasonally or using a fabric protector spray to guard against stains and odors. Steam cleaning is a gentle option for occasional refreshes.
Lastly, share your finished project with friends, family, or online quilting communities. It’s rewarding to showcase your creativity, and you might inspire someone else to try the Stitch Up Some Veggies for Your Kitchen – Quilt Pattern too.
What fabrics work best for veggie-themed quilts?
Cotton quilting fabric is ideal due to its ease of use and variety. Look for solid colors, batiks, or small prints that resemble vegetable textures and colors.
Is this pattern beginner-friendly?
Yes! Both beginners and experienced quilters can enjoy this project. Appliqué allows for easier veggie shapes, while traditional piecing offers more structure for advanced quilters.
Can I make this quilt smaller or larger?
Absolutely. Adjust the number of veggie blocks or the size of the borders to fit your desired final dimensions, whether it’s a wall hanging or a full quilt.
What quilting method is best for this project?
Straight-line quilting is a great choice for simplicity, but free-motion quilting adds a garden-inspired, whimsical feel. Choose based on your skill level and available tools.
How do I keep the quilt clean in the kitchen?
Wash it gently with cold water and hang to dry. Consider using it in decorative areas away from high splatter zones or adding a fabric protector spray.
Can I personalize the quilt with names or messages?
Yes! Adding embroidered names or veggie labels gives the quilt a personal, homemade touch that makes it perfect for gifts or family keepsakes.
The Stitch Up Some Veggies for Your Kitchen – Quilt Pattern offers a fun and rewarding way to bring a burst of color and personality into your cooking space. With thoughtful planning, creative fabric choices, and simple piecing or appliqué techniques, you can create a unique quilt that showcases your love of both quilting and fresh produce.
We hope this article has inspired you to start your own veggie quilt! If you’ve enjoyed this guide or have any suggestions, please leave a sincere opinion or a comment with your thoughts. We’d love to hear what vegetables you’re stitching up next!


