
Crochet Multi-Purpose Blouse, Shawl, Runner Model

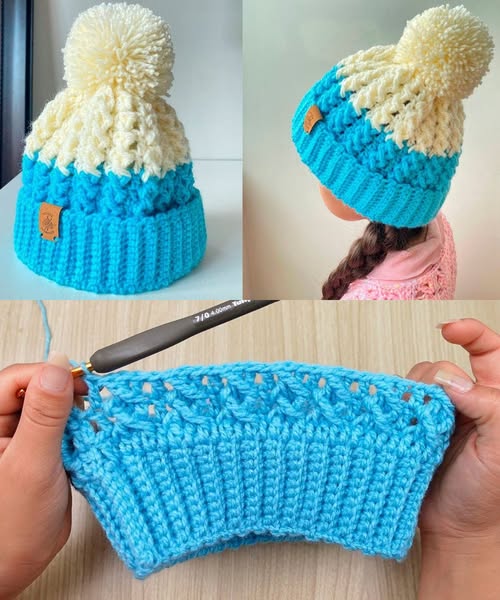
The Crochet Hat for Winter – Pattern is a cozy and stylish way to stay warm during cold months while showcasing your crochet skills. This pattern provides a step-by-step guide to creating a hat that is not only functional but also fashionable.
Whether you are making it for yourself, as a gift, or for sale, this pattern ensures a snug fit and a polished finish. With endless options for colors, stitches, and embellishments, the Crochet Hat for Winter – Pattern can be adapted to suit any personal style or winter wardrobe.
One of the best things about the Crochet Hat for Winter – Pattern is its versatility. You can create hats for all ages, from babies to adults, and experiment with various yarn types and textures. Adding a pom-pom, a contrasting brim, or decorative stitching can make each hat unique.
This pattern encourages creativity while teaching fundamental crochet techniques that are valuable for other projects.
Making a Crochet Hat for Winter – Pattern is also an excellent way to practice important crochet skills, such as working in rounds, increasing and decreasing stitches, and reading pattern instructions. Even beginners can achieve beautiful results by following this clear and detailed tutorial.
The satisfaction of wearing a handmade hat that you crafted yourself is unmatched, making this project both practical and rewarding.
Before starting your Crochet Hat for Winter – Pattern, it’s important to gather all the necessary materials. Using quality yarn and tools will ensure a comfortable and durable hat.
For this pattern, a medium-weight or bulky yarn is ideal. Wool blends are excellent for warmth, while acrylic yarns provide softness and easy care. Choose a color that complements your winter wardrobe or experiment with bold, bright shades for a fun look.
A suitable crochet hook should be selected based on your yarn choice. Typically, a 5 mm to 6.5 mm hook works well for medium to bulky yarns. Using the recommended hook ensures proper gauge and a snug fit.
Additional tools include a yarn needle for weaving in ends, stitch markers to keep track of rounds, and scissors for clean cuts. Optional embellishments, like buttons, pom-poms, or appliqués, can add a personal touch to your hat.
Checking your gauge before beginning is highly recommended. Although crochet hats are flexible, achieving the right size ensures the hat fits comfortably without being too loose or tight.
Lastly, organizing your materials in advance makes the project smoother and more enjoyable, allowing you to focus on the creative process rather than searching for supplies.
Start the Crochet Hat for Winter – Pattern by creating a magic ring or chain to form the top of the hat. Working in rounds, increase stitches evenly to create a flat circle that will form the crown.
Once the crown reaches the desired diameter, continue crocheting in rounds without increasing to build the body of the hat. This ensures a snug fit around the head while providing adequate coverage for warmth.
For a simple design, continue with single or double crochet stitches. For added texture and style, try using ribbing, shell stitches, or other decorative patterns. This adds visual interest and a unique touch to your Crochet Hat for Winter – Pattern.
If desired, create a brim by working additional rows of front post or back post stitches. A folded brim not only provides extra warmth for the ears but also adds a stylish element to the hat.
Incorporate any embellishments, like a pom-pom, at the crown of the hat. Secure it firmly to prevent shedding or unraveling. Embroidery or appliqué can also be added for personalized designs.
Finally, weave in all yarn ends neatly using a yarn needle. This ensures a clean and professional finish, completing your Crochet Hat for Winter – Pattern ready for use or gifting.
One of the best features of the Crochet Hat for Winter – Pattern is the ability to personalize it. You can choose different yarn textures, colors, and stitch patterns to match your style or your recipient’s preferences.
Consider making a set of hats in complementary colors for family or friends. This is perfect for creating matching winter accessories for group photos or holidays.
Experiment with different brim styles. Folded, scalloped, or ribbed brims can dramatically change the look of your hat while keeping ears warm.
Adding textured stitches like cables, bobbles, or puff stitches can make your Crochet Hat for Winter – Pattern more visually interesting and cozy. These techniques also allow you to practice more advanced crochet skills.
For children or babies, keep the hat simple and soft, avoiding embellishments that could pose a choking hazard. Opt for gentle yarns that are washable and skin-friendly.
Lastly, consider making reversible hats by using two contrasting yarn colors. This adds versatility and makes the hat suitable for different outfits or moods.
Even experienced crocheters can make mistakes while working on a Crochet Hat for Winter – Pattern, but these can be easily avoided with careful attention.
A common error is uneven increases at the crown, which can lead to a lopsided hat. Mark the rounds and count stitches regularly to maintain symmetry.
Incorrect gauge can result in a hat that is too tight or too loose. Always make a small swatch before starting the full project to check your tension.
Not securing embellishments properly can cause them to come loose. Use strong knots or sewing techniques to ensure pom-poms and appliqués stay in place.
Skipping stitch markers can make it difficult to track the beginning of rounds, causing uneven stitching. Place markers to maintain consistency throughout your Crochet Hat for Winter – Pattern.
Another mistake is overstuffing or adding too much texture, which can make the hat bulky and uncomfortable. Balance decoration with comfort and wearability.
Finally, neglecting to weave in ends properly can make the hat look unfinished. Take time to hide all yarn tails for a polished, professional appearance.
Q: Is this pattern suitable for beginners?
Yes, beginners can follow this pattern easily, especially if they are familiar with basic crochet stitches like single and double crochet.
Q: How long does it take to make a winter hat?
Depending on your skill level and yarn choice, a hat can be completed in 3–6 hours.
Q: What type of yarn is best for warmth?
Wool or wool blends provide excellent insulation, while acrylic yarns are soft, easy to care for, and widely available.
Q: Can I customize the size?
Absolutely. Adjust the number of rounds for the crown and body to fit different head sizes.
Q: How do I care for a handmade crochet hat?
Hand wash or machine wash on a gentle cycle with cold water. Lay flat to dry to maintain shape.
Q: Can I add a lining for extra warmth?
Yes, a soft fleece lining can increase insulation and make the hat extra cozy.
The Crochet Hat for Winter – Pattern is a versatile, practical, and enjoyable project that allows you to create handmade, cozy winter accessories. From choosing your materials to customizing colors and textures, this pattern provides everything needed to make a stylish and functional hat.
By following the step-by-step instructions and using the tips provided, you can achieve a professional-looking finish that is perfect for gifting, personal use, or even selling. Share your results, feedback, and suggestions in the comments to inspire others and celebrate your crochet achievements!


