
Crochet Multi-Purpose Blouse, Shawl, Runner Model

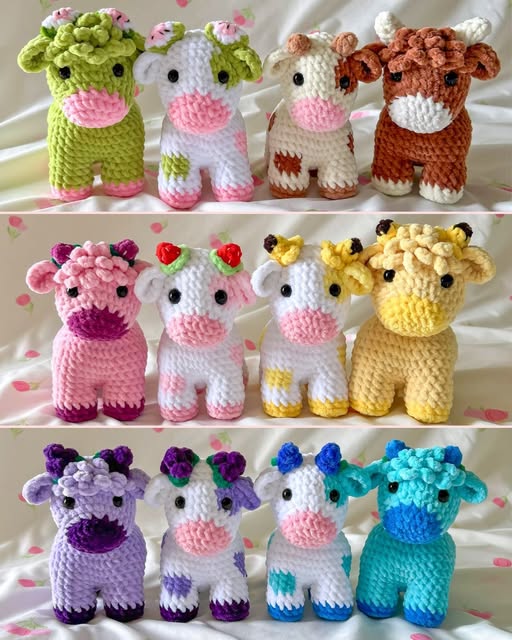
The Amigurumi Cute Cow – Pattern is a delightful crochet project that has captured the hearts of many crafters around the world. Whether you are a beginner looking for a simple and adorable project, or an experienced crocheter searching for a fun and creative design, this pattern is the perfect choice.
Handmade toys like this cow bring warmth, personality, and a touch of charm to any space, making them wonderful gifts for children and adults alike.
Creating an amigurumi cow is not only enjoyable, but it also allows you to practice important crochet techniques while experimenting with colors and textures. The versatility of this crochet cow amigurumi makes it a great option for customizing with accessories such as scarves, hats, or even small embroidered details.
By following an easy amigurumi pattern for beginners, anyone can achieve a soft and cuddly result that looks professional and unique.
In this article, you will find a well-structured guide on how to work with the Amigurumi Cute Cow – Pattern, including tips for materials, step-by-step explanations, and design variations.
We will also discuss why this project is one of the most popular farm animal crochet patterns and how it can become a treasured keepsake or part of a larger amigurumi collection. Let’s dive into the world of creativity and bring this adorable crochet cow to life.
To begin with the Amigurumi Cute Cow – Pattern, you will need some basic materials. The most important element is choosing the right yarn. Cotton yarn is highly recommended because it provides durability and a neat stitch definition. Soft acrylic yarn is also a great option if you want your cow to feel extra cuddly. A suitable crochet hook, usually size 2.5 mm to 3.5 mm, will help achieve the correct tension and size.
When selecting colors, traditional black and white spots are always a favorite, but don’t hesitate to experiment. A cute cow crochet pattern can look equally charming in pastel shades or bold, vibrant colors. Adding pink for the nose or soft brown for the horns can create a realistic yet playful look. The freedom to choose your palette is one of the joys of amigurumi.
Stuffing is another important aspect of the project. High-quality polyester fiberfill ensures that your amigurumi stuffed animals keep their shape while remaining soft and huggable. Avoid overstuffing, as this can stretch the stitches and create gaps in the fabric. A well-balanced stuffing will help your cow sit nicely and keep its adorable form.
Safety eyes are often used for amigurumi, giving the cow a bright and cheerful expression. However, if you are making the handmade crochet cow for a baby or toddler, it is safer to embroider the eyes with yarn to avoid small detachable parts. This way, you maintain both cuteness and safety.
The process of creating the different parts—head, body, arms, legs, horns, and ears—requires patience and attention to detail. Each part is crocheted separately and later sewn together. This technique is what gives the amigurumi cow tutorial its recognizable and charming look.
Finally, prepare your tapestry needle and scissors. These small tools will help you assemble the cow neatly and add final touches. Once you have gathered all the essentials, you are ready to start working on your step-by-step amigurumi cow project.
The Amigurumi Cute Cow – Pattern typically begins with the head, as it is the central feature of the design. Using the magic ring technique, you will start crocheting in the round, gradually increasing stitches to form a smooth sphere. This method avoids gaps in the center and provides a professional finish.
The snout is usually made separately in a contrasting color such as pink or beige. Attaching it to the head along with embroidered nostrils gives the cow a lively expression. This detail is what makes the crochet plush cow instantly recognizable and adorable.
Next comes the body, which is shaped like an oval or rounded cylinder. Working with continuous rounds will keep the stitches aligned, preventing uneven edges. This part is slightly larger than the head, ensuring a balanced look. As you finish the body, remember to add stuffing gradually to maintain shape.
The arms and legs are created as smaller cylinders and are usually attached at the sides of the body. Keeping the limbs short and stubby adds to the cuteness of the amigurumi cow tutorial. Positioning them symmetrically will give the cow a well-proportioned and polished appearance.
The ears and horns complete the cow’s head. Ears are crocheted in simple oval shapes and sewn near the top. Horns, often in light beige or gray, are small cones that add character. Together with the ears, they highlight the farm animal theme of the amigurumi stuffed animals collection.
Once all the pieces are completed, carefully sew them together. Take your time during this step, as proper assembly ensures durability. A well-stitched handmade crochet cow can last for years, becoming a beloved toy or collectible.
One of the most enjoyable aspects of working with the Amigurumi Cute Cow – Pattern is customization. You can transform a simple cow into a completely unique character just by adjusting colors and details. For example, instead of classic black spots, try brown, pink, or even rainbow patterns for a playful twist.
Clothing and accessories are another creative way to make your cow stand out. Adding a tiny scarf, hat, or bow instantly gives personality. Some crafters even design small aprons or overalls, making the cute cow crochet pattern a character in themed displays.
Facial expressions can also be customized. Embroidering a wide smile, sleepy eyes, or even rosy cheeks can completely change the mood of your amigurumi cow tutorial. This flexibility makes it an excellent project for gifts, as you can adapt it to match the recipient’s style.
Size adjustments are easy as well. By changing yarn thickness and hook size, you can create miniature cows that fit on keychains, or larger ones that work as huggable plush toys. This versatility is why the easy amigurumi pattern for beginners is loved by both new and experienced crocheters.
Another idea is to combine your farm animal crochet pattern collection. Creating cows along with pigs, sheep, and chickens results in a complete set that children will adore. Displaying them together emphasizes the charm of handmade toys.
Lastly, you can experiment with textures by using different stitches. While most step-by-step amigurumi cow designs rely on single crochet, adding a textured stitch for spots or using fuzzy yarn for the body can create a striking variation.
The key to mastering the Amigurumi Cute Cow – Pattern lies in consistency. Maintaining even tension throughout ensures smooth fabric and prevents uneven shapes. Practicing with smaller projects can help improve your control before tackling larger designs.
Another useful tip is to use stitch markers. Since amigurumi is often worked in continuous rounds, it’s easy to lose track of stitches. A simple marker at the beginning of each round will save time and prevent mistakes in your amigurumi cow tutorial.
Patience is crucial when sewing the pieces together. Many beginners feel frustrated during assembly, but taking small steps and double-checking alignment ensures a professional-looking handmade crochet cow.
Blocking may not be as common in amigurumi, but lightly shaping parts before sewing can make assembly smoother. Adjusting horns or ears to curve slightly gives the crochet cow amigurumi more realistic proportions.
Photography is another rewarding step. After finishing your project, take clear photos in natural light. Sharing your crochet plush cow online can inspire others and connect you with a community of amigurumi enthusiasts.
Finally, always remember that amigurumi is meant to be fun. Each mistake is a learning opportunity, and every project adds to your skills. With practice, the amigurumi stuffed animals you create will become more detailed and expressive.
1. What skill level is required for the Amigurumi Cute Cow – Pattern?
This pattern is beginner-friendly, making it suitable for those just starting with amigurumi. Basic knowledge of single crochet and working in the round is enough.
2. How long does it take to finish an amigurumi cow?
Depending on your speed, it may take between 6 to 12 hours to complete. Beginners might take longer, but the process is enjoyable and rewarding.
3. What type of yarn is best for this project?
Cotton yarn is recommended for durability and neat stitches, while acrylic yarn provides extra softness. Both are excellent for the cute cow crochet pattern.
4. Can I make the cow larger or smaller?
Yes! Using thicker yarn and a larger hook will create a bigger cow, while fine yarn and smaller hooks make miniatures perfect for keychains.
5. Is it safe to give the amigurumi cow to babies?
Yes, as long as you avoid plastic safety eyes. Embroidering the eyes with yarn makes the toy safe for babies and toddlers.
6. How do I make my amigurumi look more professional?
Focus on even tension, use high-quality stuffing, and take your time sewing pieces together. Attention to detail will improve the final result of your step-by-step amigurumi cow.
The Amigurumi Cute Cow – Pattern is a heartwarming project that combines creativity, skill, and fun. From selecting yarn colors to customizing accessories, every step allows you to put your personal touch on this adorable handmade crochet cow. With patience and practice, even beginners can create charming amigurumi stuffed animals that become cherished keepsakes.
I hope this guide has inspired you to try the cute cow crochet pattern and explore the joy of amigurumi. If you found this article helpful, please leave your honest opinion and share suggestions for future patterns you would like to see. Your feedback is always welcome and helps make our crochet journey even more enjoyable.


