
If you’re looking for a charming and whimsical crochet project, this Amigurumi Treehouse – FREE Crochet Pattern is the perfect choice. Whether you’re an experienced crocheter or just starting out, this pattern offers a delightful way to bring creativity and joy into your craft.
With its playful design and endless customization possibilities, this amigurumi treehouse is sure to become a favorite in your handmade collection.
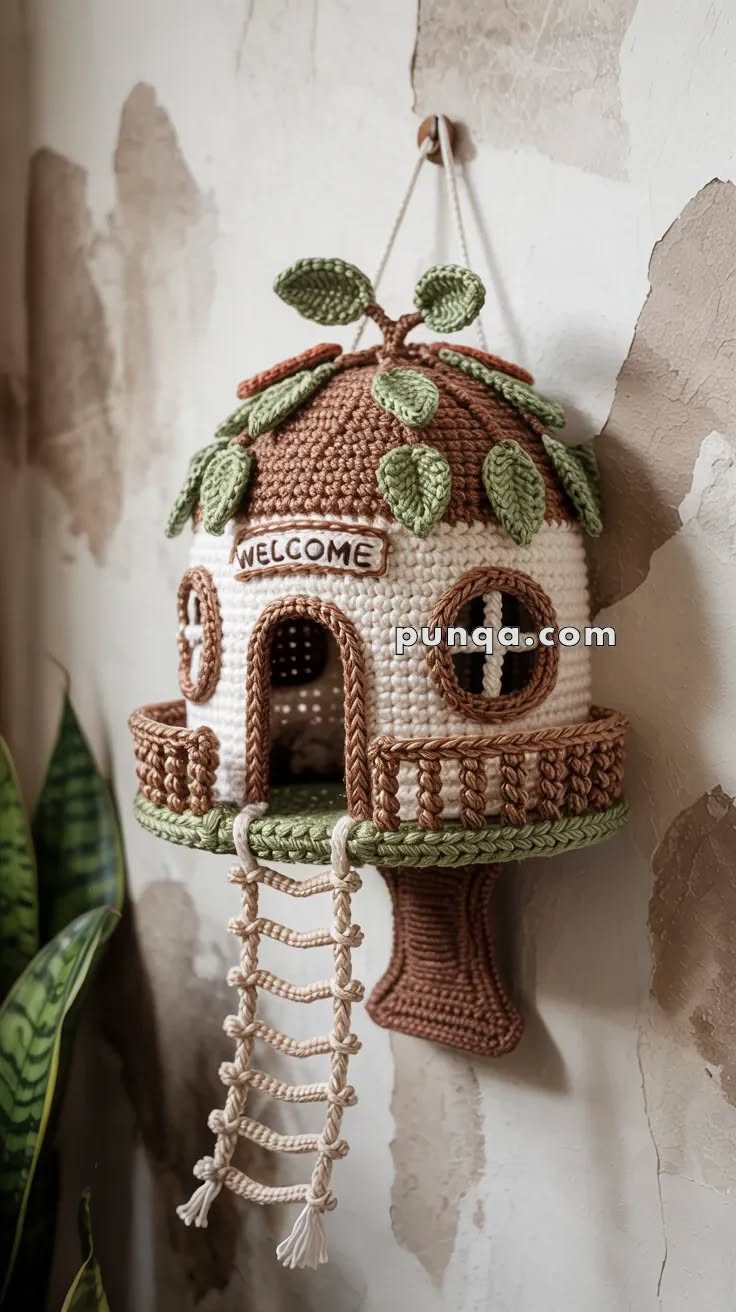
The Amigurumi Treehouse – FREE Crochet Pattern is designed to be both fun and beginner-friendly. This project features a cozy tree trunk base, a leafy rooftop, and cute little details like windows, doors, and perhaps even a tiny ladder.
It’s an imaginative project that sparks creativity and makes a wonderful gift for children or anyone who loves whimsical décor.
In this comprehensive tutorial, you’ll learn how to create your own Amigurumi Treehouse from start to finish. From gathering materials and choosing colors to assembling pieces and adding details, this guide covers every step in a clear and friendly manner.
1. Materials Needed for Amigurumi Treehouse – FREE Crochet Pattern
Before starting the Amigurumi Treehouse – FREE Crochet Pattern, gathering the right materials is essential for a smooth crocheting experience. This step ensures that you have everything ready to dive straight into the fun part.
You’ll need medium-weight yarn (category 4) in several colors. Typically, brown for the tree trunk, green for the foliage, and various shades for the windows, doors, and accessories. Cotton yarn is often recommended for amigurumi due to its durability and neat stitch definition.
A set of crochet hooks is required, with the most common size being 2.5 mm to 3.5 mm for tight stitches. Tight stitches help the treehouse hold its shape without stuffing showing through.
Stuffing is essential for giving shape and volume to your amigurumi treehouse. Use polyester fiberfill, which is lightweight, washable, and easy to work with for crochet projects.
For small details like windows, flowers, or miniature decorations, felt pieces or embroidery floss can be useful. They add texture and colorful accents to make the treehouse even more charming.
Make sure you have basic tools like a tapestry needle for sewing pieces together, stitch markers to keep track of rounds, scissors, and a row counter if needed.
Safety eyes can be used if you choose to add tiny inhabitants like birds or woodland creatures to your treehouse. Alternatively, eyes can be embroidered for a softer look.
2. Creating the Base Structure of the Amigurumi Treehouse – FREE Crochet Pattern
The first step in the Amigurumi Treehouse – FREE Crochet Pattern is creating the base structure. This forms the tree trunk, which provides stability and the foundation for the entire piece.
Begin by crocheting a flat circle that becomes the base of the tree trunk. This typically involves starting with a magic ring and working continuous rounds with gradual increases.
Once the base is complete, start building up the sides of the tree trunk. This is done by crocheting in the round without increases, which forms a cylindrical shape representing the sturdy trunk.
Add subtle texture to the tree bark by using front-post or back-post stitches. This technique gives a realistic bark-like appearance and enhances the three-dimensional look of the treehouse.
Create a doorway by leaving a space open in one round or crocheting a separate door piece to attach later. This detail makes the treehouse look welcoming and playful.
Work on windows next. Either crochet small circular or square shapes that are sewn onto the trunk or embroider them directly onto the fabric. Windows add charm and character.
Finish the trunk by adding a slight taper towards the top if desired. This subtle shaping makes the transition to the leafy roof smoother and adds a touch of realism to the design.
3. Crocheting the Roof and Foliage of the Amigurumi Treehouse – FREE Crochet Pattern
The leafy roof is one of the most charming features of the Amigurumi Treehouse – FREE Crochet Pattern. This part transforms the trunk into a magical hideaway nestled in nature.
Start the roof by crocheting another flat circle, similar to the trunk base, but larger in diameter to overhang slightly like a canopy.
Work in rounds, gradually increasing to the desired width. Once the base is wide enough, continue with rounds without increases to create a shallow dome shape.
To simulate leaves, use a combination of scallop stitches or popcorn stitches. These textured stitches create the illusion of dense foliage and add depth to the roof.
Consider adding small crochet flowers, vines, or even tiny fruit to the roof. These embellishments make the treehouse vibrant and whimsical, perfect for display or play.
Attach the roof to the trunk carefully, making sure it sits evenly and covers the top securely. This can be sewn on completely or made removable if you want access to the inside.
Optionally, crochet a chimney, bird nest, or miniature ladder leading up to the roof. These details enhance the storytelling element and give your treehouse a unique personality.
4. Assembling and Decorating the Amigurumi Treehouse – FREE Crochet Pattern
Assembling and decorating are where the Amigurumi Treehouse – FREE Crochet Pattern truly comes to life. This stage is all about putting the pieces together and adding those delightful finishing touches.
First, firmly stuff the trunk to ensure it stands upright. Make sure the stuffing reaches all corners evenly to maintain the shape over time.
Sew the door and windows onto the trunk. If you prefer, embroider extra details like window frames, curtains, or tiny flower boxes for added charm.
Attach the roof securely. If you’ve chosen to make it removable, consider adding a simple button and loop closure to keep it in place while allowing easy access inside.
Use embroidery floss to add vines wrapping around the trunk or tiny leaves cascading from the roof. These little flourishes add character and bring a sense of life to the design.
Create miniature accessories like a ladder, swing, or tiny creatures like birds, squirrels, or bees. These optional extras turn your treehouse into a playful scene straight out of a storybook.
Finally, check for loose threads and tidy up any excess yarn. Give your finished amigurumi a gentle shaping with your hands to smooth any uneven areas and bring it to life perfectly.
FAQ About Amigurumi Treehouse – FREE Crochet Pattern
1. Is the Amigurumi Treehouse – FREE Crochet Pattern beginner-friendly?
Yes, this pattern is suitable for beginners who are familiar with basic crochet stitches like single crochet, increases, and decreases.
2. How tall is the finished amigurumi treehouse?
The finished size typically ranges from 6 to 10 inches tall, depending on your yarn choice and stitch tightness.
3. Can I use different types of yarn for this project?
Yes, while cotton yarn is recommended for durability, you can use acrylic or blended yarns. Keep in mind that different yarn weights will change the finished size.
4. How long does it take to complete the Amigurumi Treehouse?
The average time is between 6 to 12 hours, depending on skill level and the number of decorative elements added.
5. Is the treehouse designed to be played with or just for decoration?
It can be both! If you make it sturdy with tight stitches and secure seams, it’s suitable for gentle play. Otherwise, it serves beautifully as décor.
6. Can I customize the design easily?
Absolutely! You can change colors, add more windows, create different types of roofs, or add accessories like ladders, swings, and miniature characters.
Conclusion
The Amigurumi Treehouse – FREE Crochet Pattern is a delightful and creative project that brings joy not only to those who make it but also to anyone who sees it. From crafting the sturdy tree trunk to designing a whimsical leafy roof and adding charming details, this pattern offers a rewarding crochet experience for all skill levels.
We hope this guide has inspired you to pick up your hook and create your very own Amigurumi Treehouse. If you enjoyed this tutorial, we’d love to hear from you! Please share your honest opinions, your creative results, and any suggestions for future patterns or tutorials in the comments. Your feedback helps grow this wonderful crochet community and keeps the inspiration flowing. Happy crocheting!


