
Macrame Heart Bracelet - Free Tutorial

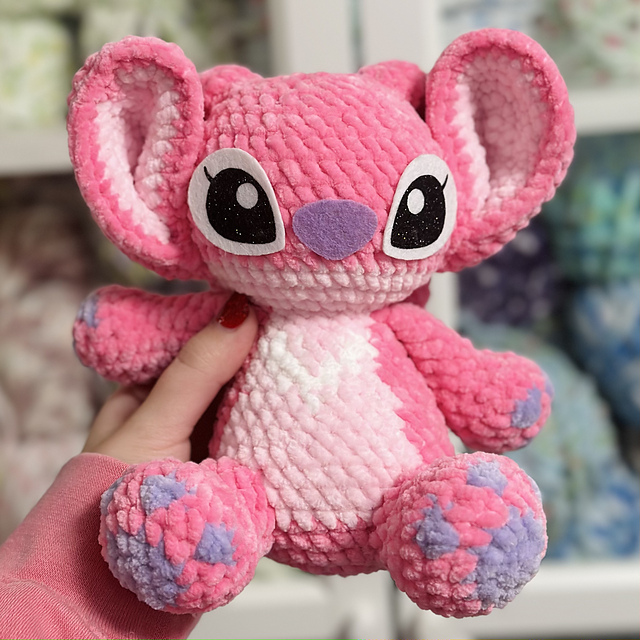
If you’ve been searching for a cute and fun project, this Angel from Lilo and Stitch – Free Pattern is perfect for you.
Whether you are a beginner or an experienced crafter, creating Angel, the adorable pink experiment from the beloved Lilo & Stitch series, is a delightful way to bring a little magic into your crafting space. This project is not only enjoyable but also a great gift idea for Disney fans of all ages.
Crafting the Angel from Lilo and Stitch – Free Pattern allows you to express your creativity while making something truly special. This guide will take you step by step through the entire process, from gathering materials to assembling your very own plush Angel.
The end result will be a soft, cuddly companion that captures all the charm of the original character.
In this article, you’ll find detailed instructions, helpful tips, and easy-to-follow steps to ensure your crafting experience is smooth and rewarding.
Whether you’re sewing by hand, using a sewing machine, or crocheting, this guide covers everything you need to know to create your Angel from Lilo and Stitch – Free Pattern with love and care.
Before starting your Angel from Lilo and Stitch – Free Pattern, it’s essential to gather all the materials. Choosing the right supplies ensures your finished Angel will be both durable and adorable.
Start with selecting the main fabric. Soft fleece, minky, or high-quality felt are excellent choices to replicate Angel’s cuddly appearance. Look for pink fabric as the primary color and purple for the inner ears and antennae tips.
You’ll also need polyester fiberfill for stuffing. This keeps your plush soft, lightweight, and squeezable while maintaining shape over time.
For the facial features, embroidery thread or fabric paint works great to create the eyes, mouth, and nose. Alternatively, felt pieces can be used for a more defined look.
Gather matching sewing thread, scissors, pins, a sewing needle, or a sewing machine depending on your preference. If crocheting, prepare pink and purple yarn with an appropriate hook size.
Safety eyes are an optional addition that give your plush a professional finish. However, embroidered or felt eyes are safer options for small children.
Lastly, consider adding accessories like a small bow or heart to personalize your Angel from Lilo and Stitch – Free Pattern, making it truly one-of-a-kind.
Now that you have your materials ready, it’s time to prepare the pieces for your Angel from Lilo and Stitch – Free Pattern. Careful cutting and preparation lead to a polished final result.
Start by printing or drawing your pattern pieces on paper. Ensure each piece is sized proportionally. You will need pieces for the body, head, ears, arms, legs, wings, and antennae.
Pin the paper templates onto your fabric. Make sure the fabric is folded when needed to cut mirrored pieces for symmetrical parts like ears and arms.
Carefully cut each piece, following the outlines exactly. Precise cutting reduces sewing errors and keeps the finished plush looking clean and accurate.
Mark any important placements on the fabric, such as where the ears, wings, and facial features will be attached. Use a washable fabric marker or tailor’s chalk for this step.
If you’re using interfacing to reinforce delicate parts like the ears or wings, iron it onto the wrong side of those pieces now. This helps them hold their shape.
Prepare your smaller pieces, such as the inner ears, antennae tips, and wing details. These accents help bring authenticity to your Angel from Lilo and Stitch – Free Pattern and are essential for capturing her playful look.
With your pieces prepared, it’s time to begin sewing your Angel from Lilo and Stitch – Free Pattern. This is the most exciting step as your plush starts coming to life.
Begin by assembling the head. Sew the front head pieces together, then attach the back panels, leaving an opening for stuffing. Carefully stuff the head until it’s firm but still soft.
Next, attach the facial features. Embroider the eyes, nose, and mouth or glue/sew on felt pieces. Position them carefully to capture Angel’s sweet and mischievous expression.
Move on to the ears and antennae. Sew the inner ear pieces to the outer ears and turn them right side out. Do the same for the antennae, adding a bit of stuffing if needed to give them dimension.
Sew the body pieces together, attaching the front to the back. Don’t forget to include openings for attaching arms, legs, wings, and the head. Stuff the body firmly to maintain shape.
Attach the limbs. The arms and legs can either be sewn into the body seams for a cleaner look or sewn externally for a more playful, floppy style.
Finally, assemble everything together. Sew the head onto the body securely, then attach the ears, antennae, and wings in their marked positions. This completes the base of your Angel from Lilo and Stitch – Free Pattern plush.
Adding final details will make your Angel from Lilo and Stitch – Free Pattern truly shine. These little touches bring personality and charm to your creation.
Topstitch around certain parts, like the ears or wings, to create definition and help them lay flat. This also reinforces the seams for added durability.
If you enjoy embroidery, consider adding small heart accents, a name, or a date to commemorate when you made the plush. These details turn a simple plush into a treasured keepsake.
You can add accessories such as a miniature bow, a tiny flower, or a ribbon collar. These playful additions personalize your Angel even more.
Adjust the facial expressions if desired. A tiny change in the angle of the mouth or eyes can create different moods—smiling, mischievous, or curious.
If crocheting your Angel from Lilo and Stitch – Free Pattern, take the opportunity to use different stitch types for texture, such as bobble stitches for added fluffiness on the antennae or wings.
Once all details are added, give your plush a gentle surface clean to remove fabric markers and any loose threads. Your handmade Angel is now ready to cuddle or gift to a lucky someone.
Is this Angel plush suitable for beginners?
Yes! The steps are straightforward and adaptable. Beginners can start with a simple version without too many extra details, while experienced crafters can add more complex features.
What’s the best fabric for this plush?
Fleece, minky, or felt are ideal because they’re soft, durable, and easy to sew. They also closely match the cuddly texture of the character.
Can I crochet the Angel instead of sewing?
Absolutely. The Angel from Lilo and Stitch – Free Pattern works beautifully as an amigurumi crochet project. Just adjust the pattern into crocheted pieces and assemble as described.
How big is the finished plush?
It depends on the pattern size you choose. A common finished size is around 12 to 18 inches tall, but you can scale the pattern up or down as desired.
Are safety eyes safe for children?
Safety eyes are secure when installed correctly, but for plush toys intended for children under three, felt or embroidered eyes are recommended to avoid any choking hazards.
Can I wash the finished plush?
Yes, if you use washable fabrics like fleece and felt. Hand washing is safest to preserve the stitches, but some can be machine washed on a gentle cycle with a pillowcase for protection.
Creating your own Angel from Lilo and Stitch – Free Pattern is a heartwarming and joyful project that combines creativity, craftsmanship, and a love for one of Disney’s most adorable characters. From gathering the right materials to stitching the final pieces, this guide has walked you through every step to ensure your handmade Angel turns out beautiful and full of personality.
I hope you enjoyed this detailed tutorial and that it inspires you to bring Angel to life in your crafting space. If you’ve tried this pattern, I would love to hear your honest opinion! Please share your feedback, experiences, and any suggestions for future tutorials in the comments. Your input helps make this creative community even better!


