
Macrame Heart Bracelet - Free Tutorial

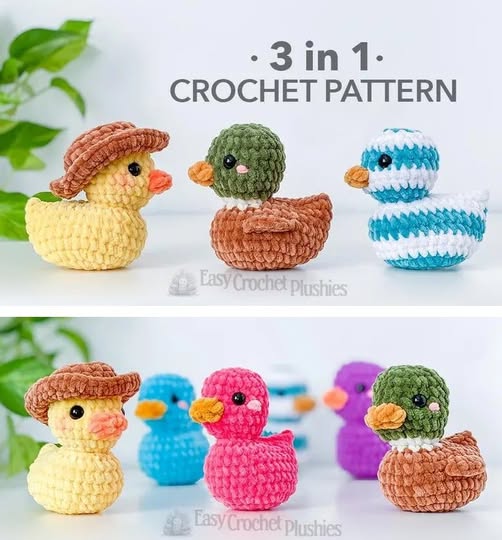
If you’re searching for a project that’s both adorable and beginner-friendly, the Ducky Crochet Pattern is a perfect choice. Whether you’re crafting for a baby shower gift, nursery décor, or simply looking to brighten someone’s day, this charming little duck will quickly win your heart.
With soft textures, cheerful colors, and easy-to-follow steps, crocheting your own duck brings joy from the first stitch to the last.
The beauty of the Ducky Crochet Pattern lies in its versatility. You can make a tiny duckling as a pocket buddy or create a larger version for cuddles. With just a few basic stitches and a bit of stuffing, your ducky comes to life in no time.
Whether you’re a complete beginner or a seasoned crocheter looking for a fun weekend project, this pattern is both enjoyable and rewarding.
In this guide, we’ll explore every detail of the Ducky Crochet Pattern. From choosing your materials to mastering the shape and adding finishing touches, we’ll walk you through the process with encouragement and helpful tips. Ready to make your own adorable little duck? Let’s get started!
The Ducky Crochet Pattern isn’t just cute—it’s practical, too. Crocheted ducks make wonderful gifts and serve as charming decorations. Whether you’re making toys for kids or keepsakes for friends, the possibilities are endless.
One of the best things about this pattern is how accessible it is. You don’t need advanced skills or special tools. All you need is some yarn, a hook, and a little time. Even if you’re new to amigurumi, this is a gentle introduction.
Another great reason to try the Ducky Crochet Pattern is how customizable it is. Want to make a yellow duck? A pink one? A multicolored duck with a bowtie? You can personalize it as much as you like.
Ducks also have universal appeal. They’re beloved characters in storybooks, cartoons, and baby themes. Your crochet duck can easily become part of a mobile, a baby rattle, or even a bath-time pretend friend.
Additionally, this pattern helps you build essential crochet skills like working in the round, increasing, decreasing, and sewing pieces together. It’s not only cute—it’s educational, too!
And finally, making ducks is just plain fun. Seeing your little ducky take shape is deeply satisfying, and the end result is something that brings smiles to everyone who sees it.
Before you dive into the Ducky Crochet Pattern, you’ll need to gather some basic materials. Fortunately, most are likely already in your stash.
Start with yarn. A soft worsted-weight or DK yarn in yellow is traditional, but feel free to get creative. You’ll also need orange for the beak and feet, and black (or safety eyes) for the eyes.
A crochet hook in size 3.5 mm to 4 mm usually works well for amigurumi. Smaller hooks help keep your stitches tight so stuffing doesn’t peek through.
Don’t forget fiberfill or poly stuffing. This gives your ducky shape and squish. Make sure to stuff evenly to avoid lumps or gaps.
A yarn needle is essential for sewing parts together, like attaching the beak, wings, and feet. You’ll also use it to weave in your ends neatly.
Optional materials include a stitch marker (to help keep track of rounds) and accessories like bows, scarves, or hats to add personality to your duck.
With your supplies ready, you’re well on your way to making a cuddly crochet duck that will charm everyone who sees it!
Let’s break down the basic steps of the Ducky Crochet Pattern. This version uses the classic amigurumi method—working in continuous rounds with simple shapes.
Start with the head and body. Typically, these are crocheted as a single piece, beginning at the top of the head with a magic ring and working downward. Increase gradually to form a round shape, then maintain stitch count for the neck and increase again for the body.
Add the beak. The beak is a small oval shape made with just a few rows. Once finished, sew it securely to the center of the face.
Create and attach the wings. Each wing is usually a simple oval or teardrop shape, made by increasing and then decreasing. Stitch them to the sides of the body at equal height.
Make the feet. These can be circles or small triangles in orange yarn. They add an adorable finishing touch and help the duck sit upright if positioned correctly.
Add eyes. Use black yarn to embroider sleepy eyes, or insert safety eyes for a more lifelike look. Placement is key, so pin first before sewing.
Stuff and shape. Once the body is complete, fill it evenly with stuffing. Add more in the neck area to ensure it stays upright. Then use a yarn needle to close the opening with a neat whipstitch.
After all pieces are attached, shape the duck gently with your hands, smoothing out the curves. And just like that, your duck is ready for cuddles or display!
The Ducky Crochet Pattern is delightfully easy to customize. With just a few tweaks, you can turn a basic duck into something totally unique.
Change the color. While yellow is classic, you can make a white duck with a blue beak, a pastel rainbow duck for spring, or even a Halloween-themed black duck with a pumpkin accessory.
Add accessories. A little bowtie, a scarf, or a flower crown can give your ducky a completely different personality. Get creative with small details!
Turn it into a keychain or bag charm. Use thinner yarn and a smaller hook to create a tiny duck, then add a keyring loop. It’s a great quick gift idea!
Make a family of ducks. Vary the size of your hook or yarn weight to make parent and baby ducks. Line them up as a cute family display!
Add sound. Insert a squeaker or rattle insert before closing the body to make your duck interactive—great for babies and toddlers.
Personalize it. Embroider initials, dates, or a little heart onto the duck’s chest to make it truly one-of-a-kind.
With just a bit of imagination, the Ducky Crochet Pattern becomes a canvas for your creativity and love.
Is the Ducky Crochet Pattern good for beginners?
Yes! The pattern uses basic stitches and techniques. Even if you’re new to amigurumi, it’s a gentle learning curve with adorable results.
What kind of yarn should I use?
Soft worsted or DK cotton or acrylic yarn works best. Cotton is ideal for baby toys, while acrylic is squishy and colorful.
How big will my duck be?
That depends on your yarn and hook size, but most finished ducks measure around 4 to 6 inches tall.
Can I wash my crocheted duck?
If using washable yarn and securely stitched eyes (not safety eyes for babies), you can gently hand wash it in cold water and air dry.
How do I make sure my duck doesn’t look lumpy?
Use small, tight stitches and stuff gradually, using your fingers to shape as you go. Always distribute stuffing evenly before closing.
Can I sell ducks made with this pattern?
Yes, as long as the pattern allows for it. Be sure to credit the designer if required, but feel free to sell your handmade ducks at markets or online.
The Ducky Crochet Pattern is a heartwarming project that brings smiles, joy, and a sense of accomplishment. Whether you’re making one for a child, a friend, or just for fun, it’s a delightful pattern that offers both ease and creativity.
You’ve learned the benefits of making a crochet duck, the materials you need, how to construct it step-by-step, and ways to personalize it for any occasion. This pattern is a lovely way to grow your skills and create something truly meaningful.
Now we’d love to hear from you! Have you made your own ducky? What yarn did you choose? Do you have tips or questions? Leave a sincere comment below and share your thoughts or suggestions. Let’s keep crafting, connecting, and spreading handmade happiness!


