
The Crochet Desert Star Throw – FREE PATTERN is the perfect project for those who want to add a touch of elegance and warmth to their home. This stunning throw features a unique star pattern that evokes the colors and beauty of the desert landscape.
If you love crochet and are looking for an easy yet beautiful project, the Crochet Desert Star Throw is a great choice. In this article, we’ll walk you through every step of the process so you can create this eye-catching throw with ease.
The Crochet Desert Star Throw – FREE PATTERN is designed for crocheters of all skill levels. Whether you’re a beginner or an experienced crocheter, this pattern is accessible and fun to work on.
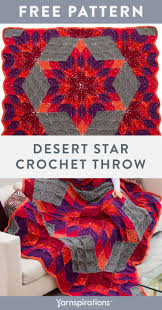
The throw’s star motifs come together seamlessly, creating a cozy and stylish addition to any room. With clear instructions and simple techniques, you’ll be able to complete this project in no time.
As you follow this free pattern, you’ll notice how quickly the design comes together. The combination of geometric shapes and earthy tones brings to mind the vast and serene desert landscapes. It’s a great way to showcase your crochet skills while creating something practical and beautiful for your home.
1. Materials Needed for the Crochet Desert Star Throw
Before you begin your Crochet Desert Star Throw – FREE PATTERN, it’s essential to gather all the necessary materials. With the right supplies, you’ll be able to complete this project efficiently and achieve the best results.
You will need yarn in the colors of your choice. For this project, a soft and comfortable yarn like worsted weight yarn is ideal. Choose earthy tones such as browns, tans, oranges, or reds to mimic the colors of the desert. However, feel free to pick any color palette that matches your style and décor.
Next, you’ll need a crochet hook that is compatible with your chosen yarn. A 5.0mm (H-8) hook is typically recommended for worsted weight yarn. Make sure to check the yarn label for any specific recommendations regarding hook size.
You will also need a tapestry needle for weaving in yarn ends as you go. This will help you tidy up your work and ensure that there are no loose ends sticking out. Additionally, if you plan to join your star motifs together, a needle and thread can come in handy to sew them together securely.
Lastly, you may want a measuring tape to ensure that your throw is the correct size. Depending on how large or small you want the throw to be, you can adjust the number of star motifs to suit your needs.
2. Crocheting the Desert Star Motif
The main element of the Crochet Desert Star Throw is the star motif. To begin, you’ll create a magic ring, which allows you to crochet in a circular shape without leaving a hole in the center. This technique is essential for starting the first few rounds of your star.
After creating the magic ring, you’ll begin crocheting the petals of the star. Each petal is made using double crochet stitches. You’ll continue working in rounds, with each round gradually increasing in size to form the star shape. Pay close attention to the stitch count as you go along to ensure your star remains symmetrical.
Once your star is complete, you’ll fasten off the yarn and weave in any loose ends using your tapestry needle. Repeat this process to create the number of stars needed for your throw. Depending on the size of the throw you want, you can create as many stars as needed, but typically, a throw will require anywhere from 12 to 24 stars, depending on the design.
When making your stars, you can experiment with different color combinations to create a visually interesting throw. You can use one color for the center of each star and another for the outer petals, or you can alternate colors for each round to give each star a unique look.
3. Joining the Crochet Desert Star Motifs
Once all your star motifs are completed, the next step is to join them together to form the Crochet Desert Star Throw. There are several methods for joining crochet motifs, but the easiest and most seamless way to do it is by using the whip stitch or the slip stitch join.
To start, lay out your stars in the pattern you want them to be arranged in. You can create a grid layout, stagger the stars, or arrange them in a spiral pattern – the choice is yours. Once you’re happy with the arrangement, begin joining the motifs one by one.
Using your tapestry needle or a crochet hook, carefully stitch the edges of the stars together. Be sure to join them tightly so there are no gaps between the motifs. As you join, make sure the motifs are lined up evenly for a clean and polished look.
As you join the stars, it’s important to maintain a consistent tension in your stitches. This will help keep the throw even and ensure that the motifs stay aligned properly. Once all the stars are joined together, you can continue adding rows if desired, or you can finish off the throw at this stage.
Once all the motifs are joined and the throw is the desired size, fasten off the yarn and weave in any remaining ends.
4. Finishing Touches and Customization
The final step in completing your Crochet Desert Star Throw – FREE PATTERN is adding any finishing touches and customizations. This is where you can make the throw truly your own.
If you want to add extra texture or flair, consider adding a crocheted border around the entire throw. You can use a simple single crochet or half double crochet border to give the throw a polished look. You can also experiment with different types of borders, such as scallops or picots, for a more decorative effect.
You may also want to add fringe to the edges of the throw for an extra touch of personality. Simply cut yarn into equal lengths and attach it to the corners or edges of the throw. This will give your throw a bohemian or rustic vibe, perfect for any desert-inspired décor.
If you prefer a minimalist look, you can leave the throw as is, letting the beautiful star motifs take center stage. Whatever you decide, remember that this throw is customizable, so feel free to experiment and make it unique to your tastes.
Lastly, take a step back and admire your work! You’ve successfully created a beautiful Crochet Desert Star Throw, and now you can enjoy the warmth and beauty it brings to your home.
FAQ: Frequently Asked Questions about the Crochet Desert Star Throw
1. Can I use a different yarn for this project?
Yes, you can use any yarn you prefer, but make sure it is suitable for the stitch pattern and gives the desired texture and drape. Worsted weight yarn is highly recommended for this throw.
2. How do I adjust the size of the throw?
To adjust the size, simply add or subtract the number of star motifs. You can also change the number of rounds for each star to create a larger or smaller design.
3. What is the best way to join crochet motifs?
The easiest methods for joining crochet motifs are the whip stitch join or slip stitch join. Both methods create a seamless connection between the motifs, making your throw look neat and professional.
4. How long will it take to complete the throw?
The time it takes to complete the throw depends on your skill level and how many stars you plan to make. On average, it can take several days to a week to finish, depending on how much time you dedicate to the project.
5. Can I add a border to the throw?
Yes, you can add a border to give the throw a finished, polished look. A simple single crochet border works well, or you can add decorative borders like scallops or picots for a more intricate design.
6. Can I make this throw with other crochet techniques?
While the star motif is the main feature of this design, you can experiment with different crochet techniques for the border or other sections of the throw to make it truly unique.
Join our VIP broadcast list and gain access to exclusive patterns, all for free. As a VIP member, you’ll receive the best patterns daily, delivered directly to your device. ✨📱 It’s a unique opportunity to stay up-to-date with the latest trends and designs, curated just for you. Don’t miss out on enhancing your projects and discovering new inspirations with the best patterns every day! 🎨🔝
Conclusion
In this Crochet Desert Star Throw – FREE PATTERN, you’ve learned how to create a stunning and customizable throw that is perfect for any room. From crocheting the star motifs to joining them together and adding your own personal touches, this project is an enjoyable and rewarding experience.
Whether you stick to earthy desert tones or experiment with vibrant colors, your finished throw will be a beautiful reflection of your creativity.
We hope this tutorial has been helpful! Please feel free to leave your thoughts and suggestions in the comments below – your feedback is always appreciated!


